5. Materiaali: Käyttöliittymä ikkunassa
Tämä on valinnainen materiaali, joka on tarpeellinen lopputyön tekijöille. Tämän materiaalin sisältö ei kuulu kurssin tenttialueeseen, ja tentti olisikin hyvä olla suoritettuna ennen tähän materiaaliin sukeltamista.
Terminaalissa pyörivät tekstiohjelmat ovat hiukan liian 80-lukua. Nykyaikana voisi ehkä edes yrittää tehdä jotain mikä avautuu omaan ikkunaansa ja jota voi tökkiä hiirellä tai kosketusnäytöllä. Viimeistellään siis urakka siirtämällä kokoelmaohjelma terminaalista ikkunaan. Tässä opittavat asiat eivät varsinaisesti kuulu alkeisiin, mutta nykyaikana suuri osa ohjelmoinnista perustuu tässä läpikäytäviin käsitteisiin. Lisäksi nykyaikana työkalut grafiikan tekoon koodilla ovat sen verran päheitä, että pienellä pintaraapaisullakin saa paljon aikaan.
Ilman suunnitelmaa ei kannata tähänkään projektiin ryhtyä. Ei ole ehkä syytä lähteä tavoittelemaan kuuta taivaalta, joten tyydytään hienojen käyttökokemusten sijaan lähinnä siihen, että saadaan ohjelman nykyiset tekstimuotoiset valikkorakenteet muutettua graafisiksi siten, että päätoiminnot löytyvät painikkeina ohjelman pääkäyttöliittymästä ja alivalikot aukeavat tarpeen mukaan erillisiin ali-ikkunoihin. Kokoelman sisältö näkyy jonkinlaisessa taulukossa tai tekstilaatikossa pääikkunassa. Tarvitaan siis
kirjasto
, joka kykenee tarjoamaan nämä perustoiminnot.Kannattaa myös esimerkkiä lukiessa pitää mielessä, että se on monimutkaisempi kuin lopputyön minimivaatimukset - siellä siis pääsee vähemmällä.
Osaamistavoitteet: Oppia hyvin minimaaliset perusteet siitä miten modernit käyttöliittymäkirjastot toimivat. Tähän kuuluu aivan erityisesti
käsittelijäfunktioiden
sielunelämän ymmärtäminen ja siihen miten niiden välillä tulisi jakaa informaatiota. Lisäksi opitaan miten yksi kurssin lopputöitä varten tehty graafinen käyttöliittymäkirjasto toimii. Toinen opitaan viimeisestä harjoitusesimerkistä.Kirjastoesittely
Normaalisti tässä vaiheessa tehtäisiin hieman tutkimusta siitä mikä kirjasto sopii parhaiten tarkoitukseen. Tämä jätetään kuitenkin tällä kertaa tekemättä, koska alkeiskurssin tiedoilla ei oikeasti voi vielä kovin hyvin tällaista arvioida. Pythonin mukana tulee TKinter-kirjasto, joka on vanha kuin taivas, ja jonka tuottama jälki on rumaa kuin suolaisen Dota-pelaajan käytös kolmelta aamuyöllä, mutta se sattuu tekemään kaikki graafisen käyttöliittymän perusteet aika yksinkertaisella tavalla. Ei tosin niin yksinkertaisella, että niitäkään olisi syytä alkaa tässä tarkemmin purkaa. Sen sijaan käytämme tätä kurssia varten tehtyä palikkaa, joka yksinkertaistaa TKinterin toiminnoista osan muutamaan helposti käsitettävään
funktioon
. Koodi on myös dokumentoitu dokumenttimerkkijonoilla
kohtalaisen yksityiskohtaisesti.Tämä on muuten sama kuin Spektriä pukkaa -lopputyössä käytettävä kirjasto, mutta tästä on poistettu matplotlib-tuki, jotta jonkun toisen aiheen valinnaiden ei tarvitse asentaa sitä pelkästään esimerkkejä testatakseen. Kirjastoa ei käydä sen tarkemmin läpi kuin siltä osin mitä esimerkissä tarvitaan. Muuten se jätetään kotitehtäväksi lopputyötä tehdessä.
Ihmemaan takaisinkutsut
Takaisinkutsua
käytettiin hyvin lyhyellä esittelyllä listojen
järjestämisessä. Listan sort-metodille
pystyttiin antamaan argumenttina funktio
, jota käytettiin järjestämisen aikana vertailuarvojen
saamiseen - näiden avulla siis pystyttiin valitsemaan minkä tiedon perusteella listan alkiot
järjestetään. Esim:kokoelma.sort(key=valitse_kesto, reverse=kaanna)
Erikoista tässä asetelmassa on siis se, että emme kutsu missään vaiheessa omassa koodissa valitse_kesto-funktiota - sitä kutsutaan silloin, kun ohjelman ohjaus on luovutettu tilapäisesti sort-metodille.
Argumentin
antaminen siis kertoo sort-metodille mitä funktiota sen tulee kutsua, kun sen tarvii saada vertailuarvo listan alkiolle. Koska argumenttien antamisesta vastaa sort-metodi, emme voi vaikuttaa siihen mitä funktiolle annetaan emmekä myöskään siihen mitä sen paluuarvolla tehdään. Takaisinkutsufunktioita tehtäessä onkin tärkeää selvittää hyvin tarkasti mitä argumentteja funktio saa ja mitä sen paluuarvolla tehdään, jotta voidaan asettaa oikea määrä parametrejä
sekä palauttaa
oikeanlainen arvo. Esimerkissä käytettyä funktiota katsomalla selviää, että sillä tulee olla yksi parametri (listan yksi alkio) ja se palauttaa yhden arvon:def valitse_kesto(levy):
return levy["kesto"]
Tämän asian kertaaminen on tärkeää, koska sama ilmiö toistuu käyttöliittymä- ja pelikirjastojen kanssa, mutta paljon laajempana. Niille on nimittäin tyypillistä se, että koko ohjelmaa ohjaava pääsilmukka sijaitsee jossain kirjaston syövereissä. Nykyisessä kokoelmaohjelmassa valikko-funktiossa oleva
while True:-silmukka on siis pääohjelmasilmukka, ja tällaista ei tulla lainkaan näkemään koodissa kun se muutetaan käyttämään graafista kirjastoa. Ohjelman kulkua tullaan siis ohjaamaan ikään kuin ulkopuolelta. Syytäkään ei tarvi kauaa ihmetellä: pääsilmukan pitäisi pystyä reagoimaan siihen kun käyttäjä on vuorovaikutuksessa käyttöliittymän kanssa, joten siihen kuuluu aika paljon koodia. Tätä koodimäärää ei ole kauhean mielekästä alkaa itse kirjoittaa, joten se on parempi ulkoistaa kirjastolle.Jos ohjelman kulun hallinta on poistettu ohjelmoijan omista kätösistä jonnekin mystisen kirjaston syövereihin, miten tässä päästään toteuttamaan yhtään mitään? Vastaus löytyy nimenomaan takaisinkutsufunktioista joita myös
käsittelijäfunktioiksi
kutsutaan. Ennen pääsilmukan käynnistämistä koodari voi kertoa kirjastolle millaiset tapahtumat
ohjelmaa kiinnostavat. Tapahtuma tarkoittaa esim. sitä, kun pääsilmukka havaitsee käyttäjän tekevän jotain. Näihin tapahtumiin voidaan kiinnittää käsittelijäfunktio. Jos määritetty tapahtuma kohdataan, kutsutaan siihen kiinnitettyä käsittelijää.Käyttöliittymäkirjastojen tapauksessa on yleistä, että kuhunkin aktiiviseen käyttöliittymäelementtiin kiinnitetään oma käsittelijä. Tämä tehdään siinä yhteydessä kun käyttöliittymän komponentit ylipäätään määritellään. Eli jos vaikka halutaan luoda nappi, siihen voidaan luomisen yhteydessä määrittää funktio, jota käyttöliittymäkirjasto kutsuu kun käyttäjä painaa nappia. Meidän yksinkertainen kirjastomme toteuttaa tämän siten, että siellä on tasan yksi napinluontifunktio, jolle annetaan kolme argumenttia:
- kehyselementti johon nappi sijoitetaan (ks. seuraava osio)
- napissa lukeva teksti (merkkijono)
- funktio joka toimii napin käsittelijänä
Korkealla tasolla ajateltuna se mitä tapahtuu kun graafista käyttöliittymää tarjoava ohjelma käynnistetään on siis seuraavanlainen prosessi:
- ohjelma määrittelee käyttöliittymän elementit käsittelijäfunktioineen
- ohjelma kutsuu funktiota, joka käynnistää käyttöliittymäkirjaston pääsilmukan
- käyttöliittymäkirjasto seuraa käyttäjän toimia
- käyttäjä tekee jotain, mikä kiinnostaa ohjelmaa (= tapahtuma, johon on kytkettykäsittelijä)
- käyttöliittymäkirjasto kutsuu käsittelijäfunktiota, jolloin ohjaus palaa varsinaiselle ohjelmalle
- käsittelijäfunktion suorituksen päätyttyä ohjaus siirtyy takaisin käyttöliittymäkirjastolle
- ohjelmassa oleva käsittelijäfunktio kutsuu funktioita, joka sammuttaa käyttöliittymäkirjaston pääsilmukan ja ohjaus palautaa ohjelmalle
- ohjelma voi suorittaa lopetukseen liittyvät toimenpiteet (esim. datan tallennus)
- ohjelma päättyy
Käyttöliittymäsimulaattori
Jotta toimintaperiatteeseen saadaan hieman kosketusta, tutkitaan hetki oheista approksimaatiota siitä millainen käyttöliittymäkirjasto voisi olla. Esitetty koodi on moninkertaisesti yksinkertaisempi kuin oikea käyttöliittymäkirjasto, mutta käyttäytyy kuitenkin samanlaisella logiikalla. Kirjaston funktioilla voidaan siis määrittää nappeja, ja se voidaan käynnistää jolloin se keräilee "klikkauksia" (jotka tuotetaan tässä tapauksessa satunnaisina pistepareina hiiren lukemisen sijaan), ja suorittaa nappien toimintoja mikäli klikkaus osuu johonkin niistä.
Tärkeintä tässä approksimaatiossa on se, että sen voisi korvata em. ikkunasto-kirjastolla - määritettyjen funktioiden rajapinnat ovat nimittäin samat kirjastoa käyttävän moduulin näkökulmasta. Käyttöliittymäkirjastojen toiminnan ymmärtämiseksi on tarpeen tarkastella kahta tässä esiintyvää funktiota, sekä sitä miten niitä käytettäisiin varsinaisessa ohjelmassa. Tätä varten on luotu siis oheinen testiohjelma, joka luo muutaman napin sisältävän käyttöliittymän.
Koodin suoritus ei luo näkyvää ikkunaa, koska kirjasto ainoastaan simuloi oikean kirjaston toimintaa. Sen sijaan
terminaaliin
tulostuu pisteitä ja välillä "aasi" tai "hemuli" - yksi piste kuvaa yhtä klikkausta, ja sanan ilmestyminen tarkoittaa, että klikkaus osui johonkin määritellyistä napeista. Samaten ohjelma päättyy, kun klikkaus osuu lopetusnappiin. Suoritus voi siis näyttää esim tältä:..................................aasi ............hemuli ..aasi ......................................................aasi ..................aasi ..terve, ja kiitos kaloista
Koska simulaattorin koodi on paljon yksinkertaisempaa, syy-seuraus-suhteet ovat myös helpompia seurata. Tarkastellaan erityisesti kahden kirjastossa olevan funktion toimintaa. Tavoitteena on siis ymmärtää miksi lopullinen ohjelma (eli kirjastotesti.py) toimii kuten se toimii. Ensimmäinen puoli on käyttöliittymän asettelu. Varsinaisen ohjelman näkökulmasta käyttöliittymä muodostuu kehyksistä (sarakkeita) ja napeista (rivejä sarakkeiden sisällä). Ohjelma voi siis luoda kehyksiä, ja tuupata uusia nappeja niihin. Kirjaston puolella nappien luomisesta vastaa
luo_nappi-funktio.def luo_nappi(kehys, teksti, toiminto):
vasen = ikkuna.index(kehys) * NAPPI_LEVEYS
oikea = vasen + NAPPI_LEVEYS
yla = len(kehys) * NAPPI_KORKEUS
ala = yla + NAPPI_KORKEUS
kehys.append({
"vasen": vasen,
"oikea": oikea,
"yla": yla,
"ala": ala,
"teksti": teksti,
"toiminto": toiminto
})
Tämä funktio laskee napin varsinaisen sijainnin ikkunan sisällä ja tallentaa napin reunoja vastaavat x- ja y-arvot
sanakirjaan
. Tässä siis rajataan käyttöliittymän alue, joka kuuluu tälle napille. Yhden napin leveys on 200 yksikköä ja korkeus 60 yksikköä, sijainti perustuu siihen mikä on kehyksen indeksi
ikkunan sisällä, sekä siihen montako nappia kehyksessä jo on. Toinen erittäin tärkeä asia joka talletetaan sanakirjaan on toiminto-parametrin
arvo, joka on siis funktio
. Tämä funktio siis suorittaa varsinaisen nappiin sidotun toiminnon - mutta vasta sitten kun nappia painetaan! Funktiota ei siis kutsuta vielä.Varsinaisen ohjelman puolella nappi luodaan siis
luo_nappi-funktiota kutsumalla, kun ensin ollaan määritelty toiminnoksi annettava funktio:def tulosta_aasi():
print("aasi")
ikkuna = kirjasto.luo_ikkuna("testi")
kehys = kirjasto.luo_kehys(ikkuna)
kirjasto.luo_nappi(kehys, "nappi 1", tulosta_aasi)
Tärkeää tässä on kiinnittää huomiota siihen, että funktiota käsitellään kuin
muuttujaa
: sitä ei siis kutsuta, se vain annetaan argumenttina
. Esimerkkiohjelmassa luodaan kolme nappia, jonka jälkeen meillä on alla olevaa kuvaa vastaa "käyttöliittymä".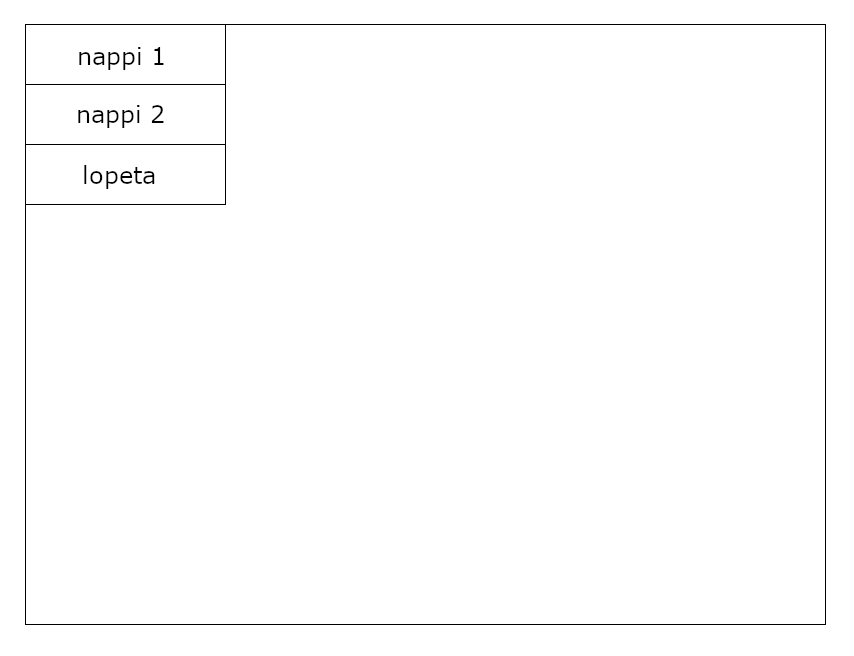
Napit ovat siis ikkunaan merkittyjä alueita, ja hiiren klikkaaminen kursorin ollessa napin alueen sisällä aiheuttaa napin painamisen. Tämä on se vaihe, missä ohjelman kontrolli luovutetaan kirjastolle - tarkalleen ottaen siellä olevalle
kaynnista-funktiolle. Funktiosta on poistettu hiukan ylimääräistä tavaraa, jotta logiikka näkyy selkeämmin:def tunnista_nappi(x, y, ikkuna):
for kehys in ikkuna:
for nappi in kehys:
if nappi["vasen"] <= x <= nappi["oikea"]:
if nappi["yla"] <= y <= nappi["ala"]:
funktio = nappi["toiminto"]
funktio()
return
def kaynnista():
tila["kaynnissa"] = True
while tila["kaynnissa"]:
print(".", end="", flush=True)
hiiri_x, hiiri_y = lue_klikkaus()
tunnista_nappi(ikkuna, hiiri_x, hiiri_y)
# lisätty jotta ohjelma ei pyöri liian nopeasti
time.sleep(0.1)
Oikean käyttöliittymäkirjaston vastaava funktio on tietenkin paljon monimutkaisempi, mutta pohjimmillaan siinä tehdään samat asiat:
- luetaan hiiren klikkauksen sijainti
- etsitään osuuko klikkaus jonkin käyttöliittymäelementin sisälle
- jos osuu, suoritetaan toiminto ja
- lopetetaan etsintä
Tätä siis toistetaan ikuisessa silmukassa kunnes ohjelman suoritus päättyy. Meidän simulaattorissamme vaihe 1 hoituu kutsumalla
lue_klikkaus-funktiota, josta saadaan (kuvitellun) klikkauksen x- ja y-koordinaatit. Vaihe 2 tapahtuu käymällä läpi kaikki kehykset sekä niissä olevat nappeja kuvaavat sanakirjat, ja vertaamalla niissä määriteltyjä rajoja klikattuun pisteeseen. Mikäli piste osuu rajojen sisällä, napin toiminto suoritetaan ottamalla sanakirjan "toiminto" avaimesta
viittaus
kutsuttavaan funktioon, ja kutsutaan sitä (ilman argumentteja).Tärkeintä tässä on siis nähdä konkreettisesti millaisessa kontekstissa napin toiminnoksi annettua funktiota tullaan lopulta kutsumaan. Kuten tästä nähdään, funktiolle annettavat argumentit määritellään kutsun yhteydessä (ja tässä tapauksessa niitä ei ole). Syntaksista myös ilmenee, että mikäli muuttuja sisältää funktion ja sen perään laitetaan kutsusulut, muuttuu kyseinen rivi muuttujaan talletetun funktion
kutsumiseksi
. Tässä vaiheessa siis kontrolli palaa varsinaisen ohjelman puolelle, ja tarkalleen siellä olevan käsittelijäfunktion
sisälle, joka ensimmäisen napin tapauksessa olisi siis:def tulosta_aasi():
print("aasi")
Näinpä siis terminaaliin tulostuu aasi. Ajossa terminaaliin tulostuneet pisteet kuvaavat klikkauksia, riippumatta siitä osuiko hiiri johonkin nappiin tai ei. Kun ohjelma "sammutetaan" kutsumalla kirjaston
lopeta-funktiota, kontrolli palaa varsinaiseen ohjelmaan ja jatkuu kaynnista-funktiokutsua seuraavalta riviltä, eli tältä riviltä - tästä syystä siis ohjelman päättyessä tulostuu "terve, ja kiitos kaloista":print("terve, ja kiitos kaloista")
Kokonaisessa kirjastossa on lisätty vielä mahdollisuus näyttää visualisointi toiminnasta turtlen avulla. Voit laittaa tämän visualisoinnin päälle lisämäällä
komentoriviargumentin
-p tai --piirto ohjelman käynnistykseen:python kirjastotesti.py --piirto
Huomaa, että napeissa ei lue mitään. Ylin nappi tulostaa aasin, toinen hemulin, ja kolmas lopettaa ohjelman. Voit pitää terminaalin näkyvissä turtle-ikkunan rinnalla, jolloin näet mitä sinne tulostuu kunkin klikkauksen kohdalla.
Toinen näppärä yksityiskohta: mikäli vaihdat ensimmäisen rivin importin siten, että se ottaakin käyttöön ikkunaston, testikoodi toimii suoraan, ja tuottaa oikean käyttöliittymän. Eli ensimmäiseksi riviksi tulisi:
import ikkunasto as kirjasto
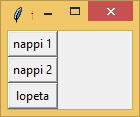
Jolloin ohjelman suoritus tuottaakin oikean ikkunan. Ikkunan geometria on erilainen, koska elementtien asettelusta vastaa kirjasto, ei kirjastoa käyttävä ohjelma. Tästä onkin kerrottu tarkemmin seuraavan otsikon alla.
Ohjeellinen käsittelijä
Käsittelijäfunktion asettaminen käyttöliittymäkomponenteille sekä erilaisille tapahtumille koodissa on tärkeä osa nykyajalle tyypillistä ohjelmointia. Kirjoitetaan tässä tehtävässä yksi käsittelijällä varustettu nappi kokeeksi.
Opittavat asiat:
käsittelijäfunktion
asettaminen käyttöliittymäkomponentille. Napin luominen ikkunasto-moduulin avulla.Alustus:
Tehtävänannon lopussa näet koodin, jossa on pienen käyttöliittymän ensiaskeleet. Koodista löytyy valmiiksi funktio, jota on tarkoitus käyttää käsittelijänä, sekä ikkuna ja kehys. Koodista puuttuu vielä rivi, joka lisää ohjeikkunan avaavan napin kehykseen.
Haettu vastaus:
Vastaukseen haetaan yhtä koodiriviä joka lisää kehykseen napin, jonka tekstinä on merkkijono
"Ohje" ja jonka käsittelijäfunktio on ainoa koodista löytyvä funktio. Luotua nappia ei ole tarpeen sijoittaa muuttujaan!Resurssit:
 Anna palautetta
Koitko tämän tehtävän hyödylliseksi oppimisen kannalta?
Kommentteja tehtävästä?
Laatikoita ja pakkaamista
Ennen syventymistä toimintojen toteuttamiseen käsittelijäfunktioilla on syytä tutkia miten käyttöliittymä määritellään ohjelmakoodilla. TKinter käyttää menetelmää, jossa käyttöliittymä voidaan jakaa kehyksiin ja varsinaisiin komponentteihin. Kehys on vähän kuin Pythonin
lista
, eli se voi sisältää muita komponentteja - myös muita kehyksiä. Asettelu perustuu pakkaamiseen jotain seinää vasten (tämä ei tosin ole ainoa vaihtoehto). Komponentille siis määritetään suunta, mihin se pyritään työntämään. Esimerkiksi jos komponentin pakkaussuunta on ylöspäin, se pyrkii olemaan niin ylhäällä kehyksessään kuin mahdollista. Komponentit pakataan lisäysjärjestyksessä, joten ensimmäisenä pakattu komponentti on lähimpänä sitä reunaa jota vasten se on pakattu, toisena pakattu tämän "päällä".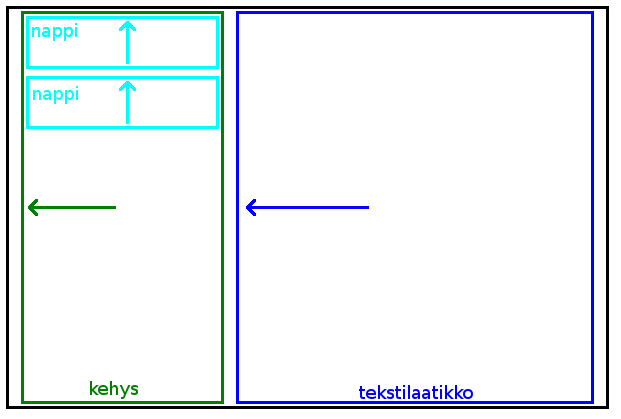
Yleisesti ottaen kaikki yhden kehyksen komponentit kannattaa pakata samaan suuntaan jotta käyttöliittymään ei jää hölmön näköisiä aukkoja. Yksinkertaisuuden nimissä käyttöliittymäkirjastomme pakkaa aina kehyksen sisällä olevat komponentit yläreunaa vasten - ainoastaan itse kehysten pakkausuuntaan voi vaikuttaa funktioiden argumenteilla. Kirjasto myös piilottaa joitain mahdollisia asetuksia joilla asetteluun voisi TKinterissä vaikuttaa, eli sitä minkä näköisiä käyttöliittymiä voidaan luoda on rajoitettu aika paljon. TKinter ei kyllä muutenkaan ole paras kirjasto, jos haluaa oikeasti hienon näköisiä käyttöliittymiä. Esim. PySide 2 kääntää huomattavasti monipuolisemman (ja monimutkaisemman) Qt-käyttöliittymäkirjaston Pythonille.
Alla on esitetty funktio, joka luo kokoelmaohjelman uuden hienon graafisen käyttöliittymän komponentit sekä kuva miltä tämä käyttöliittymä näyttää (Linuxilla). Koodiin on myös lisätty lopeta-funktio, joka toimii lopetusnapin
käsittelijänä
.import ikkunasto as ik
def lopeta():
ik.lopeta()
def luo_ikkuna():
ikkuna = ik.luo_ikkuna("Kokoelmaohjelma 0.1 alpha")
nappikehys = ik.luo_kehys(ikkuna, ik.VASEN)
kokoelmakehys = ik.luo_kehys(ikkuna, ik.VASEN)
latausnappi = ik.luo_nappi(nappikehys, "Lataa", lataa_kokoelma)
rakennusnappi = ik.luo_nappi(nappikehys, "Rakenna", rakenna_kokoelma)
tallennusnappi = ik.luo_nappi(nappikehys, "Tallenna", tallenna_kokoelma)
ik.luo_vaakaerotin(nappikehys, 5)
lisaysnappi = ik.luo_nappi(nappikehys, "Lisää", lisaa)
poistonappi = ik.luo_nappi(nappikehys, "Poista", poista)
muokkausnappi = ik.luo_nappi(nappikehys, "Muokkaa", muokkaa)
ik.luo_vaakaerotin(nappikehys, 5)
lopetusnappi = ik.luo_nappi(nappikehys, "Lopeta", lopeta)
kokoelmalaatikko = ik.luo_listalaatikko(kokoelmakehys)
ik.kaynnista()
if __name__ == "__main__":
#lahde, kohde = lue_argumentit(sys.argv)
try:
luo_ikkuna()
except KeyboardInterrupt:
print("Ohjelma keskeytettiin, kokoelmaa ei tallennettu")
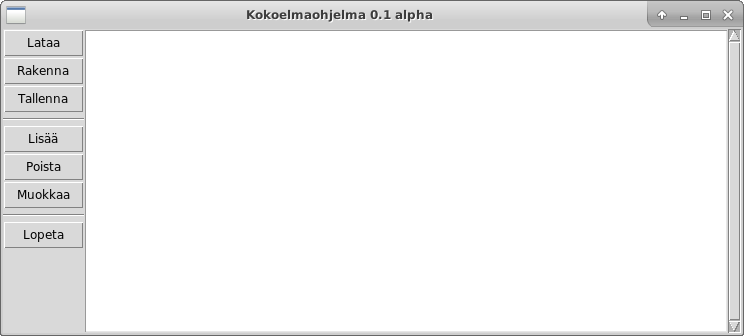
Napinluontifunktiot ja muut pääasiassa kertovat palauttavansa
objektin
. Tällä hetkellä ne otetaan kaikki talteen muuttujiin
, jotta niihin voidaan viitata myöhemmin. Emme ole tosin vielä miettineet tarvitseeko niihin viitata. Kehyksiin kyllä selkeästi viitataan jo tämän funktion sisällä, mutta nappeihin ei. Erottimet taas eivät ole aktiivisia komponentteja, joten kirjasto ei edes vaivaudu palauttamaan niitä. Toinen huomio on, että koodi voidaan tällä hetkellä ajaa, mutta napit eivät pääasiassa toimi (paitsi lopetusnappi). Pääohjelmaa on muutettu kutsumaan luo_ikkuna-funktiota aiemman valikko-funktion sijaan, ja komentoriviargumenttien lukeminen on toistaiseksi kommentoitu ulos.Uudenlaista tiedonvälitystä
Syytä sille miksi napit eivät toimi ei tarvi etsiä kovin kaukaa. Ikkunaston luo_nappi-funktion
dokumenttimerkkijono
kertoo seuraavaa help-funktiolla katsottuna:luo_nappi(kehys, teksti, kasittelija)
Luo napin, jota käyttäjä voi painaa. Napit toimivat käsittelijäfunktioiden
kautta. Koodissasi tulee siis olla määriteltynä funktio, jota kutsutaan
aina kun käyttäjä painaa nappia. Tämä funktio ei saa lainkaan argumentteja.
Funktio annetaan tälle funktiokutsulle kasittelija-argumenttina. Esim.
def aasi_nappi_kasittelija():
# jotain tapahtuu
luo_nappi(kehys, "aasi", aasi_nappi_kasittelija)
Napit pakataan aina kehyksensä ylälaitaa vasten, joten ne tulevat näkyviin
käyttöliittymään alekkain. Jos haluat asetella napit jotenkin muuten, voit
katsoa tämän funktion koodista mallia ja toteuttaa vastaavan
toiminnallisuuden omassa koodissasi. Jos laajenna-argumentiksi annetaan
True, nappi käyttää kaiken jäljellä olevan tyhjän tilan kehyksestään.
:param widget kehys: kehys, jonka sisälle nappi sijoitetaan
:param str teksti: napissa näkyvä teksti
:param function kasittelija: funktio, jota kutsutaan kun nappia painetaan
:return: palauttaa luodun nappiobjektin
Käsittelijäfunktio
ei saa siis lainkaan argumentteja
, kun taas olemassaolevat funktiot
odottavat niitä saavansa. Niitä ei voi siis suoraan käyttää käsittelijöinä. Vanhoja funktioita ei välttämättä kannata alkaa heti purkamaan. Esim lataa_kokoelma tekee edelleen työnsä aivan hyvin. Sille pitää vain saada annettua kokoelmatiedoston polku
jotain muuta kautta. Hieman tutkimalla selviää, että ikkunastossa on oma funktio tiedostojen valitsemiselle: avaa_tiedostoikkuna. Muutetaan siis latausnapin käsittelijäksi uusi funktio, joka kutsuu lataa_kokoelma-funktiota saatuaan polun avaa_tiedostoikkuna-funktiolta. Vastaava voidaan tehdä kokoelman rakentamiselle (kumpikin avaa erilaisen valintaikkunan). Poistetaan myös input-funktiokutsu rakenna_kokoelma-funktiosta ja muutetaan kansio parametriksi
.def rakenna_kokoelma(kansio):
try:
kokoelma = nuuskija.lue_kokoelma(kansio)
except FileNotFoundError:
print("Kansiota ei löytynyt")
return kokoelma
def avaa_latausikkuna():
polku = ik.avaa_tiedostoikkuna("Valitse kokoelmatiedosto (JSON)")
kokoelma = lataa_kokoelma(polku)
def avaa_rakennusikkuna():
polku = ik.avaa_hakemistoikkuna("Valitse kokoelman juurikansio")
kokoelma = rakenna_kokoelma(polku)
Tässä on nyt tosin pienoinen ongelma: käsittelijäfunktio ei myöskään voi palauttaa mitään, joten miten kokoelma, joka nyt on paikallisessa muuttujassa, saadaan näkymään muualla ohjelmassa? Tässä auttaa palauttaa mieleen, että sekä
lista
että sanakirja
ovat muuntuvia
. Jos pääohjelmatasolla
on määritelty muuntuva objekti
, sitä voidaan käsitellä ohjelman kaikissa funktioissa. Tässä tapauksessa tehdään kaukaa viisaasti sanakirja, jonka avaimiin
voidaan sijoittaa muitakin objekteja joita saatetaan joutua jakamaan.komponentit = {
"kokoelma": []
}
Huomion arvoista on, että Pylint tulee valittamaan tästä (tosin tarkistimissa tämä valitus on otettu pois päältä), koska se pitää tätä sanakirjaa
vakiona
, koska se on määritelty pääohjelmassa. Tätä objektia on kuitenkin tarkoitus muutella suorituksen aikana, joten nimen kirjoittaminen isolla antaisi siitä väärän kuvan. Muutetaan lataus- ja rakennusfunktiot sijoittamaan kokoelma tähän sanakirjaan:def rakenna_kokoelma(kansio):
try:
komponentit["kokoelma"] = nuuskija.lue_kokoelma(kansio)
except FileNotFoundError:
print("Kansiota ei löytynyt")
def lataa_kokoelma(tiedosto):
try:
with open(tiedosto, encoding="UTF-8") as lahde:
komponentit["kokoelma"] = json.load(lahde)
except (IOError, json.JSONDecodeError):
print("Tiedoston avaaminen ei onnistunut. Aloitetaan tyhjällä kokoelmalla")
komponentit["kokoelma"] = []
def avaa_latausikkuna():
polku = ik.avaa_tiedostoikkuna("Valitse kokoelmatiedosto (JSON)")
lataa_kokoelma(polku)
tulosta(komponentit["kokoelma"])
def avaa_rakennusikkuna():
polku = ik.avaa_hakemistoikkuna("Valitse kokoelman juurikansio")
rakenna_kokoelma(polku)
tulosta(komponentit["kokoelma"])
Funktioista ovat poistuneet return-lauseet, joten myös vastaavat sijoitukset tulee poistaa. Kokoelma saadaan nyt siis ladattua (tai rakennettua), joten se pitäisi enää saada näkymään käyttöliittymässä. Tätä varten on olemasa lisaa_rivi_laatikkoon-funktio, mutta sille pitäisi antaa argumenttina laatikko, johon rivi lisätään, ja rivin sisältö. Tällä hetkellä laatikko on olemassa vain luo_ikkuna-funktiossa, joten se pitänee lisätä tähän uuteen sanakirjaan. Uudelleenkirjoitetaan tulosta-funktio siten, että se tulostaa terminaalin sijaan listalaatikkoon käyttöliittymässä.
def muotoile_rivi(levy, i):
    return "{i:2}. {artisti} - {albumi} ({vuosi}) [{kpl_n}] [{kesto}]".format(
        i=i,
        artisti=levy["artisti"],
        albumi=levy["albumi"],
        kpl_n=levy["kpl_n"],
        kesto=levy["kesto"].lstrip("0:"),
        vuosi=levy["julkaisuvuosi"]
    )

def tulosta(kokoelma):
    for i, levy in enumerate(kokoelma):
        ik.lisaa_rivi_laatikkoon(komponentit["laatikko"], muotoile_rivi(levy, i + 1))
Ikkunan luonnissa listalaatikko pitää tietenkin tallentaa sanakirjaan, mikä tehdään näin
komponentit["laatikko"] = ik.luo_listalaatikko(kokoelmakehys). Yksittäisen rivin muotoilu on omassa funktiossaan, koska ennakoimme, että sitä saattaa tarvita myös rivin päivittämiseen kun levyn tietoja muutetaan. Nyt saadaan aikaan kiva tulostus.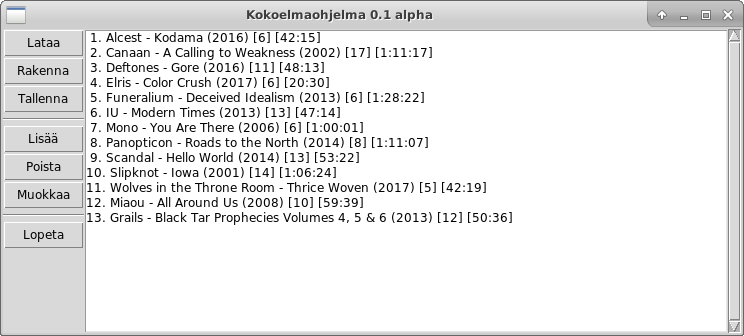
Ponnahtavia ikkunoita
Tässä osiossa on paljon koodia, mutta ei lopulta kovin montaa asiaa. Tavoitteena on saada levyjen lisäys toimimaan. Koska tämä tehtiin aiemmin
tekstisyötteillä
, muutoksia pitää tehdä aika laajasti. Ajatus on kuitenkin, että käyttöliittymän Lisää-napin painaminen avaisi erillisen ikkunan johon levyn tiedot voi syöttää. Levy tallennetaan kokoelmaan kun ikkuna suljetaan - jos tiedot ovat kelvollisia. Muuten avataan virheviesti-ikkuna ja annetaan käyttäjälle mahdollisuus korjata virhe.Kirjastosta löytyy muutama ali-ikkunoihin liittyvä
funktio
. Ali-ikkuna on siis tapa, jolla saadaan avattua toinen ikkuna pääikkunan päälle. Niihin voidaan sijoittaa kehyksiä ja komponentteja samalla tavalla kuin pääikkunaankin. Ali-ikkunan voi piilottaa ja tuoda esiin funktioilla. Hyvä tapa on siis luoda ikkuna heti ohjelman alussa, ja piilottaa se kun sitä ei tarvita. Tämä siis sen sijaan, että luotaisiin koko ikkuna joka kerta kokonaan uudestaan! Ikkuna sisältää tekstikenttiä ja niihin liittyviä otsikoita. Koko komeus luodaan luo_ikkuna-funktiossa:def luo_ikkuna():
# Pääikkunan luonti
ikkuna = ik.luo_ikkuna("Kokoelmaohjelma 0.1 alpha")
nappikehys = ik.luo_kehys(ikkuna, ik.VASEN)
kokoelmakehys = ik.luo_kehys(ikkuna, ik.VASEN)
latausnappi = ik.luo_nappi(nappikehys, "Lataa", avaa_latausikkuna)
rakennusnappi = ik.luo_nappi(nappikehys, "Rakenna", avaa_rakennusikkuna)
tallennusnappi = ik.luo_nappi(nappikehys, "Tallenna", avaa_tallennusikkuna)
ik.luo_vaakaerotin(nappikehys, 5)
lisaysnappi = ik.luo_nappi(nappikehys, "Lisää", avaa_lisayslomake)
poistonappi = ik.luo_nappi(nappikehys, "Poista", poista)
muokkausnappi = ik.luo_nappi(nappikehys, "Muokkaa", muokkaa)
ik.luo_vaakaerotin(nappikehys, 5)
lopetusnappi = ik.luo_nappi(nappikehys, "Lopeta", lopeta)
komponentit["laatikko"] = ik.luo_listalaatikko(kokoelmakehys)
# Ali-ikkunan luonti
levylomake = ik.luo_ali_ikkuna("Levyn tiedot")
kenttakehys = ik.luo_kehys(levylomake, ik.YLA)
nappikehys = ik.luo_kehys(levylomake, ik.YLA)
ohjekehys = ik.luo_kehys(kenttakehys, ik.VASEN)
syotekehys = ik.luo_kehys(kenttakehys, ik.VASEN)
ik.luo_tekstirivi(ohjekehys, "Artisti")
komponentit["lomake_artisti"] = ik.luo_tekstikentta(syotekehys)
ik.luo_tekstirivi(ohjekehys, "Albumi")
komponentit["lomake_albumi"] = ik.luo_tekstikentta(syotekehys)
ik.luo_tekstirivi(ohjekehys, "Kpl N")
komponentit["lomake_kpl_n"] = ik.luo_tekstikentta(syotekehys)
ik.luo_tekstirivi(ohjekehys, "Kesto (HH:MM:SS)")
komponentit["lomake_kesto"] = ik.luo_tekstikentta(syotekehys)
ik.luo_tekstirivi(ohjekehys, "Julkaisuvuosi")
komponentit["lomake_vuosi"] = ik.luo_tekstikentta(syotekehys)
ik.luo_nappi(nappikehys, "Tallenna", tallenna_lomake)
ik.piilota_ali_ikkuna(levylomake)
komponentit["levylomake"] = levylomake
ik.kaynnista()
Viittaukset lomakkeen kenttiin ja itse lomakkeeseen tarvitaan komponentit-
sanakirjaan
, jotta kenttien sisältö voidaan lukea muualla ohjelmassa, ja jotta ikkuna voidaan piilottaa sekä tuoda esiin. Samalla Lisää-napin käsittelijäfunktioksi
vaihdetaan uusi funktio, joka avaa lisäyslomakkeen. Vastaavasti tehdään myös tallennusnapille oma käsittelijä.def avaa_tallennusikkuna():
polku = ik.avaa_tallennusikkuna("Valitse tallennettava tiedosto")
tallenna_kokoelma(komponentit["kokoelma"], polku)
def avaa_lisayslomake():
ik.nayta_ali_ikkuna(komponentit["levylomake"], "Lisää levy")
def tallenna_lomake():
ik.piilota_ali_ikkuna(komponentit["levylomake"])
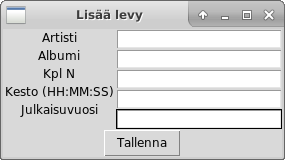
Näillä eväillä lomake saadaan auki ja kiinni, joten voidaan katsoa miltä se näyttää. Ohjemerkkijonot eivät ihan osu kenttien kohdalle, mutta olkoot, niitä ei aleta tässä säätämään paikoilleen.
Seuraavaksi lomake pitäisi saada tekemään jotain. Tämä vaatii hieman päätöksentekoa ja suunnittelua. Olemme päättäneet käyttää samaa lomaketta lisäämiseen ja muokkaamiseen. Olemme myös päättäneet, että tallennus tehdään ikkunan sulkemisen yhteydessä (missäs muuallakaan?) Tieto siitä onko lomake avattu lisäystä vai muokkausta varten pitäisi siis jotenkin kuljettaa tallenna_lomake-funktiolle. Mekanismi on sama kuin se, millä kokoelmalistaa kuskataan pitkin ohjelman käsittelijäfunktioita: tungetaan tieto siitä mitä ollaan tekemässä
sanakirjaan
. Eritellään samalla kokoelma-lista ja tämä uusi informaatio toiseen sanakirjaan, ja jätetään komponentit-sanakirjaan pelkästään viittaukset varsinaisiin käyttöliittymäelementteihin.EI_VALITTU = 0
LISAA = 1
MUOKKAA = 2
komponentit = {
"laatikko": None,
"levylomake": None,
"lomake_artisti": None,
"lomake_albumi": None,
"lomake_kpl_n": None,
"lomake_kesto": None,
"lomake_julkaisuvuosi": None,
}
tila = {
"kokoelma": [],
"toiminto": EI_VALITTU
}
Toteutetaan eri toimintojen erottaminen
vakioilla
. Näiden numeroarvoilla ei ole merkitystä, mutta nimetyt numerot ovat tällaisen informaation esittämiseen kätevämpiä kuin merkkijonot
saati sitten paljaat numerot. Olemme myös tallentaneet komponenttisanakirjaan None jokaisen avaimen
kohdalle. Tämä ei ole pakollista, mutta tällä halutaan esittää heti ohjelman alussa mihin komponentteihin sanakirjan kautta voi viitata. Hyödyntäen tila-sanakirjassa olevaa toiminto-informaatiota voidaan jatkaa lomakkeen käsittelyä:def avaa_lisayslomake():
ik.nayta_ali_ikkuna(komponentit["levylomake"], "Lisää levy")
tila["toiminto"] = LISAA
def tallenna_lomake():
if tila["toiminto"] == LISAA:
onnistui = lisaa(tila["kokoelma"])
paikka = len(tila["kokoelma"]) - 1
elif tila["toiminto"] == MUOKKAA:
onnistui = muokkaa(tila["kokoelma"])
else:
return
if onnistui:
ik.lisaa_rivi_laatikkoon(
komponentit["laatikko"],
muotoile_rivi(tila["kokoelma"][paikka], paikka + 1), paikka
)
ik.tyhjaa_kentan_sisalto(komponentit["lomake_artisti"])
ik.tyhjaa_kentan_sisalto(komponentit["lomake_albumi"])
ik.tyhjaa_kentan_sisalto(komponentit["lomake_kpl_n"])
ik.tyhjaa_kentan_sisalto(komponentit["lomake_kesto"])
ik.tyhjaa_kentan_sisalto(komponentit["lomake_vuosi"])
ik.piilota_ali_ikkuna(komponentit["levylomake"])
tila["toiminto"] = EI_VALITTU
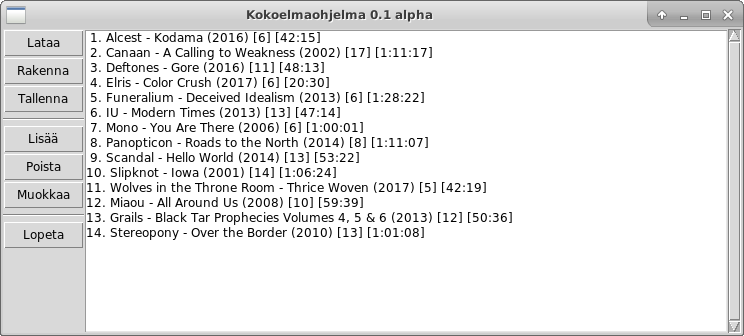
Toiminto siis asetetaan kun lomake avataan ja sen arvoa tarkastellaan kun lomake suljetaan Tallenna-napilla. Samalla tässä on tehty lomakkeen sulkemiseen liittyvää lisäkäsittelyä. Lomake halutaan sulkea vasta kun käyttäjä antoi oikeanlaista tietoa. Samalla halutaan myös pyyhkiä lomakkeen kentät tyhjiksi, jotta ne eivät ole siellä kummittelemassa seuraavalla avauskerralla. Onnistuneen tallennuksen tapahtuessa levy pitää lisätä myös käyttöliittymän listanäkymään. Toinen vaihtoehto olisi tietenkin tyhjentää koko lista ja kutsua tulosta-funktiota, joka tulostaisi koko kokoelman uudestaan, mutta tässä on aika paljon turhaa työtä. Varsinainen lisäysfunktio muuttuu itse asiassa vähän laajemmaksi rivien määrän puolesta.
def tarkista_kesto(kesto):
    return kesto

def lisaa(kokoelma):
    artisti = ik.lue_kentan_sisalto(komponentit["lomake_artisti"])
    albumi = ik.lue_kentan_sisalto(komponentit["lomake_albumi"])
    try:
        n = int(ik.lue_kentan_sisalto(komponentit["lomake_kpl_n"]))
    except ValueError:
        ik.avaa_viesti_ikkuna("Virhe tiedoissa", "Kappaleiden lukumäärän on oltava kokonaisluku", virhe=True)
        return False

    try:
        kesto = tarkista_kesto(ik.lue_kentan_sisalto(komponentit["lomake_kesto"]))
    except ValueError:
        ik.avaa_viesti_ikkuna("Virhe tiedoissa", "Keston on oltava muodossa HH:MM:SS", virhe=True)
        return False

    try:
        vuosi = int(ik.lue_kentan_sisalto(komponentit["lomake_vuosi"]))
    except ValueError:
        ik.avaa_viesti_ikkuna("Virhe tiedoissa", "Julkaisuvuoden on oltava kokonaisluku", virhe=True)
        return False

    kokoelma.append({
        "artisti": artisti,
        "albumi": albumi,
        "kpl_n": n,
        "kesto": kesto,
        "julkaisuvuosi": vuosi
    })
    return True
Syy on virheviesteissä: niissä halutaan nyt mainita erikseen missä kentässä virhe on, joten jokainen tarvii oman try-exceptin. Virheestä viestitään nyt kirjaston tarjoamalla viesti-ikkuna-toiminnolla, jolla voidaan tehdä erillisiä viesti-ikkunoita. Viimeinen argumentti, joka on selkeyden nimissä annettu
avainsana-argumenttina
kertoo kirjastolle, että ikkunassa tulisi käyttää virheestä kertovaa kuvaketta. Lomakkeen kentät saadaan luettua lue_kentan_sisalto-funktiolla, jota varten tarvitaan siis komponentit-sanakirjasta
viittaukset kenttiin - tämä siis palauttaa kentän sisällön merkkijonona. Huomattavaa on, että tarkista_kesto ei edelleenkään oikeasti tee mitään, mutta ainakin nyt se käsitellään mikäli joskus koittaa päivä jolloin se tekee jotain.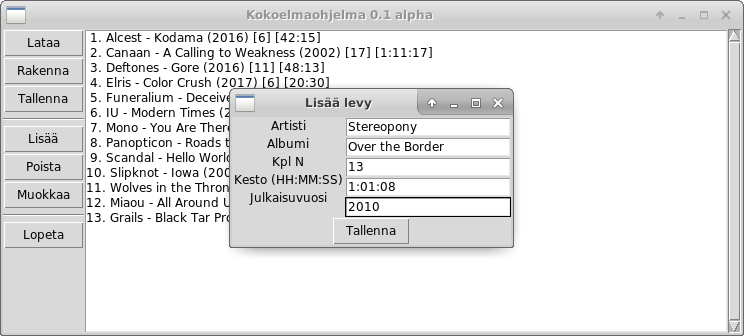
Helpotusta korjaustöihin
Levyjen poisto kokoelmasta oli aiemmin hyvin kankeaa: levyn valintaan vaadittiin, että käyttäjä kirjoitti sekä albumin että artistin nimen. Nykymaailmassa olisi kuitenkin mukavampaa, jos poistettavan levyn voisi valita suoraan klikkaamalla käyttöliittymässä olevasta luettelosta. Juuri tätä varten olemme käyttäneet pelkän tekstilaatikon sijaan listalaatikkoa, jossa jokainen rivi on klikattava kokonaisuus. Kirjastossa on tätä varten oma
funktio
lue_valittu_rivi. Funktio palauttaa valitun rivin (jos valittu) indeksin ja sisällön. Lisäksi kirjastossa on funktio rivin poistamiseen. Näin olleen poista-funktiosta tuleekin aiempaa huomattavasti yksinkertaisempi:def poista():
valittu, sisalto = ik.lue_valittu_rivi(komponentit["laatikko"])
if valittu != None:
tila["kokoelma"].pop(valittu)
ik.poista_rivi_laatikosta(komponentit["laatikko"], valittu)
Tässä käytetään nyt pop-
metodia
poistamaan alkio
listasta
, koska halutaan poistaa indeksin eikä sisällön perusteella. Todettakoon myös, että tämä metodi myös palauttaa poistamansa alkion - nyt sillä ei vain tehdä mitään. Viimeinen rivi puolestaan poistaa levyn käyttöliittymän listanäkymästä. Ainoaksi ongelmaksi jää se, että numerointiin tulee reikä. Asia korjataan tällä kertaa laiskasti, eli poistamalla numerointi kokoelman tulostuksesta. Jos numerointia ei poisteta, pitäisi kaikki poistokohdasta eteenpäin olevien levyjen tiedot tulostaa uudestaan. Tätä funktiota voidaan käyttää suoraan poistonapin käsittelijänä
.Levyn valintaa listalaatikosta voidaan käyttää myös muokkaamiseen. Tämä on yhdistelmä aiemmin tehtyä lisäystoimintoa, mistä lainataan muokkauslomake, sekä juuri tehtyä poistotoimintoa, josta lainataan levyn valinta. Tällä kertaa avataan sama ali-ikkuna kuin levyä lisätessä, mutta halutaan täyttää tekstikenttiin levyn olemassaolevat arvot. Lisäksi muokattu levy pitäisi saada näkymään vanhalla paikallaan eikä kokoelman lopussa. Kaiken kaikkiaan tässä tarvitaan jälleen kohtalaisesti päätöksentekoa siitä, mitä tapahtuu missä. Helpointa on lähteä liikkeelle siitä, miten lomake avataan:
def avaa_muokkauslomake():
    paikka = kirjoita_tiedot_lomakkeeseen()
    ik.nayta_ali_ikkuna(komponentit["levylomake"], "Muokkaa levyä")
    tila["toiminto"] = MUOKKAA
    tila["valittu"] = paikka
Lomake pitää täyttää tässä vaiheessa ennen kuin se näytetään. Tätä varten lie parasta tehdä erillinen funktio. Sovitaan myös, että valittu paikka listassa (eli levyn indeksi kokoelmassa) luetaan tuossa funktiossa ja palautetaan sieltä. Toinen tässä tehty päätös on tallettaa tila
sanakirjaan
valitun levyn indeksi. Tämä ihan vain siksi, että käyttäjä ei sotke kokoelmaa valitsemalla toisen levyn lomakkeen avaamisen jälkeen, jolloin uudet tiedot tallentuisivat väärän levyn päälle. Tuo mainittu uusi funktio näyttää tältä:def kirjoita_tiedot_lomakkeeseen():
valittu, sisalto = ik.lue_valittu_rivi(komponentit["laatikko"])
levy = tila["kokoelma"][valittu]
ik.kirjoita_tekstikenttaan(komponentit["lomake_artisti"], levy["artisti"])
ik.kirjoita_tekstikenttaan(komponentit["lomake_albumi"], levy["albumi"])
ik.kirjoita_tekstikenttaan(komponentit["lomake_kpl_n"], levy["kpl_n"])
ik.kirjoita_tekstikenttaan(komponentit["lomake_kesto"], levy["kesto"])
ik.kirjoita_tekstikenttaan(komponentit["lomake_vuosi"], levy["julkaisuvuosi"])
return valittu
Nyt lomake saadaan siis auki, ja sinne ilmestyvät valitun levyn tiedot muokkausta varten.
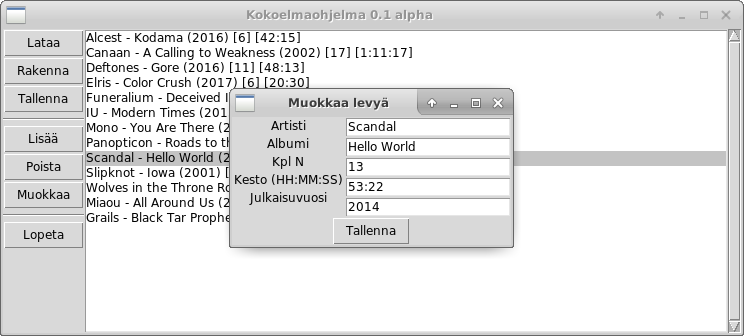
Lomakkeen tallennusnapin käsittelijä on jo olemassa lisäystoiminnon jäljiltä, mutta silloin tehty arvaus siitä miten muokkaus toimii ei ollut täysin riittävä. Tehdään siis hieman lisää töitä:
def tallenna_lomake():
    if tila["toiminto"] == LISAA:
        onnistui = lisaa(tila["kokoelma"])
        paikka = len(tila["kokoelma"]) - 1
    elif tila["toiminto"] == MUOKKAA:
        paikka = tila["valittu"]
        onnistui = muokkaa(tila["kokoelma"], paikka)
        if onnistui:
            ik.poista_rivi_laatikosta(komponentit["laatikko"], paikka)
            tila["valittu"] = None
    else:
        return

    if onnistui:
        ik.lisaa_rivi_laatikkoon(
            komponentit["laatikko"], muotoile_rivi(tila["kokoelma"][paikka]), paikka
        )
        ik.tyhjaa_kentan_sisalto(komponentit["lomake_artisti"])
        ik.tyhjaa_kentan_sisalto(komponentit["lomake_albumi"])
        ik.tyhjaa_kentan_sisalto(komponentit["lomake_kpl_n"])
        ik.tyhjaa_kentan_sisalto(komponentit["lomake_kesto"])
        ik.tyhjaa_kentan_sisalto(komponentit["lomake_vuosi"])
        ik.piilota_ali_ikkuna(komponentit["levylomake"])
        tila["toiminto"] = EI_VALITTU
Paikka päätettiin siis lukea siitä tilasanakirjan arvosta, joka asetettiin "valittu"-
avaimeen
kun lomake avatiin. Muokkauksen tekee varsinaisesti muokkaa-funktio. Jos se raportoi muokkauksen onnistuneen, poistetaan laatikosta vanha rivi, jotta sen paikalle voidaan tulostaa uudet tiedot. Varsinainen lisäys ei sen sijaan ole muuttunut, joten siltä osin funktion suunnittelussa onnistuttiin aiemmin. Jäljelle jää enää varsinaisen muokkaa-funktion toteutus:def lue_tiedot_lomakkeesta(levy):
levy["artisti"] = ik.lue_kentan_sisalto(komponentit["lomake_artisti"])
levy["albumi"] = ik.lue_kentan_sisalto(komponentit["lomake_albumi"])
try:
levy["kpl_n"] = int(ik.lue_kentan_sisalto(komponentit["lomake_kpl_n"]))
except ValueError:
ik.avaa_viesti_ikkuna("Virhe tiedoissa", "Kappaleiden lukumäärän on oltava kokonaisluku", virhe=True)
return None
try:
levy["kesto"] = tarkista_kesto(ik.lue_kentan_sisalto(komponentit["lomake_kesto"]))
except ValueError:
ik.avaa_viesti_ikkuna("Virhe tiedoissa", "Keston on oltava muodossa HH:MM:SS", virhe=True)
return None
try:
levy["julkaisuvuosi"] = int(ik.lue_kentan_sisalto(komponentit["lomake_vuosi"]))
except ValueError:
ik.avaa_viesti_ikkuna("Virhe tiedoissa", "Julkaisuvuoden on oltava kokonaisluku", virhe=True)
return None
return levy
def muokkaa(kokoelma, indeksi):
levy = lue_tiedot(kokoelma[indeksi].copy())
if levy:
kokoelma[indeksi] = levy
return True
return False
def lisaa(kokoelma):
levy = lue_tiedot_lomakkeesta({})
if levy:
kokoelma.append(levy)
return True
return False
Koska lisäys ja muokkaus molemmat tarvitsevat samanlaista lomakkeesta lukemista, siitä päätettiin tehdä oma funktio. Siksi alimpana näkyy myös miten lisaa-funktiota on muokattu käyttämään tätä uutta työkalua. Kaiken kaikkiaan kokoelmaohjelma näyttää lopulta tältä. Järjestämiseen liittyvät toiminnot jätettiin tällä kertaa toteuttamatta, koska tarkoitus oli pääasiassa näyttää miten funktioita sidotaan käyttöliittymäelementteihin. Vanha järjestysfunktio jää koodiin malliksi, josta sen voi halutessaan vaikka muokata toimimaan uuden käyttöliittymän kanssa... Yksi aika helppo tapa on tehdä jokaiselle sarakkeelle oma nappinsa, jota painamalla kokoelma järjestetään sen mukaan, ja uudestaan painamalla sama käänteisenä.
Lopullinen tiedosto, jota on vielä hieman siistitty Pylintin avulla (esim. poistettu turhat muuttujat ikkunan luonnista, koska nappeihin ei tarvi viitata niiden luomisen jälkeen).