VSCode Python asennusohje
VSCode on suosittu interaktiivinen kehitysympäristö (IDE, interactive development environment), joka tukee useita ohjelmointikieliä - myös Pythonia. Se tarjoaa enemmän ohjelmistokehityksen kannalta tarpeellisia työkaluja kuin mihin pelkkä tekstieditori pystyy. Nämä työkalut ovat erityisen tarpeellisia käännettyjen kielten kanssa työskennellessä, mutta ovat hyödyllisiä myös Pythonin kanssa.
Tässä ohjeessa käydään läpi seuraavat asiat:
- Python-asennus
- VSCode-asennus
- Ympäristön luominen projektia varten
- Yksinkertaisen ohjelman kirjoittaminen
- Debuggerin käyttö
- Ylimääräisten pakettien asentaminen ja käyttö
Python-asennus
Tarkemmat ohjeet löydät Asennusohjeita-sivulta, alla kuitenkin tiivistelmät.
Windows
- Mene Pythonin lataussivulle.
- Valitse
Get standalone installer for Python 3.x.y-vaihtoehto. (Huom. ei "install manager"). - Suorita asennusohjelma lataamisen jälkeen ja valitse "Add python.exe to PATH" option ennen asennuksen aloittamista.
- Kun näet tekstin "Setup was successful" voit sulkea ikkunan.
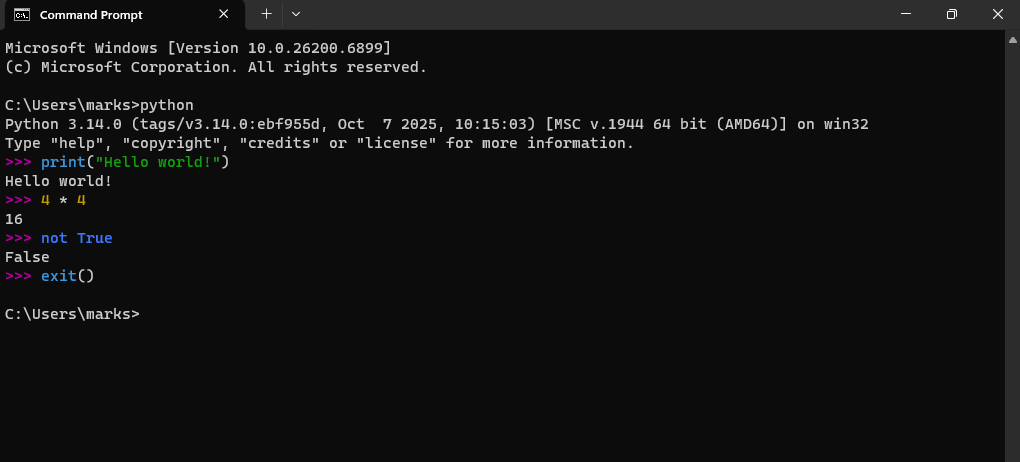
- Olet asentanut onnistuneesti "Python-tulkin". Voit varmistaa tämän komentokehoitteessa kirjoittamalla
python. Tämän pitäisi avata interaktiivinen tulkki ja näyttä>>>-merkit. Tähän tulkkiin voit kirjoittaa Python-komentoja. Poistu kirjoittamallaexit().
Linux
Linuxilla on hyvin mahdollista, että Python on jo asennettuna. Voit tarkistaa tämän avaamalla terminaalin ja kirjoittamalla sinne
python3. Jos tämä avaa interaktiivisen Python-tulkin ja näyttää >>>-merkit, Python on jo asennettuna ja toimii oikein. Voit kirjoittaa tulkkiin Python-komentaja tai sulkea sen kirjoittamalla exit.Jos Python ei ole asennettuna tai haluat uudemman version, voit asentaa sen pakettienhallinnalla. Komento riippuu siitä mitä Linux-jakelua käytät, yleisimmät alla:
- Red Hat, CentOS, Fedora:
sudo dnf install python3 python3-devel- Debian tai Ubuntu:
sudo apt-get install python3 python3-dev- Arch Linux:
sudo pacman -S python3
Asennuksen jälkeen voit tarkistaa toiminnan kirjoittamalla terminaaliin
python3. Poistu tulkista exit-komennolla. VSCode-asennus
- Lataa VSCode Visual Studio Coden verkkosivulta.
- Valitse käyttämäsi käyttöjärjestelmä
- Lataa tiedosto ja avaa se
- Asennuksessa ei tarvi muuttaa mitään asetuksia
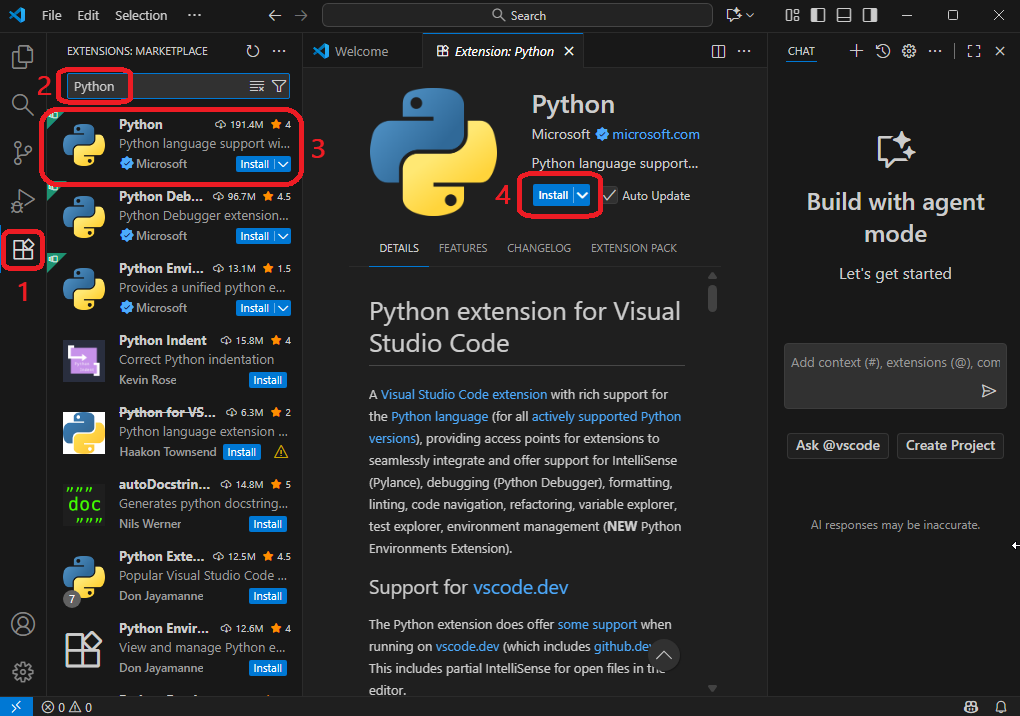
- Kun VSCode on asennettu, mene extensions-valikkoon, etsi sieltä Python-laajennus ja asenna se.
Projektiympäristön luominen
- Luo projektia varten tyhjä kansio tiedostonhallinnan avulla. Kansio voi sijaita missä tahansa.
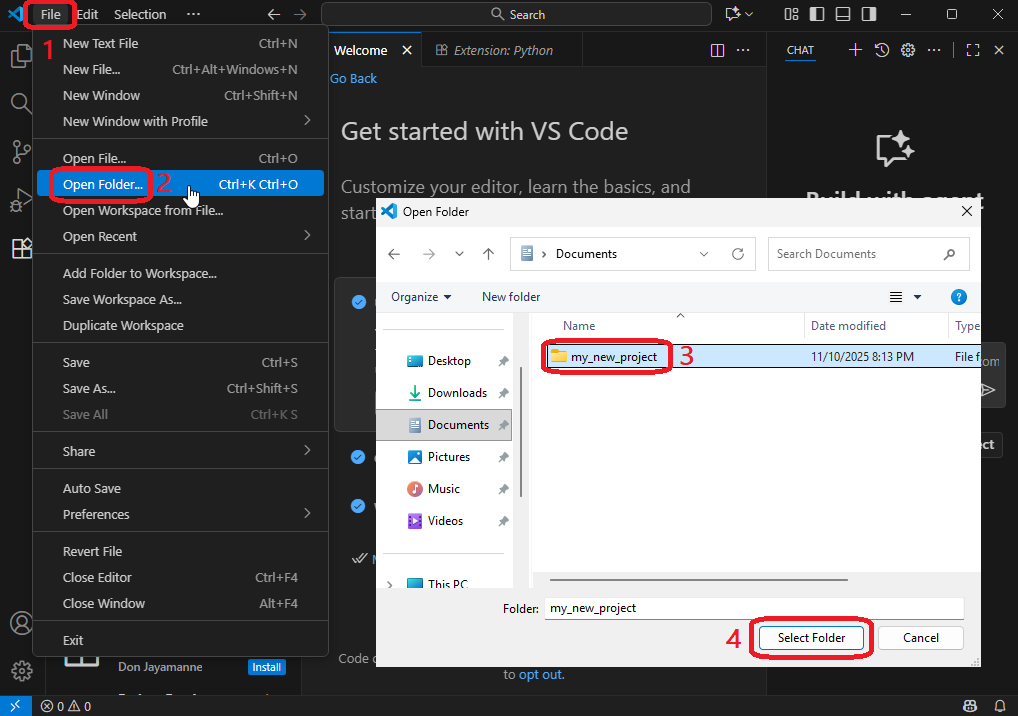
- Avaa kansio VSCodessa valitsemalla
File->Open Folder. Kansio on nyt ns. työtila. - Jos VSCode kysyy jotain tyyliin "Do you trust the authors of the files in this folder?", vastaa myöntävästi.
Seuraavaksi luomme virtuaaliympäristön. Virtuaaliympäristö auttaa pitämään projektit erillä toisistaan. Jokainen virtuaaliympäristö sisältää siihen asennetut paketit, ja näin ne eivät vaikuta sen ulkopuolella. Näin voit esimerkiksi asentaa eri versiota paketeista projektien tarpeiden mukaan ilman ongelmia.
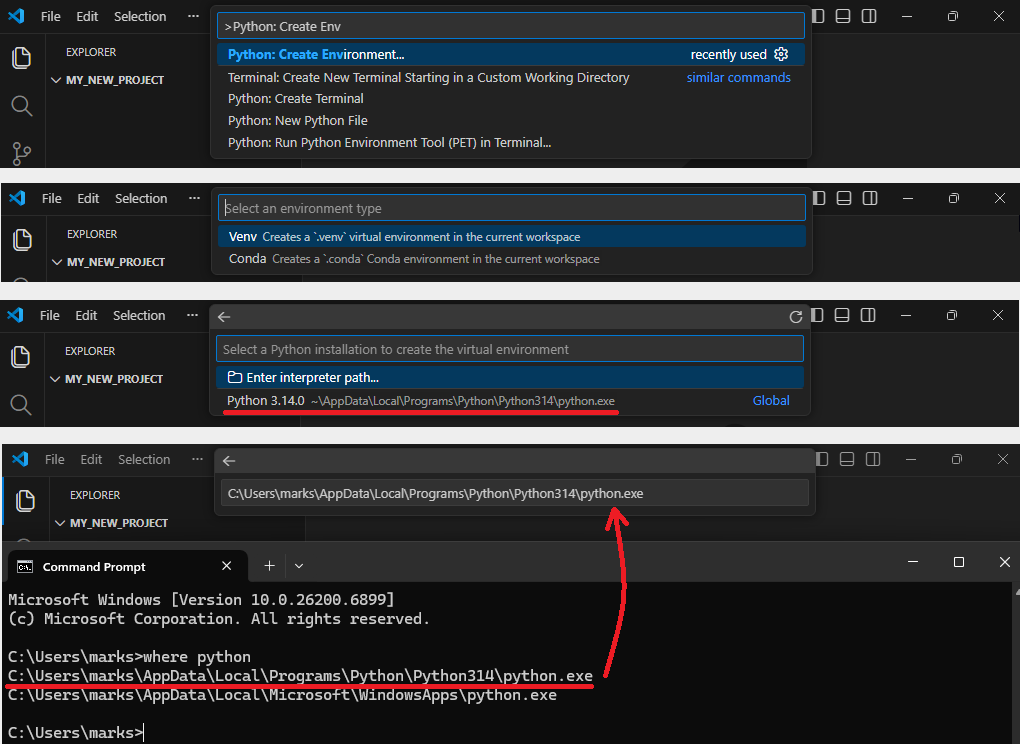
- Paina Ctrl + Shift + P. Tämä avaa komentopaletin. Kirjoita siihen
Python: Create Environmentja klikkaa löytynyttä valintaa. - Valitse ympäristön tyypiksi
Venv - Valitse aiemmin asennettu Python-tulkki listasta
- Jos et ole varma mikä niistä on oikea, tai lista on tyhjä, valitse
Enter interpreter path. Avaa tämän jälkeen komentokehote ja kirjoita siihenwhere python(Windows) taiwhich python3(Linux). Kopio komennon näyttämä polku ja liitä se VSCodeen. - Virtuaaliympäristö on nyt valmis. Työtilaksi valitussa kansiossa pitäisi näkyä
.venv-kansio.
Yksinkertainen esimerkkiohjelma
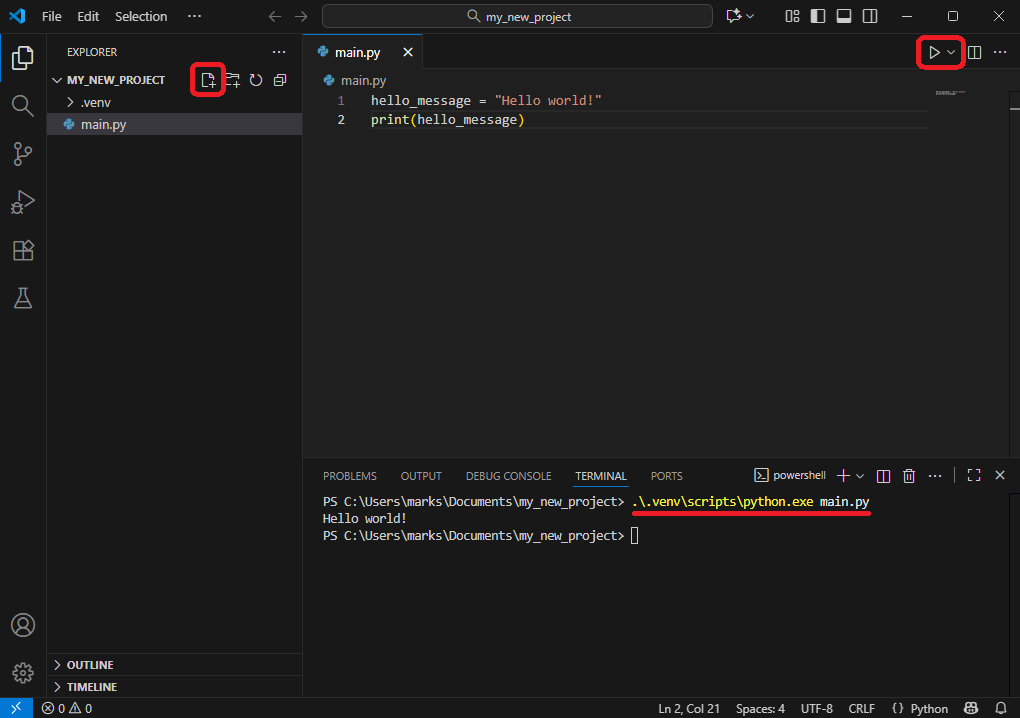
- Luo uusi tiedosto vasemman laidan tiedostoselaimessa olevalla napilla. Valitse
.py-pääte. - Kirjoita nämä rivit luotuun tiedostoon:
viesti = "Hei maailma!"print(viesti)- Tallenna tiedosto painamalla Ctrl + S
- Suorita tiedosto painamalla oikealla ylhäällä olevaa suoritusnappia. Tämän pitäisi avata terminaali ruudun alaosaan. Siellä pitäisi näkyä teksti
Hei maailma!. - Jos suoritusnappi ei toimi, voit kirjoittaa komennon myös itse. Avaa terminaali painamalla Ctrl + ' ja kirjoitta
.venv/Scripts/python main.py(Windows) tai.venv/bin/python main.py(Linux). Tässä komennon alkuosa suorittaa virtuaaliympäristössä olevan Python-tulkin, ja loppuosa määrittää sille suoritettavan kooditiedoston. - On mahdollista, että näet punaisen virheviestin ensimmäisellä suorituksella, mutta sen pitäisi mennä pois myöhemmillä yrityksillä.
Debuggerin käyttö
Debugger on osa asentamaasi Python-laajennusta. Debuggerin avulla voit hallita ohjelman suoritusta tarkemmin, mikä auttaa ongelmien ratkaisemisessa. Yksi tapa käyttää sitä ovat ns. breakpointit, joilla voi pysäyttää koodin suorituksen haluaamansa kohtaan ja tarkastella ohjelman tilaa sillä hetkellä.
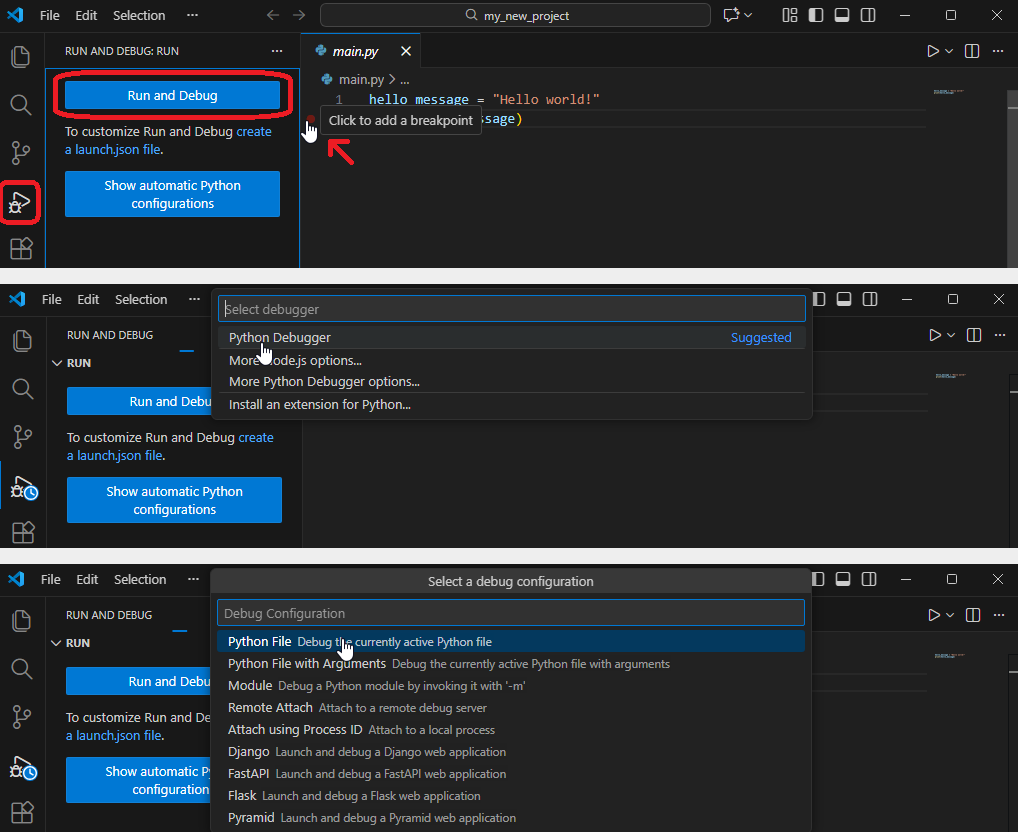
- Aseta breakpoint toiselle riville klikkaamalla rivin numeron vasemmalla olevaa tyhjää tilaa. Tähän pitäisi ilmestyä punainen ympyrä merkiksi.
- Avaa vasemmalla oleva "Run and Debug" -paneeli ja paina
Run and Debug. - Valitse listasta
Python DebuggerjaPython File.
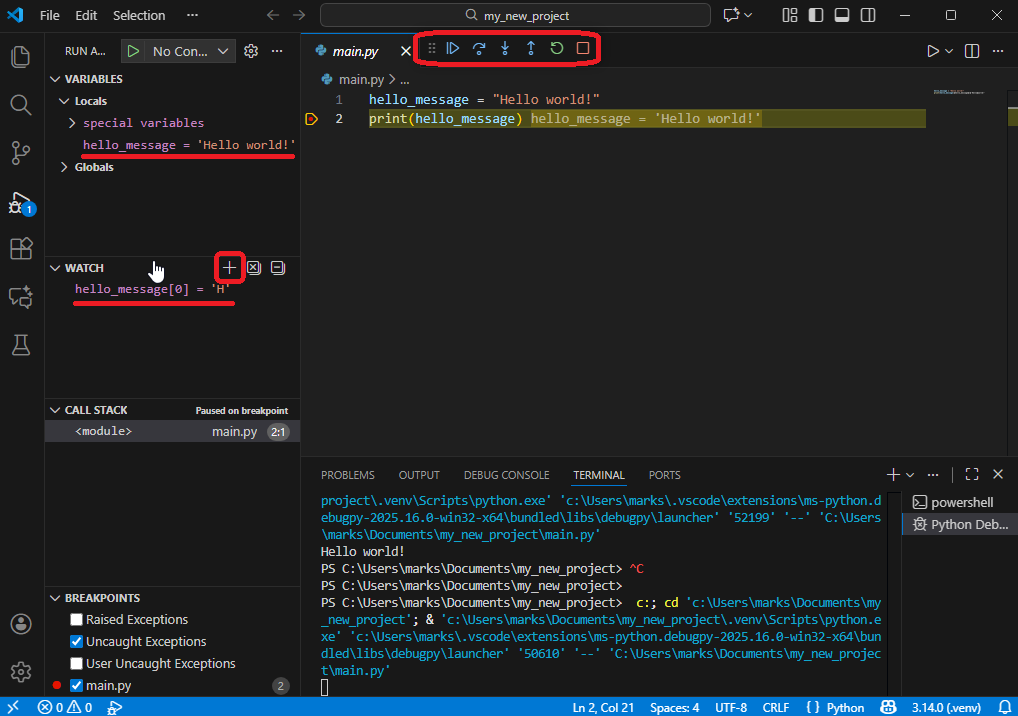
Tämän jälkeen debugger suorittaa koodiasi kunnes saavutetaan breakpointilla merkitty rivi. Tällöin voidaan:
- Tarkastella ohjelmassa olevia muuttujia ja niiden arvoja (vasemmalla ylhäällä).
- Lisätä lauseita tarkkailtavaksi. Esim.
viesti[0]alla olevassa kuvassa näyttää merkkijonon ensimmäisen merkin.
Ylhäällä olevat painikkeet ohjaavat suoritusta:
- Continue - jatkaa ohjelman suoritusta seuraavan merkittyyn riviin asti.
- Step over / Step into - jatkavat suoritusta seuraavalle riville. Funktiokutsun tapauksessa Step into siirtyy funktion sisälle, Step over ei.
- Step out - poistuu funktion sisältä.
- Restart - aloittaa suorituksen alusta.
- Stop - pysäyttää suorituksen.
Näin pienessä ohjelmassa debuggerin käytöstä ei ole juuri hyötyä. Se on kuitenkin hyödyllinen työkalu pitää mielessä myöhempää varten.
Paketin asentaminen ja käyttäminen
Ohjelmissa käytetään usein ulkoisia kirjastoja, jotka laajentavat käytössä olevaa työkalupalettia. Näihin tutustutaan kurssilla tarkemmin vasta loppupuolella, mutta tässä on esitelty lyhyesti miten niitä hallinnoidaan VSCodessa. Esimerkkinä olkoon värien lisääminen pieneen testiohjelmaan
colorama-moduulin avulla.Lisätään moduulin käyttö koodiin:
import colorama

viesti = "Hei maailma!"
print(colorama.Fore.GREEN + viesti)
print(colorama.Style.RESET_ALL)
Jos koodin yrittää suorittaa tämän jälkeen, saadaan virheilmoitus "No module named 'colorama'".
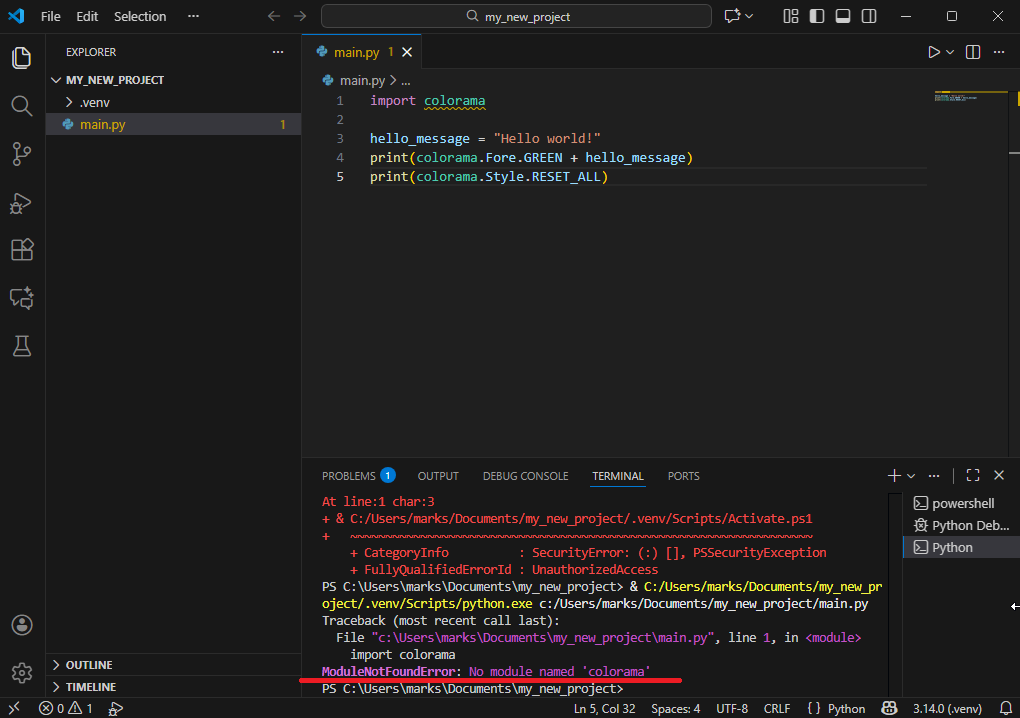
Tämä johtuu siitä, että colorama ei kuulu Pythonin mukana tuleviin peruskirjastoihin, eikä sitä ole vielä erikseen asennettu. Asentaminen tapahtuu pip-ohjelmalla, jota käytetään yleisesti Python-pakettien asentamiseen.
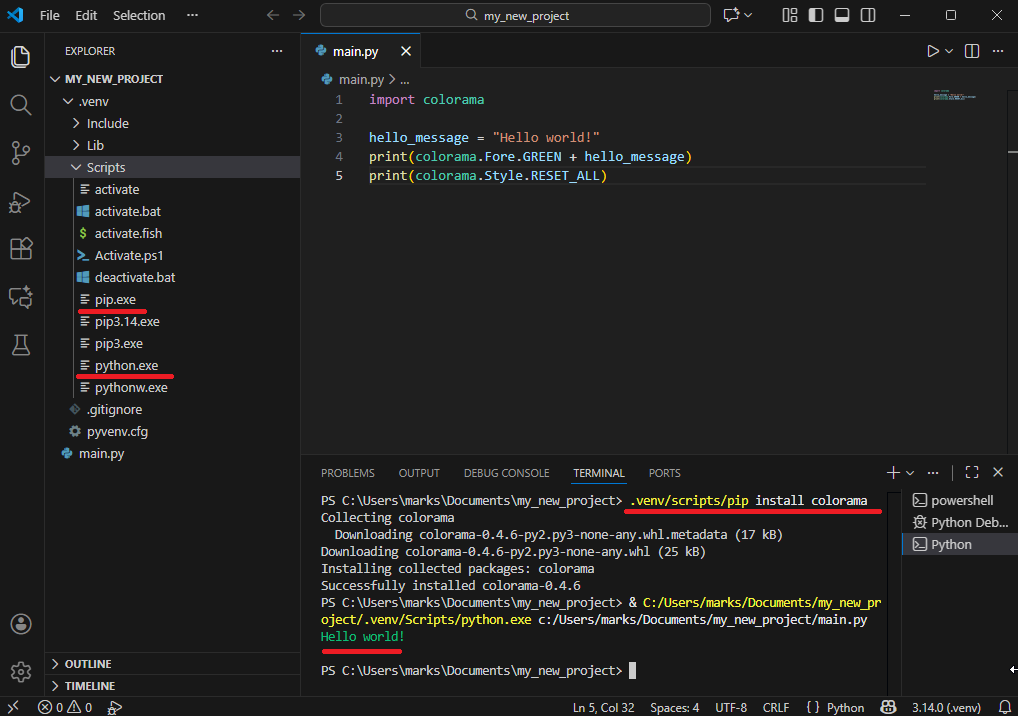
Paketti halutaan asentaa projektin omaan virtuaaliympäristöön, joten asennukseen tulee käyttää projektin sisällä olevaa pip-skriptiä. Tämä löytyy sijainnista
.venv/Scripts/pip (Windows) tai .venv/bin/pip (Linux). Asennus tapahtuu kirjoittamalla komento terminaaliin (avaaminen: Ctrl + '):.venv/Scripts/pip install colorama(Windows).venv/bin/pip install colorama(Linux)
Asennuksen jälkeen ohjelman pitäisi toimia ja teksti on nyt vihreä.