In database terminology primary key refers to the column in a table that's intended to be the primary way of identifying rows. Each table must have exactly one, and it needs to be unique. This is usually some kind of a unique identifier associated with objects presented by the table, or if such an identifier doesn't exist simply a running ID number (which is incremented automatically).
Testing Flask Applications
This page contains information about how to test your Flask applications. Testing is divided into two categories: manual testing and unit testing. Manual testing refers to using tools to send requests to your API server and examine the responses. This is particularly useful during development for
HTTP Methods
other than GET. It allows you to call your views
and see what they respond with. Unit testing on the other hand is an important aspect of software engineering, and will be required in the course project. The latter part of this page contains information about writing unit tests.Running in Debug Mode
When developing, running your application in debug mode is preferable. Being in development mode gives you more detailed output in the server log and enables automatic reloading (i.e. the server restarts whenever changes are detected in files). This is configured by setting the FLASK_ENV (environment) environment variable in the shell. In Linux:
export FLASK_ENV=development
In Windows command prompt:
set FLASK_ENV=development
You can also use environment variables to run your app from a Python file that is not named app.py:
export FLASK_APP=sensorhub.py
How to Send POST (and other) Requests
When you type an address into your browser, it always performs a GET
request
. Your browser does know how to make requests using other methods but doesn't offer a user interface to do so. For instance, when you submit normal HTML forms in web pages, they often perform the submission through a POST request. Unfortunately API servers don't serve HTML forms. But no worries, we can use a browser plugin or Python console to send requests!Before going through the options, let's setup the up-and-coming sensor hub app to serve the example requests. Download the app from below and start it. Furthermore we're going to assume the database is in the state where we left it, or at least in a state where a sensor called "uo-donkeysensor-1" exists.
Using the Restlet Client
The Restlet client is a browser plugin that provides a user interface for sending HTTP requests using all methods. As the name suggests it's specifically intended for REST APIs, making it very adequate for our purposes. Below is a screenshot of making a simple POST request:
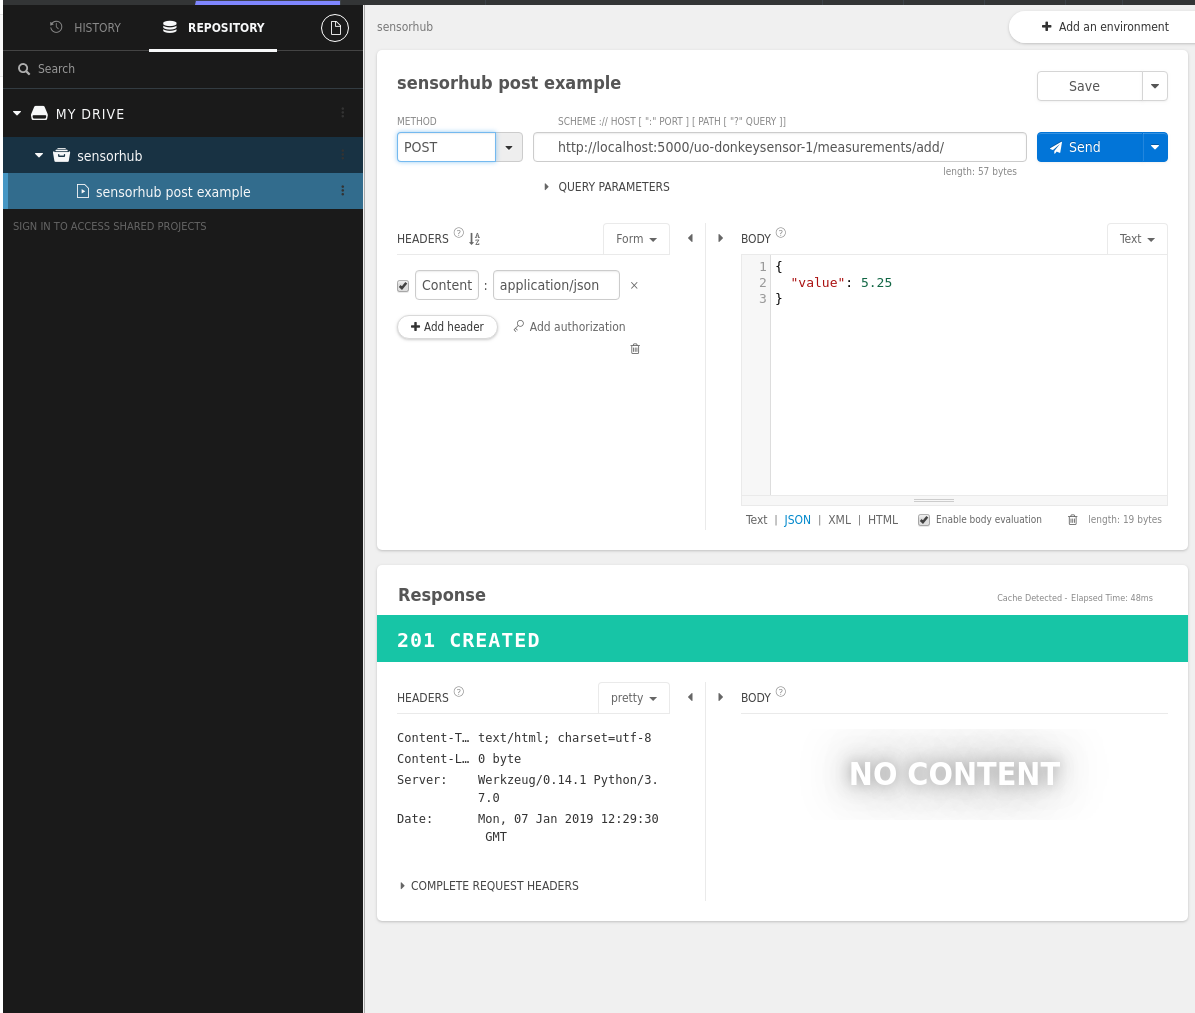
In addition to sending requests, you can also save them for later use, and organize them neatly into project folders. There's also a request history available at the bottom. This makes it the most recommended option for manual testing.
Using Python Console
Another reasonable way to manually test a Flask app is to use the Flask test client inside a Python console session. The same test client feature is used in unit tests, and it's also used by the automated checkers in exercises. Note that the server does not need to be running when using test client. You can obtain a test client by importing your app and calling its test_client method:
In [1]: from app import app
In [2]: client = app.test_client()
The test client object is capable of "sending" "requests" to the server (it actually just creates a
request object
). From your application's viewpoint these are indistinguishable from actual HTTP requests
. There's a method for each HTTP request, e.g. for POST there is client.post. These methods take a number of arguments and keyword arguments - we're only going to cover some of them. The first argument should be the URL, without the host part
. To get the list of sensors:In [3]: response = client.get("/sensors/")
In [4]: response.status_code
Out[4]: 200
In [5]: response.data
Out[5]: b'[["uo-donkeysensor-1", "donkeysensor2000"], ["uo-donkeysensor-2", "donkeysensor2000"]]'
Where we can see that the test client returns a
response
object. You can use the dir function to see that it has a whole bunch of attributes. In most cases the interesting ones are status_code and data. Next let's make the same POST request we did with Restlet:In [6]: response = client.post("/uo-donkeysensor-1/measurements/add/", json={"value": 5.25})
In [7]: response.status_code
Out[7]: 201
An important detail about the test client is that it uses different keyword arguments for different types of data. If your server is implemented to retrieve json data from
request.json, then you must use the json keyword when making a request with the test client. Also note that this argument is just a Python data structure. On this course all requests generally use the json keyword for any data that would be in the request body. To actually pass the request body as a string, you'd use the data keyword; to pass data that simulates a form submission, you'd use the form keyword (with a dictionary as the value). In case you need to pass
query parameters
as part of the test request, these go as a dictionary into the query_string keyword argument (NOT in the URL!). For example, calling the trigonometric calculator from console (when in the app folder):In [1]: from app import app
In [2]: client = app.test_client()
In [3]: response = client.get("/trig/sin", query_string={"angle": 45, "unit": "degree"})
In [4]: response.data
Out[4]: b'0.707'
Unit Testing
The purpose of unit testing is to ensure that individual components of the program behave as they are expected to. A very classic case of unit testing is to test a function with various arguments and comparing its return value(s) to what we expect it to return. As development continues in a project, having tests for each individual component makes it much easier to discover when a change breaks something that worked before. Testing is extremely important for APIs - a popular API is relied upon by numerous web applications that use it. Breaking the API with an untested update can have widespread consequences. Therefore it's integral to ensure that the API works fully before committing changes to a production server.
This section covers the basics of writing unit tests for database
models
and view functions
. Installation and Setup
We are using pytest in the examples as it is a much leaner framework for testing than Python's built-in unittest module. Its biggest downside is its incompatibility with other testing frameworks, but in this case we don't need those anyway. To install pytest (inside your virtual environment):
pip install pytest
We're also going to install the coverage plugin that can be used to generate reports about the coverage of our tests. It shows which statements in the application source code are covered by our tests. This report will also be used in project evaluation!
pip install pytest-cov
For now let's put our tests into the same directory as our app.py file - we'll do proper project layout later. All Python modules that either begin with
test_ or end with _test are automatically detected by pytest. Once you have some tests, you can just type pytest into the terminal when in the project directory to run all tests.Database Testing
What to Test
One of the benefits of using SQLAlchemy is that we have one less thing to worry about:
SQL
queries
. Since SQLAlchemy is a reliable library, we can safely assume that our database queries will work as intended. What we should test however is that our models conform to the intended requirements. The following tests are expected in the course evaluation:- an instance of each model can be created, and they can be found from database afterward, and foreign key relationships are created correctly
- ondelete and onmodify behaviors for foreign keys work as intended
A more thorough checklist would also include (tests for this are shown in the example at the end):
- test uniqueness of columns by trying to create objects that violate each individual unique column
- test that columns have their nullable attribute set correctly
- test that column types and restrictions have been set correctly
Test Setup
Of course we don't want to run tests on an existing database, and we also don't want tests to interfere with each other. Therefore the first order of business when writing tests for anything related to databases is to create a mechanism that produces a fresh temporary database for each test case. When using pytest, this is best achived with
fixtures
. A function registered as a fixture is called when executing a test that has the same name as a parameter, i.e.@pytest.fixture
def my_fixture():
# do preparations here
def test_something(my_fixture):
# do some testing
means that when my_test is executed, my_fixture is called first and its return value is accessible with the same name inside the test function. The fixture shown below creates and sets up a new database using a temporary file. It then yields a database handle which test functions can use to perform operations on the database. The code is based on this example.
import os
import pytest
import tempfile

import app

@pytest.fixture
def db_handle():
    db_fd, db_fname = tempfile.mkstemp()
    app.app.config["SQLALCHEMY_DATABASE_URI"] = "sqlite:///" + db_fname
    app.app.config["TESTING"] = True

    with app.app.app_context():
        app.db.create_all()

    yield app.db

    app.db.session.remove()
    os.close(db_fd)
    os.unlink(db_fname)
Implementation detail: Using yield in a fixture enables the same function to handle both
setup
(before yield) and teardown
(after yield). After creating this fixture, your tests can obtain a fresh database by including db_handle in their parameters.Another thing is to enable foreign key support (like we did in the app itself), and to import all models from the app. Adding these lines after
import app does the trick:from app import Location, Sensor, Deployment, Measurement
from sqlalchemy.engine import Engine
from sqlalchemy import event
@event.listens_for(Engine, "connect")
def set_sqlite_pragma(dbapi_connection, connection_record):
cursor = dbapi_connection.cursor()
cursor.execute("PRAGMA foreign_keys=ON")
cursor.close()
After this setup we can do any number of functions whose name starts with
test_ and that have db_handle as their sole parameter, e.g. test_create_instances. Writing Test Functions for Models
A test function represents a test case. It typically consists of preparations and one or more assert statements that are used to determine whether the test subject performed correctly. Assert is a Python statement that functions like an if statement, but instead executing a code block if its condition is (equivalent to) True, assert raises AssertionError if the condition is (equivalent to) False. The pytest framework has its own traceback analysis for AssertionError (see pytest documentation on assert for examples). You can also write a custom message that will replace the traceback.
When testing models a typical pattern is to create one or more model instances, (try to) save them to the database, and then do assertions about the values stored in the database. A simple example related to our sensor app would be to create a sensor with some values, and check that it was stored.
def test_create_sensor(db_handle):
    sensor = Sensor(
        name="uo-donkeysensor-1",
        model="donkeysensor2000"
    )
    db_handle.session.add(sensor)
    db_handle.session.commit()
    assert Sensor.query.count() == 1
This test will fail if either there is an error in committing the transaction, or if for some reasons there isn't exactly 1 sensor in the database (remember that each test case is run on a fresh empty database). What we'll quickly notice is that the boilerplate code needed to obtain model instances for test cases is repeated a lot. Therefore it's best to create some helper functions that produce these:
def _get_sensor():
    sensor = Sensor(
        name="uo-donkeysensor-1",
        model="donkeysensor2000"
    )

def test_create_sensor(db_handle):
    sensor = _get_sensor()
    db_handle.session.add(sensor)
    db_handle.session.commit()
    assert Sensor.query.count() == 1
Of course the functions can be parametrized if needed (in the full example at the end of this section some of them have been). A slightly more complex would be to create a sensor and a measurement for it, and assert that the relationship works from both sides:
def _get_sensor():
    sensor = Sensor(
        name="uo-donkeysensor-1",
        model="donkeysensor2000"
    )

def _get_measurement():
    return Measurement(
        value=44.51,
        time=datetime.now()
    )

def test_create_sensor_measurement(db_handle):
    sensor = _get_sensor()
    measurement = _get_measurement()
    measurement.sensor = sensor
    db.session.add(measurement)
    db.session.commit()
    assert Measurement.query.count() == 1
    assert Sensor.query.count() == 1
    db_measurement = Measurement.query.first()
    db_sensor = Sensor.query.first()
    assert db_measurement.sensor == db_sensor
    assert db_measurement in db_sensor.measurements
There is no need to create separate test functions for creating an instance of each existing model. It's sufficient to gather everything into one function. This has been done in the full example at the end of this section.
Testing Exceptions
Another category of testing is to ensure that certain operations are rejected by the database engine. This would include uniqueness violation as well as column type and restriction violations. Technically it would also include foreign key violations. However whether foreign keys work or not has already been tested in the last example - it would fail without properly configured model relationships. The pytest framework has its own mechanism for tests that expect a certain exception to be raised: using
pytest.except in a with statement. Since we are dealing with exceptions, they need to be imported into the test module before they can be referenced. With SQLAlchemy, exceptions are found in the
sqlalchemy.exc module (list of exceptions). In our current testing, we need one exception: IntegrityError. To import it:from sqlalchemy.exc import IntegrityError
For example the following test would check that it's not possible to add two sensors with the same name:
def test_sensor_name_unique(db_handle):
    sensor_1 = _get_sensor()
    sensor_2 = _get_sensor()
    db_handle.session.add(sensor_1)
    db_handle.session.add(sensor_2)
    with pytest.raises(IntegrityError):
        db_handle.session.commit()
When testing for exceptions, we are deliberately failing database commits. This puts the database engine into an inconsistent state where it refuses to do further commits - trying to do so results in InvalidRequestError. In order to be able to continue testing in the same function after a deliberate failure, a
rollback
is needed. A rollback cancels everything that was queued up for the failed commit. This is done by calling the rollback method of the database session, e.g. db_handle.session.rollback(). This has been done in the full test example.Documenting Tests
If you have run any of the tests introduced so far, you may have noticed that pytest doesn't have particularly much to say about tests that pass - not even their names in the output. In order to actually remember in the future what the gazillion tests you wrote a year ago do, this information needs to be written somewhere. A good practice is to write each test function's purpose in it's documentation string. Furthermore, if the test function is long and has multiple phases, these should be annotated with normal comments in the function source code.
On this course in particular, the value of your tests is based on your documentation. If you haven't documented a test, we're going to assume the test does not exist when evaluating your tests.
Model Testing Example
Below is a full example test for our sensorhub application. Do note that this example contains more meticulous testing than is required from your project. You don't need to test things like column types or nullable columns in your project. They are just shown here for completeness' sake.
Drop the test module into the same folder as your app and run it by typing
pytest. Do note that you may get 3 deprecation warnings related to Werkzeug (about importing ABC from collections). These can be ignored, as they are not your fault. Hopefully a Werkzeug developer will catch onto them before Python 3.8 is released...View Testing
This section will be added when exercise 2 is released.