In database terminology primary key refers to the column in a table that's intended to be the primary way of identifying rows. Each table must have exactly one, and it needs to be unique. This is usually some kind of a unique identifier associated with objects presented by the table, or if such an identifier doesn't exist simply a running ID number (which is incremented automatically).
Introduction to Web Development
This exercise material covers the very basics of developing simple web applications. The goal is to make a simple application that can be used to remotely access and manage data stored on the server's database. The coverage of this material is very horizontal - a wide variety of topics will be touched lightly. Furthermore, we will be using tools that are used in modern Python web development. These tools encapsulate a lot of implementation details and hide them away from the application developer. Uncovering these details has been largely left out. While understanding them makes it easier to understand how high level tools work, it is not required for using them.
The two main tools at this stage of the course are Flask and SQLAlchemy. Flask is a microframework for Python web development. It's great for small applications and learning as it avoids the development overhead of bigger frameworks (e.g. Django, the framework that powers Lovelace) - at the cost of features. SQLAlchemy is a database toolkit that bypasses the need to work with a
structured query language
, allowing database management entirely through Python objects.The Very Beginning: Serving Static Content
Learning goals: How to install and setup Flask in a Python virtual environment, and have it say hello when viewed from the browser.
Sanity Check: Python Virtual Environments
Although this step is technically optional, the use of virtual environments is highly recommended for all kinds of Python application development.
Virtual environments
are used to create clean Python environments that are separated from the operating system's main Python installation. Each virtual environment manages its own set of installed modules independently from the main installation - a freshly created virtualenv contains only the built-in modules of Python (by default). Virtualenvs can also be managed locally in the user's home directory, which allows the installation of new modules without admin privileges. Virtualenvs are particularly useful if you need an installation to have a specific version of a third party module but want to have another version for everything else. This can easily happen in projects with multiple third party components: one component (module A) undergoes a backwards-incompatible change, and another component (module B) that has module A as a dependency does not immediately follow up on the update, thus breaking module B - unless the installation retains the last compatible version of module A. Also when setting up your application on another system, virtualenvs can be used to ensure that the Python environment is the same as in your development system.
And of course, if you somehow mess up your Python environment, you can just destroy the virtualenv and start fresh. Also on Linux systems with package management, using Pip to install Python modules can mess with the Python modules installed by the package manager. However, installing modules using Pip inside a virtualenv is completely safe.
Creating and Activating Virtual Environments
Starting with version 3.3 of Python, all the necessary tools are automatically included. In case they are not, you need to install Pip and use it to install the venv module. In order to create a virtual environment, all you need to do is to type
python -m venv /path/to/the/virtualenv
on OS X and most Linux distributions you need to use python3 instead (running the above command on Python 2 will result in an error message that says "No module named venv"). The virtualenv will be a normal folder on your file system. In order to activate it Windows, type:
c:\path\to\the\virtualenv\Scripts\activate.bat
in OS X or Linux:
source /path/to/the/virtualenv/bin/activate
After which you will see the name of your virtualenv in parenthesis in front of your command prompt. E.g. if we made an environment called "pwp-env" in the home directory, a command prompt would look like:
(pwp-env) user@system:~/pwp-env$ (when cd'd inside the virtualenv - note that you don't actually need to work inside the virtualenv folder, it just contains your Python environment). As long as you see the name in parenthesis, you know your virtualenv is active. When you run Python, it will launch using the virtualenv. Likewise, when you install modules with Pip they will be installed to the virtualenv only.For the remaining steps, make sure you are always within the virtualenv.
Very Short Introduction to Web Frameworks
If we make a gross oversimplification, a web application is a piece of software that reads an
HTTP request
and produces an HTTP response
. This happens in some sort of mystical communication with the HTTP server. Requests and responses contain a variety of headers
and often (but not always) a request body
. Parameters can be passed in the URL or the message body. As another gross oversimplification we can describe the role of web frameworks as turning HTTP requests into Python function calls, and turning Python function return values into HTTP responses. This removes a lot of intermediate steps. While it leaves a lot of blanks into how the code actually works, it's good for your sanity.When using web frameworks, URLs are mapped to functions (or methods) through
routing
. Routing supports URL templates
, where parts of the URL are defined as variables so thathttp://api.hundredacrewood.org/profile/winnie/ http://api.hundredacrewood.org/profile/tigger/
would both match the same URL template
/profile//
where user would be passed as an argument (or in some other way) to the function assigned to the URL. All this means that your actual web application consists primarily of functions that render a response, and routing registrations. These are called
view functions
.Frameworks also make it harder to create security holes accidentally. When the routing process and request parsing are standardized into the framework, you don't need to create your own custom solutions where you'd have to know all the security considerations. Typically things like authentication can also be tucked into a separate layer in the framework so that it is applied automatically for all functions that are marked as requiring authentication. All in all, web frameworks allow you to focus on your application's
business logic
in your main code file while other details are tucked away.Flask - The Very Basics
Now that we have been briefly informed about how web frameworks make our developer lives a lot easier, it's time to try one. For the examples and exercises in this course we are using Flask. We want to have the basic features of Python web frameworks without any of the development overhead of heavier frameworks, and Flask is ideal for that. Installing Flask is extremely simple, provided that you are in your
virtual environment
. Simply typepip install Flask
and while we're at it since we need them soon anyway:
pip install pysqlite3
pip install flask-sqlalchemy
The simplest possible Flask app is indeed very simple. A more detailed explanation about this application can be found from Flask's documentation. Here's the code in all its short glory. Create a new folder your application and download the file there.
If you name your code file
app.py, you can run it simply by typing: flask run
in the terminal, provided that you are in the same folder as your
app
. If you used a different filename, you need to set the environment variable FLASK_APP to point to your code file first. You can now view your application in the browser by pointing it to http://localhost:5000 (or http://127.0.0.1:5000). This is the address and port where the Flask development server runs your application by default.If we were writing actual web applications for human consumption through a browser, typically we would return an HTML document instead of a plain string. However since this is an API course we don't pay much attention to HTML.
Serving Simple Dynamic Content
Static web pages are very 90s, and web frameworks are hardly necessary for serving them. However, the moment we want something to be dynamic, the advantage of web frameworks becomes quickly apparent. There are a few ways of passing arguments in
HTTP requests
. Each is intended for a slightly separate use, but for now we are simply going to introduce two of them briefly and show how Flask delivers them to your view functions
. The third one is introduced later.Saying Hello to Someone
The first way of using parameters is to put them into the URL as variables which was seen briefly above. Normally this mechanism is used to identify which resources we want to access. For instance to look at your own profile in a site, you typically use a URL that's something like
/profile/eeyore/. In short, parts in the URL always refer to something that exists. However we don't really have anything like that yet, so for now we're just using them like function arguments. In the future however this is our primary way of passing parameters.Let's add another function to the previous example that responds to URLs that fit the following
template
:/hello//
We're doing this to demonstrate how to set variables to routes and how those variables are available in the function that handles the route. The new function is defined and routed like this:
@app.route("/hello/<name>/")
def hello(name):
    return "Hello {}".format(name)
Now any urls that start with /hello/ followed by any string will result in this function getting called with the string placed into the name argument.
Internet Age Calcutron
In order to get some practice in very basic routing we're going to bring a beginner level programming staple into the internet age. This amazing web application can do basic math operations using numbers provided in the URL.
Learning goals: How to create a simple web application using Flask's
routing
system. How to begin:
Create a project folder within your
virtual environment
using a name of your choosing. Create the file app.py inside the project folder - all of your code should be placed in this file. The code should contain five view functions
, described in the sections below.1st function:
index- Route:
"/" - Returns:
- help string that describes how to use the web application (string)
This function returns a "how to use" document. As long as it's a string, you can type anything there.
2nd function:
plus- Route:
"/add/<float:number_1>/<float:number_2>" - Parameters:
- first number (float)
- second number (float)
- Returns:
- a formatted string with the result in it (string)
This function performs addition of two numbers and returns the result. Note that Flask defines a few converters that can define what kinds of values are accepted as part of the
URL template
. In this case we're using the float converter. If the URL doesn't contain two floats, the result is 404 - not found (note: integers in the URL will also result in 404!). The function needs to return a string with the result formatted into it. You can try to find out what happens if you try to return the result as a number. NOTE: the checker uses the first number it finds in your response as the result, don't include the operands!3rd function:
minus- Route:
"/sub/<float:number_1>/<float:number_2>" - Parameters:
- first number (float)
- second number (float)
- Returns:
- a formatted string with the result in it (string)
This function performs substraction of number_2 from number_1 and returns the result. All considerations from the plus function apply.
4th function:
mult- Route:
"/mul/<float:number_1>/<float:number_2>" - Parameters:
- first number (float)
- second number (float)
- Returns:
- a formatted string with the result in it (string)
This function performs multiplication of number_1 with number_2 and returns the result. All considerations from the plus function apply.
5th function:
div- Route:
"/div/<float:number_1>/<float:number_2>" - Parameters:
- dividee (float)
- divisor (float)
- Returns:
- a formatted string with the result (or NaN) in it (string)
This function performs division of number_1 with number_2 and returns the result. All considerations from the plus function apply. In addition, if the divisor is 0.0, the function returns
"NaN" as the result.Remember to test your
app
before submitting. Anna palautetta
Koitko tämän tehtävän hyödylliseksi oppimisen kannalta?
Kommentteja tehtävästä?
Inquiry
Another mechanism to pass parameters as part of the URL is the use of
query parameters
. You have probably seen these in use if you have ever looked at the address bar after doing a Google search, e.g. a search for "eeyore" would produce something like this (with a bunch of other query parameters not shown here for brevity):https://www.google.fi/search?q=eeyore&oq=eeyore
Everything after the ? in the URL is query parameters. Each is a key-value pair, where the key is on the left side of the =, and the & separates pairs from each other. Query parameters are the proper way to pass parameters that have arbitrary values. For instance the more proper way to do the calculator above would be to use query parameters. The same applies for the hello example. Let's transform the hello function to use query parameters:
@app.route("/hello/")
def hello():
    try:
        name = request.args["name"]
    except KeyError:
        return "Missing query parameter: name", 400
    return "Hello {}".format(name)
The first important difference is in the
route
definition: the name is nowehere to be found. This is not a mistake: query parameters are not part of the route - if you try to put them there, your URL will not work. Likewise the name parameter doesn't appear in the hello function definition because it is not a route variable. Instead we have to dig it up from the request object
. This object is integral part of the web framework sorcery and contains everything that can possibly obtained from the HTTP request
made by the client. It's made globally available by importing it from Flask.The query parameters can be found from a dictionary-like object
request.args (details here). The last difference comes down to reporting failure. Previously when the name variable was part of the URL, leaving it out would have resulted in 404 Not Found. However, this time 404 is not the proper error, because regardless of query parameters the URL target itself still exists. While 400 (Bad Request) is not particularly accurate, it is appropriate in this situation. It means that while the client did send their request to the right place, the request cannot be processed because it's missing information that is required.There are actually several different ways to return an error response to the client. In this case we have simply made a return statement with the status code added. Other ways will be introduced further along in the course. Alternatively you can just search Flask documentation for more information. Using a return statement like this is not ideal because it doesn't easily distinguish this result as an error. We're just doing it because it makes the example as simple as possible.
Trigonometric Calcutron
Leaning goals: How to use
query parameters
in Flask applications. How to return error codes from a view function
. Control flows involved in validating requests within view functions.How to begin:
You can add the new function to your previous calcultron, or you can create a new
app
for it. This time we're only going to do one function: the trigonometric operation is selected by a route variable. You should also import the [!term=Request Object]request object[!term!] from Flask by changing the flask import line to: from flask import Flask, request
Function:
trig- Route:
"/trig/<func>" - Parameters:
- trigonometric function to execute (sin, cos or tan)
- Query parameters:
anglethe angle argument for the trigonometric function (mandatory)uniteither "radian" or "degree", defaults to radian. (optional)- Returns:
- 200: result of the trigonometric function in a string (round to 3 decimal precision)
- Example:
/trig/sin?angle=3.14 - Example:
/trig/sin?angle=90&unit=degree - 404: error message
"Operation not found" - Example:
/trig/acos?angle=3.0 - 400: error message
"Missing query parameter: angleor"Invalid query parameter value(s)" - Example:
/trig/cos/ - Example:
/trig/tan?angle=pi - Example:
/trig/sin?angle=4&unit=donkey
This view function calculates the sine, cosine or tangent of an angle. If the angle is given in degrees, it needs to be first converted into radians. If the func route variable doesn't match any of the three trigonometric functions, the reply is given with the 404 status code. If angle is not set, or either query parameter has an invalid value, a reply with the 400 status code is given using the appropriate error message.
Anna palautetta
Koitko tämän tehtävän hyödylliseksi oppimisen kannalta?
Kommentteja tehtävästä?
Databases and ORM
You can only get so far without storing information between
requests
. Databases are integral to web development because that's where all of the persistent information is stored. All data that is not static
is stored in a database where it can be efficiently queried
. Relatively efficiently at least - in the end database interactions are the most likely performance bottlenecks for web services. As this course's focus is developing web APIs that utilize databases, majority of the finer details regarding databases have been omitted. These can be obtained from other courses or studied online. Following practices of modern web development, we're even going to skip SQL
(structured query language) in favor of using an object relation mapper
(ORM).This material touches several topics regarding databases (very lightly): what they are, design considerations, how to use them in a Python application and how to maintain them over the course of development.
Structure of Databases
In this course we're using "traditional" databases that have a predefined structure for all information they store. This includes well-known databases such as MySQL and PostgreSQL that are commonly used in web development, and SQLite which is often used in prototyping. These kinds of databases contain data in
tables
. Each table has a predefined set of columns
that define what attributes items in that table must/can have. These items are stored in rows
. In addition different tables in the database can have relations between them so that a column in one table refers to rows in another table. All of this is defined in the database schema
.An important part of guaranteeing row uniqueness in tables is the concept of the
primary key
. In each table at least one column must be assigned as the primary key (PK for short). For each row the PK value must be unique. This is often some kind of identifier or other kind of handle like user ID in a web service that cannot change. Just as often the PK is simply a row number - a running number that is always incremented when rows are added to the table. Another type of key is the
foreign key
(FK for short). These are used when creating relations between tables. A foreign key field in table A is a column that can only take values that refer to rows in table B by using a unique column in table B to identify the relation. It is quite typical to use the primary key of table B as the foreign key in table Let's consider an example: table A contains data about pets and table B contains data about people. Table A would then have a column owner that would reference table B by the username column (which is unique). Using this relation we can retrieve any information about the pet's owner that is stored in table B.This kind of a relationship is called one-to-many in the sense that a single owner can have multiple pets. Note that this relationship is only visible in the pets table. The other side of the relationship is many-to-one.
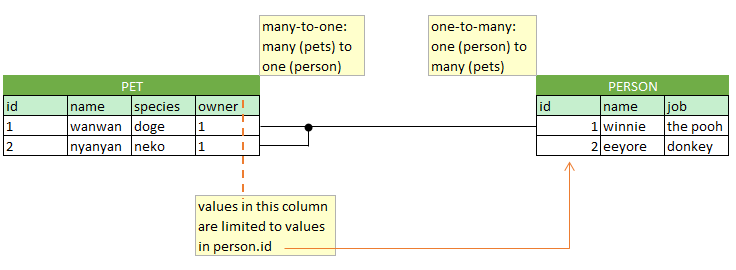
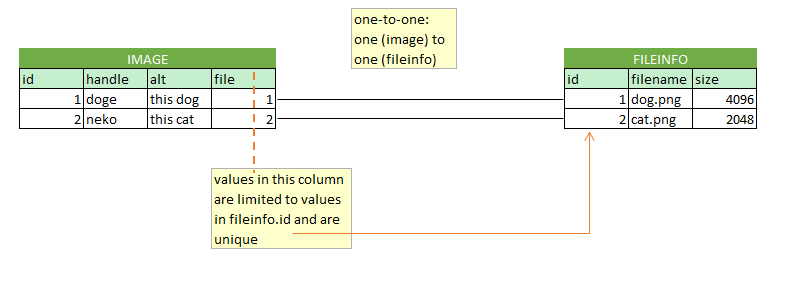
Other types of relationships are one-to-one and many-to-many. In one-to-one the foreign key column in table A is additionally marked as unique. For instance your social security number has a one-to-one relationship with youm. In the example below we have image metadata in one table and the image's filesystem-related data on another table.
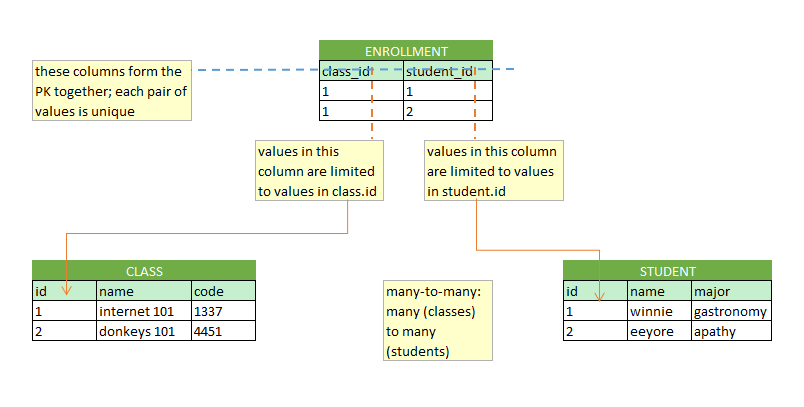
Many-to-many requires an additional mapping table that contains pairs of connected foreign keys. For example in a school classes typically have multiple students, and students also take multiple classes. This relationship would be represented by a mapping table that has two columns: student ID and class code, both foreign keys. It's important to notice that neither of the tables refer to each other directly via foreign keys - the link is only created by the relationship table.
Object-Relational Mapping
In this course databases are managed through
object-relational mapping
(ORM for short). In this approach, database tables
and their relationships are managed as objects in code. Much like how Flask hides away a lot of details about how an HTTP request
becomes a Python function call, an object-relational mapper hides a lot of the details about how a database table become a Python class, and database operations become method calls. While understanding the underlying SQL queries that ORM makes automatically can be useful for performance considerations and such, in normal small scale use everything we are ever concerned about is Python code. Our examples use SQLAlchemy through Flask SQLAlchemy. SQLAlchemy actually does a lot more than just ORM (in fact ORM is just an optional component of it) but in line with the overarching theme of this course, we're just scratching the surface.Regardless of which ORM is used, the basic way to define database structure is to create Python classes that have various attributes representing
columns
called model classes
. Each class corresponds to a table in the database, and each attribute of the class that is initialized as a column represents a column in the table. Class instances, i.e. objects, represent rows
that have been retrieved from the database into the program's workspace. Note that typically the database schema
is generated from the class definitions. This is why didn't bother with creating a schema beforehand. In fact since we're using SQLite for now, we don't need to bother with creating a database either. Using Flask SQLAlchemy, a class representing a simple table would look like this:from flask import Flask
from flask_sqlalchemy import SQLAlchemy
app = Flask(__name__)
app.config["SQLALCHEMY_DATABASE_URI"] = "sqlite:///test.db"
app.config["SQLALCHEMY_TRACK_MODIFICATIONS"] = False
db = SQLAlchemy(app)
class Measurement(db.Model):
id = db.Column(db.Integer, primary_key=True)
sensor = db.Column(db.String(20), nullable=False)
value = db.Column(db.Float, nullable=False)
time = db.Column(db.DateTime, nullable=False)
The beginning covers what is needed to be done in order to use SQLAlchemy with Flask. We just need to tell where we want our database to be (a file in the same folder). The second config line is done to silence a warning as we don't need to track modifications right now. The database interface is acquired by initiating SQLAlchemy from flask_sqlalchemy, and this object is then used for defining our single database class. In SQLAlchemy an attribute is defined as a column by using the db.Column constructor which takes the column type as the first argument and other column properties as keyword arguments - see the
Column Attribute
term for a list of commonly used keywords. If you wish, you can also override the model's
__repr__ method. Doing so changes how the model instance is shown in the console. We haven't done this in the examples on this page, but will do it in later examples. Otherwise it will be shown as e.g. <Measurement 1> (model name and primary key value). As an example, you could write a method that shows a measurement as e.g. uo-donkeysensor-1: 44.51 @ 2019-01-01 00:00:00 instead. Doing Things With ORM
At this point we don't have our database yet. It can be created from the python console. Go to the folder of your application, activate Python console (example shown in IPython) and do:
In [1]: from app import db
In [2]: db.create_all()
Basic Class in Modeling
Since we'll be creating a whole bunch of model classes in this course, let's make sure you got the basics right!
Learning goals: How to define a
model class
.Model:
StorageItem- Columns:
- id (integer, primary key)
- handle (string, max length 64, unique, not null)
- qty (integer, not null)
- price (float, not null)
Define this class using Model as the base class, and use Column contstructor calls like in the example. Before submitting you should also make sure that you can at least create a database by using this model class.
Anna palautetta
Koitko tämän tehtävän hyödylliseksi oppimisen kannalta?
Kommentteja tehtävästä?
Adding Objects
After this your application folder should contain the test.db file, which is now an SQLite database with one empty
table
(called measurement). The next step is to add some rows
into the table. In the ORM pattern this is done by creating instances of the model class. By default model classes have a constructor that accepts the database column names as keyword arguments. Note that Creating the instance by itself doesn't do anything to the database. It needs to be marked for addition and then committed. Therefore we can create a measurement by doing:In [1]: from app import db, Measurement
In [2]: from datetime import datetime
In [3]: meas = Measurement(
...: sensor="donkeysensor2000",
...: value=44.51,
...: time=datetime(2018, 11, 21, 11, 20, 30)
...: )
In [4]: db.session.add(meas)
In [5]: db.session.commit()
Validation against the
database schema
is done at the last stage. If one or more insertions cannot be done due to breaking constraints, an exception will be raised. Usually this is IntegrityError, accompanied with an explanation of what caused the error. Also note that when this happens, further operations cannot be done before the transacton has been rolled back
with db.session.rollback(). Retrieving Objects
We have now saved a measurement into the database. In order to use it an application, it needs to be retrieved. Searches from tables are done using the class's query attribute. Retrieving everything is easy:
In [1]: from app import db, Measurement
In [2]: Measurement.query.all()
Out[2]: [<Measurement 1>]
The all method of the query object returns all records from a table as a Python list. This is fine in our small test, but in real life we don't want to load everything into memory. Instead of fetching everything, we should perform filtering by using the filter_by method.
In [3]: Measurement.query.filter_by(sensor="donkeysensor2000").all()
Out[3]: [<Measurement 1>]
Once again the all method at the end is what returns the results of the filtering, filter_by only returns a query object. It's also worth noting that filter_by is a simple filtering method that is only suitable for exact matching. It's good for finding values by a certain sensor, but if we want to find values higher than a certain threshold, the filter method is needed. The syntax is different:
In [4]: Measurement.query.filter(Measurement.value > 100).all()
Out[4]: []
All in all there is a lot to writing queries using SQLAlchemy's query objects (you can study more starting here - note that in our examples using Flask SQLAlchemy,
Measurement.query is a shorthand for db.session.query(Measurement)). Regardless of how they were queried, once we take out the results of our query they are Measurement instances:In [5]: meas = Measurement.query.first()
In [6]: type(meas)
Out[6]: app.Measurement
In [7]: meas.sensor
Out[7]: 'donkeysensor2000'
In [8]: meas.value
Out[8]: 44.51
In [9]: meas.time
Out[9]: datetime.datetime(2018, 11, 21, 11, 20, 30)
Removing and Modifying Objects
Modifying is simple - whenever an object is modified it is automatically marked as dirty, and any commit will apply changes to the database.
In [10]: meas.sensor = "donkeysensor2001"
In [11]: db.session.commit()
In [12]: Measurement.query.first().sensor
Out[12]: "donkeysensor2001"
Deleting rows from the database is also simple, and very similar to adding new ones.
In [13]: db.session.delete(meas)
In [14]: db.session.commit()
There is no error if this fails, only a warning. Deletion can also be done without retrieving model instances:
In [15]: Measurement.query.filter_by(sensor="donkeysensor2001").delete()
Forging Relationships
Managing tables connected through
foreign keys
has been made very convenient in ORM
. Typically there's a mechanism that allows model classes
to directly refer to each other so that an attribute in an instance can contain a direct reference to an instance of another model class. In our example, instead of identifying sensors by arbitrary names only, we can make another table that contains the sensors. So let's define a second model class:class Sensor(db.Model):
id = db.Column(db.Integer, primary_key=True)
name = db.Column(db.String(32), nullable=False, unique=True)
model = db.Column(db.String(128), nullable=False)
location = db.Column(db.String(128), nullable=False)
latitude = db.Column(db.Float, nullable=True)
longitude = db.Column(db.Float, nullable=True)
measurements = db.relationship("Measurement", back_populates="sensor")
As we can see, this
table
contains much more information about a sensor that we were previously able to present. We have also defined a relationship attribute. This creates the reverse side of our foreign key connection, allowing convenient access to all measurements recorded for this sensor. In order to create the connection, we need to modify the Measurement class:class Measurement(db.Model):
id = db.Column(db.Integer, primary_key=True)
sensor_id = db.Column(db.Integer, db.ForeignKey("sensor.id"))
value = db.Column(db.Float, nullable=False)
time = db.Column(db.DateTime, nullable=False)
sensor = db.relationship("Sensor", back_populates="measurements")
The back_populates keyword argument in the relationship constructor indicates an attribute that will refer back to this model in the other side of the relationship. Also note that when defining foreign key with db.ForeignKey you must use the table name (default is model name in lowercase) where as when creating the relationship with db.relationship you must use the model name. Relationship attributes only exists in our Python models - in the database level the relationship between these two tables is still only presented by the foreign key in the measurement table.
At this point our
database schema
will have changed. That means we have to delete the database and create it again from scratch. This is usually fine in development and sufficient for us right now - for production databases there is a process called migration
that preserves data and modifies it to fit the new schema. After deleting the database we can once again launch the console and do some magic tricks.In [1]: from app import db
In [2]: db.create_all()
In [3]: from app import Sensor, Measurement
In [4]: from datetime import datetime
In [5]: sensor = Sensor(
...: name="uo-donkeysensor-1",
...: model="donkeysensor2000",
...: location="kylymä",
...: )
In [6]: meas = Measurement(
...: value=55.41,
...: sensor=sensor,
...: time=datetime.now()
...: )
Magical fun fact: instead of defining sensor_id in the measurement object, we can define the sensor relationship attribute instead and the foreign key field gets filled automatically. This is particularly nice since at this moment in time our sensor actually doesn't have an id since it hasn't been committed yet. After we commit, we can query and see the relationship in action:
In [7]: db.session.add(sensor)
In [8]: db.session.add(meas)
In [9]: db.session.commit()
In [10]: Sensor.query.first().measurements
Out[10]: [<Measurement 1>]
In [11]: Measurement.query.first().sensor_id
Out[11]: 1
In [12]: Measurement.query.first().sensor
Out[12]: <Sensor 1>
Note: explicitly adding the sensor (line 7) can also be omitted. Another way to add a measurement is to append one into the measurements attribute of a sensor instance (note also the lack of an explicit
db.session.add):In [13]: meas2 = Measurement(
...: value=12.35,
...: time=datetime.now()
...: )
In [14]: sensor.measurements.append(meas2)
In [15]: db.session.commit()
In [16]: Sensor.query.first().measurements
Out[16]: [<Measurement 1>, <Measurement 2>]
Modeling Relationships
Learning goals: How to define a one-to-many/many-to-one relationship using SQLAlchemy ORM.
You're going to expand the previous exercise by adding another
model class
. Similarly to the example, we want you to create a table for products that contains more information. Another thing that is added is a location field so that we the database can track items in multiple storage locations.Modified model:
StorageItem- New columns:
- product_id (integer, foreign key product.id)
- location: (string, max length 64, not null)
- Removed columns:
- handle
- price
The model class should also define a relationship named product, with a back reference to the Product table's in_storage attribute.
New model:
Product- Columns:
- id (integer, primary key)
- handle: (string, max length 64, unique, not null)
- weight: (float, not null)
- price: (float, not null)
This model class should also define a relationship named in_storage, with a back reference to the StorageItem table's product attribute.
Anna palautetta
Koitko tämän tehtävän hyödylliseksi oppimisen kannalta?
Kommentteja tehtävästä?
Sidenote: Foreign Keys in SQLite
As a small sidenote, by default SQLite does not enforce
foreign key
constraints. Then again, if you use the above methods to create related objects, you should never be violating them anyway. The only way to do that is to set the foreign key field's (e.g. sensor_id) value manually to something invalid. However, you should still know that putting this code snippet in your app enables foreign keys for SQLite (source: here):from sqlalchemy.engine import Engine
from sqlalchemy import event
@event.listens_for(Engine, "connect")
def set_sqlite_pragma(dbapi_connection, connection_record):
cursor = dbapi_connection.cursor()
cursor.execute("PRAGMA foreign_keys=ON")
cursor.close()
Together We Fall
Since foreign keys are constrained to values existing in another table, what happens when the target row in the other table is deleted? The answer is: it needs to be defined by assigning a behavior. The most commonly used behaviors are 1) to delete
rows
that pointed to the deleted row (CASCADE) or; 2) to set their values to null (SET NULL) (if they are nullable). The same applies for updating: if set to cascade, the foreign key value is updated along with the value it points to. This is generally less important than deleting when using primary keys as foreign keys since they usually should not change. All of these are set by giving the ForeignKey constructor keyword arguments ondelete and onupdate. The values are given as strings, i.e. "CASCADE" and "SET NULL". Which behavior to choose depends on the application. For instance, in our sensor example using cascade would lose data when a sensor is deleted from the database while set null would leave us with measurements that don't belong to any sensor. Neither is truly desirable so it's probably best to not delete sensors in the first place and instead mark them as inactive. However, just to be on the safe side, let's use set null as the behavior:
class Measurement(db.Model):
    id = db.Column(db.Integer, primary_key=True)
    sensor_id = db.Column(db.Integer, db.ForeignKey("sensor.id", ondelete="SET NULL"))
    value = db.Column(db.Float, nullable=False)
    time = db.Column(db.DateTime, nullable=False)

    sensor = db.relationship("Sensor", back_populates="measurements")
There is also a rather curious implementation detail in SQLAlchemy's ORM which necessitates that you set the behavior not only to the foreign key but also the the relationship attribute at the opposite end. This needs to be set if you want children to be deleted along with the parent when deleting through the model instance (i.e. with the delete method). So if we wanted measurements to go along with the sensor when it's deleted, the relationship attribute on the Sensor model class needs to be defined as:
measurements = db.relationship("Measurement", cascade="all, delete-orphan", back_populates="sensor")
More information here.
Querying Through Relationships
Separating information into related
tables
is fine and all, but what if we want to find e.g. all measurements done by a certain sensor model? Our current simple querying tools aren't getting us anywhere because the information we want to search by is not in the table we want to query from. This is where SQLAlchemy's join method comes in. It's an abstraction that results in SQL
join statements, and can be used to make queries that involve multiple tables. To answer our example question (assuming the database we created earlier):In [1]: from app import db, Measurement, Sensor
In [2]: Measurement.query.join(Sensor).filter(Sensor.model == "donkeysensor2000").all()
Out[2]: [<Measurement 1>]
The table we want results from is on the left while the table which contains the column we want to use for searching is an argument to the join method. We can of course also add columns from measurement to the filtering, e.g. to only find measurements above a certain threshold.
In [3]: Measurement.query.join(Sensor).filter(Sensor.model == "donkeysensor2000", Measurement.value > 1.0).all()
Out[3]: [<Measurement 1>]
Modern Relationships
If we only had one kind of possible relationship we'd be overly conservative. Even though many-to-one (and its reverse one-to-many) is probably the most common relationship in use cases seen in this course, we should at least know how to define other kinds using SQLAlchemy. A one-to-one relationship is easy to define because it's just a modification to the many-to-one relationship described above. This is achieved by setting the
uselist keyword argument of the relationship constructor to False. For example let's turn the location parameters of a sensor into a table of locations, with each location being able to hold exactly one sensor:class Location(db.Model):
id = db.Column(db.Integer, primary_key=True)
latitude = db.Column(db.Float, nullable=True)
longitude = db.Column(db.Float, nullable=True)
altitude = db.Column(db.Float, nullable=True)
description=db.Column(db.String(256), nullable=True)
sensor = db.relationship("Sensor", back_populates="location", uselist=False)
class Sensor(db.Model):
id = db.Column(db.Integer, primary_key=True)
name = db.Column(db.String(32), nullable=False, unique=True)
model = db.Column(db.String(128), nullable=False)
location_id = db.Column(db.Integer, db.ForeignKey("location.id"), on_delete="SET NULL")
location = db.relationship("Location", back_populates="sensor")
measurements = db.relationship("Measurement", back_populates="sensor")
As seen in the diagram, a many-to-many relationship is not quite as straightforward. It requires the creation of an association table that is made of reference pairs - one
foreign key
to each side of the relationship. It's required because database columns cannot have mutable sequence type values (i.e. you can't have a Python list in your database table - although technically you could serialize a list but this would be extremely stupid because the relationship would no longer be understood by the database thus making your queries inefficient). For an example, let's add a new table for deployments - a period of time where a certain configuration of sensors was in place. Since a deployment consists of multiple sensors, and sensors can be present in multiple deployments, this is a many-to-many relationship. As said, a helper table is required to make this relationship possible. Since we're not intending to use this table directly, it should be defined as a table rather than a
model
. SQLAlchemy will just use it for performing its magic. This table is shown below:deployments = db.Table("deployments",
db.Column("deployment_id", db.Integer, db.ForeignKey("deployment.id"), primary_key=True),
db.Column("sensor_id", db.Integer, db.ForeignKey("sensor.id"), primary_key=True)
)
By setting them both to primary key they actually form the primary key of the table together, i.e. each pair of IDs in the table is unique. This will produce a table that will look something like this.
| deployment_id | sensor_id |
| 1 | 1 |
| 1 | 2 |
| 2 | 1 |
| 2 | 2 |
Relationship Meddling
Let's practice working with interconnected models. In particular, this exercise demonstrates what happens when we try to create errors. It's also good practice for creating model instances in the Python console.
Learning goals: What happens when relationship limitations are tested.
Before you begin:
Download the sensorhub app from below:
Put it in a folder inside your
virtual environment
and open IPython. Type the following two lines. The rest you have to figure out yourself.In [1]: from app import db, Deployment, Location, Sensor
In [2]: db.create_all()
You need to also create two locations (A and B) and a sensor (s1 for A and s2 for B) for each. Finally you need one deployment that contains both sensors. Figuring out how to create these is part of the task. In many-to-many relationships, use append to add objects to the relationship (e.g.
deployment.sensors.append(s1))Task Steps:
This task has two steps. For each step, two lines should be written into the answer box for a total of four lines. When asked to copy a value, use print to see it in the console in order to get them in the format expected by the evaluator.
Note: if you get an exception, you need to roll the transaction back by typing
db.session.rollback() before continuing.- Change the location of sensor s1 to B.
- first change the location in the model
- then check the value of sensor s2's location and copy it into the answer box
- commit your change - if there is an error, type its name into the answer box; otherwise copy the value of sensor s2's location field
Remember: : if you get an exception, you need to roll the transaction back by typing
db.session.rollback() before continuing.- Add s1 to the deployment configuration a second time
- append s1 to the list of sensors
- then check the value of the deployment's sensors list and copy it into the answer box
- commit your change - if there is an error, type its name into the answer box; otherwise copy the deployment's sensors list into the answer box
Anna palautetta
Koitko tämän tehtävän hyödylliseksi oppimisen kannalta?
Kommentteja tehtävästä?
Databases in Web Development
While managing database in the console can be occasionally useful, it's not really a real life usecase. Usually when something is added to the database via HTTP request, it is done with the POST method, and the
row
values are included in the request body. With Flask the way to access the request body differs based on the request's MIME type
. In case of interactive web application (i.e. human user) these values usually come from a form and can be accessed through request.form which is a dictionary-like object similar to request.args. An example with minimalistic error messages (and taking timestamp from the server rather than client):@app.route("/measurements/add/", methods=["GET", "POST"])
def add_measurement():
if request.method == "POST":
# This branch happens when user submits the form
try:
sensor_name = request.form["sensor"]
sensor = Sensor.query.filter_by(name=sensor_name).first()
if sensor:
value = float(request.form["value"])
meas = Measurement(
sensor=sensor,
value=value,
time=datetime.now()
)
db.session.add(meas)
db.session.commit()
else:
abort(404)
except (KeyError, ValueError, IntegrityError):
abort(400)
else:
# This branch happens when user loads the form
# and would render the form as HTML
pass
Shown here is a very common code structure for
view functions
that deal with forms. The same URL is used for both showing the form and submitting it, and we differentiate between the two by the request method
being used (also note that we have to allow them in the route definition). In a real application we'd have more accurate error messages. However, in a real application we would also have form validation to deal with that. As important as forms are in web application development, they mostly fall out of scope for this course. Our primary concern are APIs. In this use case the client is another machine so there's no need for fancy HTML forms or validation libraries. Typically the data is delivered in a document notation format, presently mostly
JSON
(XML in the past). JSON has its own MIME type and Flask makes the data available through request.json as a Python data structure (effectively the result of json.loads done to the request body). Assuming a JSON document that looks like this:
{
    "sensor": "uo-donkeysensor-1",
    "value": 44.51
}
Our code to read it and save it into the database would look like this. Note that only one method is allowed this time, so there is no need to examine it further:
@app.route("/measurements/add/", methods=["POST"])
def add_measurement():
    # This branch happens when user submits the form
    try:
        sensor_name = request.json["sensor"]
        sensor = Sensor.query.filter_by(name=sensor_name).first()
        if sensor:
            value = float(request.json["value"])
            meas = Measurement(
                sensor=sensor,
                value=value,
                time=datetime.now()
            )
            db.session.add(meas)
            db.session.commit()
        else:
            abort(404)
    except (KeyError, ValueError, IntegrityError):
        abort(400)
However since sensor here is actually something that exists as an object in our database, it is usually preferable to include it in the URL as a variable rather than something that's extracted from the request body. This way when the API returns 404 for an unknown sensor, the client developer has an easier time figuring out that the sensor they requested does not match any existing sensor, and that the problem is in the URL.
@app.route("/<sensor_name>/measurements/add/", methods=["POST"])
def add_measurement(sensor_name):
    # This branch happens when user submits the form
    try:
        sensor = Sensor.query.filter_by(name=sensor_name).first()
        if sensor:
            value = float(request.json["value"])
            meas = Measurement(
                sensor=sensor,
                value=value,
                time=datetime.now()
            )
            db.session.add(meas)
            db.session.commit()
        else:
            abort(404)
    except (KeyError, ValueError, IntegrityError):
        abort(400)
Inventory Engineer: Web Edition
To summarize the main points of this exercise, we're going to create a small API without any particular regard to API design principles at this point. The API is based on previous tasks and provides a very small inventory management system.
Learning goals: Creating a simple flask application that allows management of a database through an interface of GET and POST requests.
Before you begin:
The database models created in the Modeling Relationships exercise can be used as the basis for your application. You can either expand the app created in that exercise, or copy its contents to a new app.
When implementing the
views
that use POST, you should also take a look at how to test them.Note: due to how Flask's test client is implemented, your code must access the JSON data through
request.json. 1st function:
add_product- Route:
"/products/add" - Parameters:
- no parameters
- Request body JSON fields:
"handle"(string)"weight"(float)"price"(float)- Returns:
- 201: if successful
- 400:
"Weight and price must be numbers"or"Incomplete request - missing fields" - 405:
"POST method required"or flask's default 405 message - 409:
"Handle already exists"- if a product with the same handle already exists - 415:
"Request content type must be JSON"- if the request body cannot be loaded as json
The function will take the product information from the
JSON
document sent by the client, and create a new product in the database with the given information. If the request is faulty in more than one way you can choose which error code to return. Presumably the client developer will fix that error first, and then get the second one on a subsequent attempt. 2nd function:
add_to_storage- Route:
"/storage/<product>/add" - Parameters:
- the product to add to storage (product handle)
- Request body JSON fields:
"location"(string)"qty"(int)- Returns:
- 201: if successful
- 400:
"Qty must be an integer"or"Incomplete request - missing fields" - 404:
"Product not found"- if no product is found with the handle - 405:
"POST method required"or flask's default 405 message - 415:
"Request content type must be JSON"- if the request body cannot be loaded as json
Since database IDs don't really mean anything, products are identified by their other unique field: handle. The function must therefore check that the given handle matches to a product in the database and return 404 if it doesn't. If the request is valid, the function must create a storage entry that is related to the selected product.
3rd function:
get_inventory- Route:
"/storage/" - Parameters:
- no parameters
- Returns:
- 200: JSON document containing the inventory as an array of objects
- 405:
"GET method required"- if the method is not GET
If this URL is invoked with a GET method it fetches the full inventory into a list that meshes together data from both database tables. The list has one item for each existing product. This item is a dictionary with the following keys:
"handle": the handle of the product"weight": weight of the product"price": price of the product"inventory": a list of storage entries for this product - a tuple for each indicating location and quantity.
This data structure will be put into the response body as JSON (you can use json.dumps to serialize it), e.g. (indentation added for reader's sanity, you can add it too with the indent argument):
[
    {
        "handle": "donkey plushie",
        "weight": 1.20,
        "price": 20.00,
        "inventory": [
            ["shop", 2],
            ["warehouse", 42]
        ]
    }
]
Anna palautetta
Koitko tämän tehtävän hyödylliseksi oppimisen kannalta?
Kommentteja tehtävästä?
Anna palautetta
Kommentteja materiaalista?