Termipankki
  1. A
    1. API Blueprint
    2. Addressability
    3. Ajax
    4. Anonymous Function
    5. App Context
  2. B
    1. Blueprint
    2. Business Logic
  3. C
    1. CORS
    2. Callback
    3. Client
    4. Column
    5. Column Attribute
    6. Components Object
      Concept
    7. Connectedness
    8. Container
    9. Control
    10. Converter
      Framework
    11. Cookie
      WWW
    12. Credentials
      Concept
  4. D
    1. DOM
    2. Daemon
    3. Database Schema
    4. Decorator
      Python
  5. E
    1. Element
    2. Entry Point
    3. Environment Variable
  6. F
    1. Fixture
    2. Flask App
    3. Foreign Key
  7. G
    1. Generic Client
  8. H
    1. HTTP Method
    2. HTTP Request
    3. Hash
      Concept
    4. Header
    5. Host Part
    6. Hypermedia
  9. I
    1. Idempotent
    2. Info Object
      Concept
    3. Instance Folder
  10. J
    1. JSON
    2. JSON Schema
  11. L
    1. Link Relation
  12. M
    1. MIME Type
    2. Microservice
    3. Migration
    4. Model Class
  13. N
    1. Namespace
  14. O
    1. ORM
    2. OpenAPI
      OpenAPI
    3. Operation Object
      Concept
  15. P
    1. Pagination
      Concept
    2. Path Parameter
      OpenAPI
    3. Primary Key
    4. Profile
  16. Q
    1. Query
    2. Query Parameter
  17. R
    1. Regular Expression
    2. Request
    3. Request Body
    4. Request Object
    5. Resource
    6. Resource Class
    7. Resource Representation
    8. Response
    9. Response Body
    10. Response Object
    11. Rollback
    12. Routing
    13. Route
      Routing
    14. Row
  18. S
    1. SQL
    2. Serialization
    3. Static Content
    4. Swagger
      tool
    5. System User
  19. T
    1. Table
    2. Test Setup
    3. Test Teardown
  20. U
    1. URI
    2. URL Template
    3. Uniform Interface
    4. Unique Constraint
  21. V
    1. View Function
    2. Virtualenv
  22. W
    1. WSGI
    2. Web API
    3. Web Server
  23. Y
    1. YAML
      Language
Ratkaistu: / tehtävää

Implementing API Clients

In this final exercise we're visiting the other side of the API puzzle: the clients. This exercise material has two parts: in the first one we make an automated machine client (Python script). In the second part we'll go over another means of communication between services using task queues with RabbitMQ.

API Clients with Python

Our first client is a map script that reads a map representations from local files, and then uploads their contents to the API server, or updates if the map already exists but is different.
Learning goals: Using Python's requests library to make HTTP requests

Preparations

Another exercise, another set of Python modules. We're using Requests for making API calls. Another module that is used in the latter half of the exercise is Pika, a RabbitMQ library for Python. Installation into your virtual environment as usual.
pip install requests
pip install pika
In order to test the examples in this material, you will need to run a new API. This API is a rather simple grid based map service that could be used to store e.g. video game maps. For the purposes of this course it only has three concepts: maps, observers, and obstacles. The API can be grabbed from Github. You may also want to run it with some basic data for testing:
pip install -e .
flask --app=gridmap init-db
flask --app=gridmap testgen
flask --app=gridmap run
You can also see the documentation at the Flasgger default location localhost:5000/apidocs/.

Using Requests

The basic use of Requests is quite simple and very similar to using Flask's test client. The biggest obvious difference is that now we're actually making an
HTTP request
. Like the test client, Requests also has a function for each
HTTP method
. These functions also take similar arguments: URL as a mandatory first argument, then keyword arguments like headers, params and data (for
headers
,
query parameters
and
request body
respectively). It also has a keyword argument json as a shortcut or sending a Python dictionary as JSON. For example, to get maps collection:
In [1]: import requests
In [2]: SERVER_URL = "http://localhost:5000"
In [3]: resp = requests.get(SERVER_URL + "/api/maps/")
In [4]: body = resp.json()
For another example, here is how to send a POST request, and read the Location header afterward:
In [5]: data = {"name": "Fancy Map", "height": 6, "width": 12}
In [6]: resp = requests.post(SERVER_URL + "/api/maps/", json=data)
In [7]: resp.headers["Location"]
Out[8]: '/api/maps/fancy-map/'

Request Deleted

We didn't show you how to send a DELETE request. As you might have guessed, this means we're going to ask you how to do it.
Learning goals: How to write a HTTP request using requests, a DELETE request in particular.

Assuming that the
host part
of the URL is stored in a constant called SERVER_URL, write a code line that deletes the album Hypnagogia by Evoken. Check the MusicMeta swagger documentation if you don't remember how.
Remember the artist name should be in lower case, while the album is written as-is (capitalized).
Write the code line below, using requests.
Varoitus: Et ole kirjautunut sisään. Et voi vastata.

Using Requests Sessions

Our intended client is expected to call the API a lot. Requests offers sessions which can help improve the performance of the client by reusing TCP connections. It can also set persistent
headers
which is helpful in sending the Accept header, as well as authentication tokens for APIs that use them. Sessions should be used as context managers using with statement to ensure that the session is closed.
In [1]: import requests
In [2]: SERVER_URL = "http://localhost:5000/"
In [3]: with requests.Session() as s:
   ...:     s.headers.update({"Accept": "application/json"})
   ...:     resp = s.get(SERVER_URL + "/api/maps/")
With this setup, when using the session object to send
HTTP requests
, all the session headers are automatically included. Any headers defined in the request method call are added on top of the session headers (taking precedence in case of conflict).

Basic Client Actions

Now that we know the basics of using Requests, we can look at the example properly. We're not going to show the full code here, only the parts that actually interact with the API (but you can download the full code later). We are going to go with a custom map representation for local files that uses the symbols "." for empty tile, and "#" for obstacle. Any remaining characters denote observers, and their details will be listed after the map itself. Map name is always on the first line, e.g.
Fancy Map
............
.a...##...b.
.....#......
........####
.c........d.
....##......

a,Fancy Observer A,6
b,Fancy Observer B,6
c,Fancy Observer C,6
d,Fancy Observer D,6
Admittedly this data format is not very good and we would very likely much better off just storing the same JSON locally that the API holds. We chose to use this data format mostly to demonstrate the idea of converting between two different representations of data when interacting with an API. That and also because we don't really want to implement an editor for the JSON data, whereas this format is at least somewhat editable with just a text editor.

Client Workflow

The client workflow is roughly as follows:
  1. GET the full map collection from the API
  2. Loop through local map files for
    • new maps
    • maps to update
  3. For each new map:
    1. Send a POST request to create the map
    2. Loop through the map and send a POST request to create each observer and obstacle
  4. For each existing map:
    1. GET the map's details from the API
    2. Calculate map dimensions from local file and compare to the API data, updating with PUT if different
    3. Loop through the map and compare each observer and obstacle to existing data
      • exists locally, absent on API: create with POST
      • absent locally, exists on API: remove with DELETE
      • exists on both: check for differences, update with PUT if needed
  1. Optionally: download all maps that we don't have locally.
If we wanted to be fancier with this whole thing, we would add modification date to maps on the API and then the client could see which side has newer information by comparing the timestamp from the API to the local file's last modified timestamp. In the event of API having newer information, it would simply reverse the above steps.
Because this is not a hypermedia client, there is a chance of API changes breaking the client. To avoid further complications, the client will include a check at the beginning that compares the server's API version to a local constant that indicates what API version the client was implemented for. If these differ, the user should review API changes, then update the code, and the API version constant accordingly to make sure changes do not cause errors.

Client Architecture

In the material we are going to focus on the part of the client that actually interacts with the API. In order to properly do so, we are going to decouple it as much as possible from the rest of the application logic. This is generally good practice as it allows you to change backends without having to modify everything about the client. The chosen structure for the code is to use a handful of classes to organize things:
Knowledge about the API is split as follows: The APIDataSource class knows the URIs used by the API and the Map class has an internal data format that is compatible with the API's resource representations. The subclasses of Map are mostly there to separate the loading logic into two classes that can both have their own __init__, for convenience. We could also just have two different load methods in the Map class instead. Another design would be to have two different data source classes that both output instances of Map. Either way there needs to be an agreement somewhere about how data in the client is mapped to resource representations used by the API.
The program flow is going to be defined by a handful of functions that utilize these classes.

Making a Generic Client Class

An easy starting point is to simply make a generic client class that works with any REST API. This is a relatively simple matter of creating a class with a constructor that creates a session and sets necessary headers and other information, and methods for sending the basic request types. To initialize a client, at mimimum a host address as needed, and possibly other information for authentication and TLS. We are going to leave header-based authentication as homework, but TLS for self-signed certificates will be supported by passing a file path.
import requests
from urllib.parse import urljoin

class APIDataSource:

    def __init__(self, host, ca_cert=None):
        assert host.startswith("http"), "No protocol in host address"
        self.host = host
        self.session = requests.Session()
        if ca_cert:
            self.session.verify = ca_cert
It's best to set the host address at the beginning. If the client needs to communicate with multiple APIs, it's a good idea to create a different instance of the client class for each of them, as they might also have different certicates or authentication. The assert at the beginning to ensure that either "http" or "https" was included in the host address is a sanity check that prevents errors in the future. If we wanted to be fancier, the client could also just add it automatically by guessing which one is used if it's missing (e.g. if ca_cert has been given, the connection is most likely going to use TLS). Setting a session's verify attribute will make requests check the host's identity against the specified certificate.
Basically all that's left is to add methods for each of the HTTP methods so that everything will work in a unified manner. Just like before, we are using assert statements to make checks, handling them will be someone else's problem.
    def _get(self, uri):
        response = self.session.get(urljoin(self.host, uri))
        assert response.status_code == 200
        return response.json()

    def _post(self, uri, data):
        response = self.session.post(method, urljoin(self.host, uri), json=data)
        assert response.status_code == 201
        return response.headers.get("Location")

    def _put(self, uri, data):
        response = self.session.post(method, urljoin(self.host, uri), json=data)
        assert response.status_code == 204

    def _delete(self, uri):
        response = self.session.delete(urljoin(self.host, uri))
        assert response.status_code == 204
These are intended to be internal methods of the client class. As we discussed earlier, the client class should know the URIs so that if there are changes in the API, all of them can be updated in the same place. The place in question will be a bunch of convenience methods that each either get data from the API or send data to it. For example, there will be a method called get_maps which makes a GET request to the API's /api/maps/ URI. When another part of the client code needs to have all of the maps, it will call this method, not the _get method directly. This way those parts of the code do not need to know the URI. The convenience method would look simply like:
    def get_maps(self):
        return self._get("/api/maps/")
Finally one point of interest in the client class is how the session is managed. Unlike in the earlier examples, the session is not used directly in a with statement. This is because we want to keep it around for multiple different methods. Instead, it is now necessary to explicitly close the session when the connection is no longer needed. Now, one could write a close method for the client class that closes the session, and then just remember to call it at the end. However, since the client class itself kinda does serve a similar purpose as a session, why not make the class itself compatible with context management? Making a class compatible with the with statement is quite simple, it simply needs to define two special methods: __enter__ and __exit__. The first defines what kind of an object is stored into the with statement variable, and the second what happens at the end. For our simple client class:
    def __enter__(self):
        return self

    def __exit__(self, exc_type, exc_value, exc_tb):
        self.session.close()
Now it's possible to write code like with APIDataSource(hostname) as api: to get an instance of the class and have the session always closed properly regardless of what happens inside the with block.

Comparing Data

The section above really covers all you need to know about writing REST API clients with Requests. This last section mostly aims to give you some idea of how to go about comparing data from two sources, one of which is an API. For these examples, we are assuming local map data has been read to instances of LocalMap as described earlier. If you want to see how these are parsed, refer to the full example code. Let's start by showing the basics of the Map class:
class Map:

    def __init__(self):
        self.name = ""
        self.slug = ""
        self.width = 0
        self.height = 0
        self.observers = {}
        self.obstacles = set()

    def __hash__(self):
        return hash(self.slug)

    def __eq__(self, other):
        return self.slug == other.slug

    def __str__(self):
        return self.name
The maps are initialized empty but the corresponding __init__ in each of the subclasses takes are of setting basic attributes. For API side maps we don't actually populate the observers and obstacles unless needed. If you check the documentation of /api/maps/, it only contains the basic information of a map, not its contents. As the contents are only relevant when a map exists on both sides, we don't need to GET that information for the other two cases. There's also some class magic once again. By setting the __hash__ and __eq__ methods we are basically saying that any instance of the class is the same as another instance if their uniquely identifying string attribute, slug, is the same. This makes writing comparison expressions easier.
Since our client's purpose is to only synchronize data one way, from local to remote, it is sufficient to check which maps exist locally, and which of them also exist remotely. For observers on a map we still need to do a two-way check, so we are going to actually cover both scenarios. For maps we need to first have a list of Map instances from each source. Since /api/maps/ returns the entire map collection from the API, we just need to create RemoteMap instances for each object in the JSON document. If you look at this class definition, all that is needed is to pass the map object to the constructor:
class RemoteMap(Map):

    def __init__(self, document):
        super().__init__()
        self._read_map_info(document)

    def _read_map_info(self, document):
        for key, value in document.items():
            setattr(self, key, value)

def read_remote_maps(api):
    maps = []
    document = api.get_maps()
    for map_data in document["maps"]:
        maps.append(RemoteMap(map_data))
    return maps
The use of setattr here to streamline setting attributes is possible because we decided in the design stage that Map will have properties that are compatible with the API data, i.e. it will have the exact same names for attributes. Again refer to the full example if you want to see how this is done for local map files. Once we have a list of Map instances from each source, they can be compared quite simply. This comparison takes advantage of the fact that we made it possible to make two different instances of the class identical when their slug matches:
def compare_maps(api, local, remote):
    for map_obj in local:
        if map_obj in remote:
            remote_obj = remote[remote.index(map_obj)]
            remote_obj.update_from_api(api)
            if map_obj.attribute_difference(remote_obj):
                api.update_map(map_obj.slug, map_obj)
            compare_observers(api, map_obj, remote_obj)
            compare_obstacles(api, map_obj, remote_obj)
        else:
            api.create_map(map_obj.serialize_json())
            for observer_data in map_obj.serialize_observers():
                api.create_observer(map_obj.slug, observer_data)
            for x, y in map_obj.serialize_obstacles():
                api.create_obstacle(map_obj.slug, x, y)
As discussed earlier there are only two branches here: either we check for differences between local map and remote map, and update accordingly, or create a new map on the API side if a map we have locally was not found there. The latter case is obviously much more straightforward, as all we need to do is to serialize the data and do the necessary API calls with the data.
The update branch is a little more interesting because now we have two instances of the same map, and need to figure out what changes are needed to make them equal. We need to start by adding the data about observers and obstacles to the remote map, using its update_from_api method. Looking at the API documentation we can see that there is no way to simply submit a list of observers and obstacles with the PUT request that udpates basic information about maps. This means the individual API calls need to be figured out at the client end. We are going to look at the observer update process more carefully. It is more interesting because there are four possible outcomes for each observer:
  1. it's new, i.e. only exists on the local map;
  2. it has been moved or its vision range has changed, API side needs to be updated;
  3. it has been removed, i.e. it only exists on the remote map;
  4. it's the same, no action needed
To find these, the Map class has a method for comparing two instances. When reading the code it's good to recall that we are comparing two dictionaries where observer slugs are used as keys, and the entire data of an observer as the value. We made it a method of Map instead of a function that would compare two instances of Map largely because this way functions that are outside of Map don't need to know how its internals work.
    def observer_difference(self, other):
        new = []
        changed = []
        gone = []
        for slug, observer_data in self.observers.items():
            if slug in other:
                if any(observer_data[key] != other[slug][key] for key in observer_data):
                    changed.append(observer_data)
            else:
                new.append(observer_data)

        for slug in other:
            if slug not in self.observers:
                gone.append(slug)

        return new, changed, gone
Once we have the three lists returned by this method it's rather simple to call the API for each element to POST, PUT, and DELETE accordingly. In the last list it's sufficient to only have the observer slug as no data is needed when deleting. As the obstacles are simply coordinate pairs in sets, similar difference comparison for them is very simple. The - operator is a shorthand for using set.difference.
    def obstacle_difference(self, other):
        new = self.obstacles - other
        gone = other - self.obstacles
        return new, gone
The functions compare_observers and compare_obstacles simply submit the lists returned from these methods. You can find the boring details from the full code example below.
gridmap_client.py

DIY File Sync

Synchronizing files with e.g. cloud storage is an important part of everyday life. Being able to access files from multiple devices is increasingly important, and similarly the importance of backups has never been higher. Since you never know when the clouds are going to explode, we figured it might be a fun exercise to write our own file synchronization API. Since this is the API client exercise, we wrote the API. You write the client.
Learning goals: Comparing remote and local data, and deciding which is more relevant. Uploading binary files to APIs.

Preparation:
We have a new API to share with you. Please grab it from Github, and test your client on your own computer properly before trying to submit it to this task. This task uses an API deployed in Rahti, and will consume the course project's resource units whenever you submit an answer.
git clone https://github.com/UniOulu-Ubicomp-Programming-Courses/pwp-file-sync-api.git
As for your code, this time we are requiring that it has a command line interface that we have specified for you. Therefore we are also providing the code for parsing the command line arguments. You must use this in your code unmodified. The checker will also write the required API key into the .apikey file, so your code should read it. When testing locally, you can omit the key. The API only requires a key if it's configured with one.
if __name__ ==  "__main__":
    parser = argparse.ArgumentParser()
    parser.add_argument("folder", help="Path to folder containing local files")
    parser.add_argument("bucket", help="Name of the API side bucket")
    parser.add_argument("--host", dest="host", help="API host address")
    parser.add_argument("--ca", dest="ca", default=None, help="CA certificate file")
    try:
        args = parser.parse_args()
    except SystemExit:
        # This except is needed for the checking to work
        pass
    else:
        try:
            with open(".apikey") as keyfile:
                key = keyfile.read().strip()
        except FileNotFoundError:
            key = None
            
        # Your main code starts here
You may also want to look at the API documentation which you can do by running the API and checking localhost:8000/apidocs/, just like Exercise 3.

Requirements:
Your client must perform a synchronization between a local file system folder, and a "bucket" in the API. As the result of the sync, both sides should have the latest information about the state of the data. The handling of each file depends on its current state, as follows:
  • File exists on both ends:
    • If file checksums differ: update the content of the file to match the side that has the later modification time
  • File exists only in the API side:
    • If its modification time is after the last sync timestamp, or this is the first sync: download the file to local folder
    • If its modification time is before the last sync: delete the file from the API
  • File exists only locally:
    • If its modification time is after the last sync timestamp, or this is the first sync: upload the file to the API
    • If its modification time is after the last sync: delete the local file
The last sync referred to here is something your client must keep track of between runs. This must be implemented by reading and writing the last synchronization timestamp into a file called .lastsync in the data folder. This file indicates when the folder was last synchronized. The checking program will write these files in advance when preparing test cases using the output from datetime.isoformat(), so your client must be able to read these files.

Useful Informaton:
In case you have not worked with binary files and file metadata in Python too much, here are some pointers on how to handle them. First of all it is easiest to handle all files in binary mode, even if they are text files (excluding the meta files .apikey and .lastsync). Opening files for reading and writing is done by adding "b" to the mode, i.e. "rb" and "wb" respectively.
In order to get modification times from local files, you need to use os.stat, and the attribute st_mtime from the resulting object. This time will be given as a what's called timestamp by the datetime module, which means you need to do some conversion as the modification times in the API are given as isoformat output. Getting modification time from a file at path:
os.stat(path).st_mtime
You will also need checksums when detecting whether a file has changed. We are using MD5 checksums from hashlib. You can get the checksum of a binary string (i.e. a file's content when read with "rb") with
hashlib.md5(content).hexdigest()
Finally, in order to transfer binary data in an HTTP request, it is usually converted into some form of ASCII string to avoid encoding related issues. The FileSync API uses Base64 encoding for the content field.
# encode when sending
base64.b64encode(binary_content).decode("utf-8")

# decode when reading
base64.b64decode(base64_content)
The easiest way to test that your files travel safely is to drop a small image into a folder, sync that folder into an API bucket, and then sync the same bucket from the API to a new folder. If the image still looks the same in the new folder, your data transfer works correctly.

Sallitut tiedostojen nimet *.py

Varoitus: Et ole kirjautunut sisään. Et voi vastata.

TLS Authentication

From this point on you will need to communicate with a RabbitMQ server. If you want to run the examples as they are, you need to have it running on your own computer. Simply installing and using default settings will be fine. However, we are also providing a live RabbitMQ server in the CSC cloud that you can use. Since it is publicly available, some measures are in place to increase security. First you will need some keys.

Decryptify

This task is a prepartion for the final boss of this exercise. You need to get an encrypted file, and decrypt it with the tools provided to you. This file contains credentials that you'll need to access the course's API server and RabbitMQ servers.

What to do
In order for you to complete the last part of this exercise, we have set up a server environment with two main components: an API server and a RabbitMQ server. In order to keep both of those secure in the wide open internet, we needed to also set up API keys and passwords. These have been prepared for each group. As sending keys and passwords in plain email would be a bad example, we have instead prepared encrypted files that contain them. In order to obtain your keys, you have to complete two steps:
  1. Have someone from your group email to the course email list, requesting the encrypted file
  2. Read the encrypted file with the small script provided at the Resource section of this task.
Once you have your keys, make sure to treat them like your own passwords.

Answering this task:
This task is here just to confirm that you were able to open the encrypted file. One of the pieces of data in the file is the API server's IP address. Type the address into the answer box to complete this task.
Resources:
You need to install pycryptodome in order to use this script.
pip install pycryptodome
If the script is in the same folder as your encrypted file, unlock it by running and inputting your encryption key when prompted. The script will then print the contents of the encrypted file.
python pwp_decrypt.py my_secrets.bin
pwp_decrypt.py
import sys
from getpass import getpass
from Crypto.Cipher import AES

if __name__ == "__main__":
    try:
        fname = sys.argv[1]
    except IndexError:
        print("Specify file to decrypt as command line argument")
    else:
        with open(fname, "rb") as f:
            nonce = f.read(16)
            tag = f.read(16)
            ciphertext = f.read(-1)

        key = getpass("Input key:").encode("utf-8")
        cipher = AES.new(key, AES.MODE_EAX, nonce)
        print(cipher.decrypt_and_verify(ciphertext, tag).decode("utf-8"))

Type the API's IP address as your answer.
Varoitus: Et ole kirjautunut sisään. Et voi vastata.

Using TLS

TLS (Transport Layer Security) is a rather important topic in the internet world as it is the vehicle that allows sending secrets like API keys encrypted. As there are other courses that will give you a much better understanding into what TLS involves, we will cover it rather briefly and mostly focus on what you need to know to access the course servers that use TLS. We are only covering this subject because without TLS, all traffic including keys and passwords would be plain text.
Generally speaking, when you connect to a server using TLS you obtain its certificate that has two purposes: 1) it can be used to verify that the server is who it says it is; 2) to encrypt communication between your client that holds the certificate, and the server that holds the corresponding private key. We are mostly interested in the latter part for the purposes of this course in order to keep things a little bit simpler.
Our servers are using self-generated certificates which means no client will trust them by default. This is more or less the only option because we do not have hostnames for them, only IPs. If you point a browser to the API you will get a warning along these lines:
Browser screenshot of security warning with the error code NET::ERR_CERT_AUTHORITY_INVALID
Security warning that says the certificate was not issued by any trusted authority
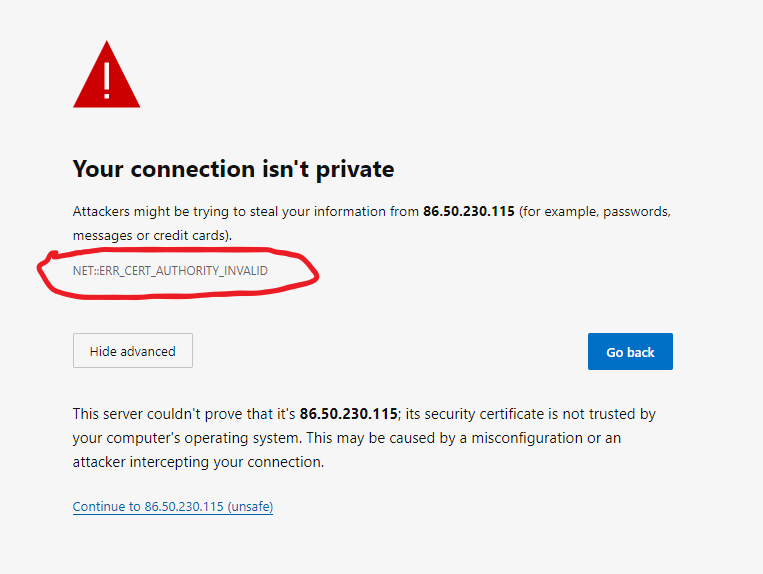
There are two ways around this when implementing your own TLS clients: you can download the certificate or its associated certificate authority certificate (aka issuer certificate), and configure your client with it to make it trusted, or you can just instruct the client to ignore the issue. The latter option is not recommended, so we are using our own "certificate authority", as discussed earlier in the CSC instructions page. Simply grab this file and use it whenever you need to instruct a client to trust a certificate:
pwp-ca.crt

TLS with Requests

When using the Requests module, things are relatively straightforward as it basically handles everything. However it will give you an error if you try to connect to a server with a self-signed certificate and will drop the connection. To get around the issue, include the optional verify argument:
requests.get("https://some.whe.re/api/", verify="/path/to/ca/file")
This instructs requests to verify the server's identity against the specified certificate.

TLS Peer Verification

In addition to encryption, our RabbitMQ server also uses TLS peer verification. In order to be able to connect to the server, your client must have its own certificate that is signed by the same CA certificate as the server's own certificate. As we are also using passwords this is not necessarily needed but it doesn't hurt either. Most importantly, it is a good opportunity to introduce yet another concept that you might find useful when making real life deployments. Just like how your client needs the server to prove its identity in order to trust it, peer verification does the same from the server's side - only clients with valid certificates are allowed to connect.
Once again export your group name into an environment variable with
export PWPGROUP=<group_name>
In order to obtain a client certificate (or a server certificate, it's more or less the same process), you must first generate a private key. Do not use the same private key you used for the SSH key! Generate a new key file with:
openssl ecparam -name prime256v1 -genkey -noout -out client.key
As usual, this key file must be treated with utmost security considerations. Ideally it should never leave the machine where it was generated. Once you have your key, you can generate a Certificate Signing Request (CSR). This is a file that you will send to your Certificate Authority for signing in order to obtain your certificate. Regardless of whether you are dealing with our course's CA, or a real one, you will always need to do this. The generation will ask you a bunch of questions and we do not care too much about what you put there, but a real CA might so please pay attention to any instructions. The most importat one is the FQDN where you should normally put your domain name. Anyway, to start the process:
openssl req -new -sha256 -key client.key -out $PWPGROUP.csr -addext "extendedKeyUsage=clientAuth"
This will output the .csr file. Send this file to the course email list. In return you will get a certificate file with the same name and the .crt extension. This is the certificate file that you will use when setting up your client to communicate with our RabbitMQ server.

TLS with Pika

In order to configure Pika to connect with TLS, you need a little bit more work and the help of the built-in ssl module. Pika needs to be given an SSL context which you can build with the ssl module. In our case we are simply going to build a context that uses the CA certificate to verify the receiving server. These lines will prepare the context. The last one specifies the client certificate to send for peer verification.
import ssl
context = ssl.create_default_context(cafile="/path/to/ca/file")
context.verify_mode = ssl.CERT_REQUIRED
context.load_cert_chain(
    "/path/to/client/cert",
    "/path/to/client/key",
)
Once you have your context, it is simply passed to the Pika connection along with your credentials. The following example assumes you have username, password, host, port, and vhost defined somewhere earlier in the file.
credentials = pika.PlainCredentials(username, password)
connection = pika.BlockingConnection(pika.ConnectionParameters(
    host,
    port,
    vhost,
    credentials,
    ssl_options=pika.SSLOptions(context)
))
After this change to forming the connection, the rest of the examples work just like you were using a default RabbitMQ installation without credentials and TLS.

Managing Secrets

Before moving on we need to discuss the topic of how to make secrets available to your code. As code these days tends to end up in Github - particularly for your project - you should never include any credentials in your code. Not only is this incredible insecure, it also makes deployment harder. Generally speaking there are two primary ways to convey secrets to an application:
  1. Configuration files
  2. Environment variables
In some scenarios command line arguments and interactive prompts can also be considered, but usually only for human users. When making automated machine clients, picking one of the two primary methods is recommended. In case of Flask, using a configuration file as explained in Flask API project example is the recommended way. For clients that simply use Requests you can make your own configuration file solution with e.g. Python's configparser, or use environment variables.
Environment variables are set with the set or export command depending on your operating system. Python access them through the environ dictionary in the os module, or the getenv function if you want to use defaults instead of getting an error when a variable is not found
username = os.environ["PWP_RABBIT_USER"]
password = os.getenv("PWP_RABBIT_PASSWD", "notsafe")
You can also remove the variable after retrieving provided unsetenv is supported on your system. This would be done just like removing and retrieving a key from any dictionary, with the pop method:
username = os.environ.pop("PWP_RABBIT_USER")
While the variable will still exist after you exit the application, it will not be available to any subprocesses etc. during the application's runtime so if you are doing something fun like, I don't know, running student code in order to check whether it's correct, it is probably a good idea to not let those processes access any important environment variables.
In general configuration files are easier to manage because with environment variables you still need to write them into the environment somehow, and this usually happens from a file so might as well use a configuration file at that point. The most important thing about configuration files is to just make sure they are only readable by the user your application is running as. While full web server setups usually use configuration files, in container deployments it can be more straightforward to configure the container launchup to write secrets into environment variables. Choose an approach that suits your needs. Please see the extra part of exercise 3 for more information on your options when using containers.

Task Queues and Publish/Subscribe

Major part of the course has involved direct communication between the API and client where the client accesses the API through HTTP requests and gets mostly immediate responses. By that we mean the client expects to get whatever it was looking for as a direct response to its request. However, this is certainly not the only way of communication between services and clients or other services. In this last segment we are taking a peek at using task queues and publish/subscribe, two means of communication that are more asynchronous in nature.
This section will use RabbitMQ, a message broker commonly used to implement communication between services. We have provided you a running instance of RabbitMQ that you can access with credentials. You will be informed via course channels about how to get access. Feel free to use this instance to test examples, complete tasks, and implement these messaging protocols in your project if you want to go that way.
Our way of interacting with RabbitMQ is the Pika module which offers a Python interface for connecting to RabbitMQ.

Task Queues

Task queues are used to "place orders" for computational tasks that will be run by separate workers. Unlike API calls that would be targeted to a specific service by its address, tasks are sent to the message broker. As it is a queue, the first eligible worker to notice the message will undertake the task, marking it as being processed. They are generally used when you have lots of heavy tasks that can be run independently of each other, or tasks that need to be run in isolation. Worker pools are usually easy to scale as all a worker needs to do is connect to the message broker and it's ready to go. Usually workers don't have their own persistent storage.
For a real life example, Lovelace uses task queues when checking code submissions. This is a use case where task
queues fit like a glove:

Sensorhub Statistics

As to our code example, we're going to implement a feature to get statistics from a sensor. Because calculating statistics can be time-consuming, they will be calculated on separate workers. For the purposes of this example we are only calculating the mean value of measurements, but you could add all sorts of statistics without changes to the communication protocol. In our simple plan, only one set of stats will exist for a sensor at any given time. Here is a summary of how this will be implemented:
The full API can be found from Github. We made a separate fork from the one used in the previous exercise to keep them separate. Grab it with Git:
git clone https://github.com/UniOulu-Ubicomp-Programming-Courses/pwp-senshorhub-ex-4.git sensorhub-stats
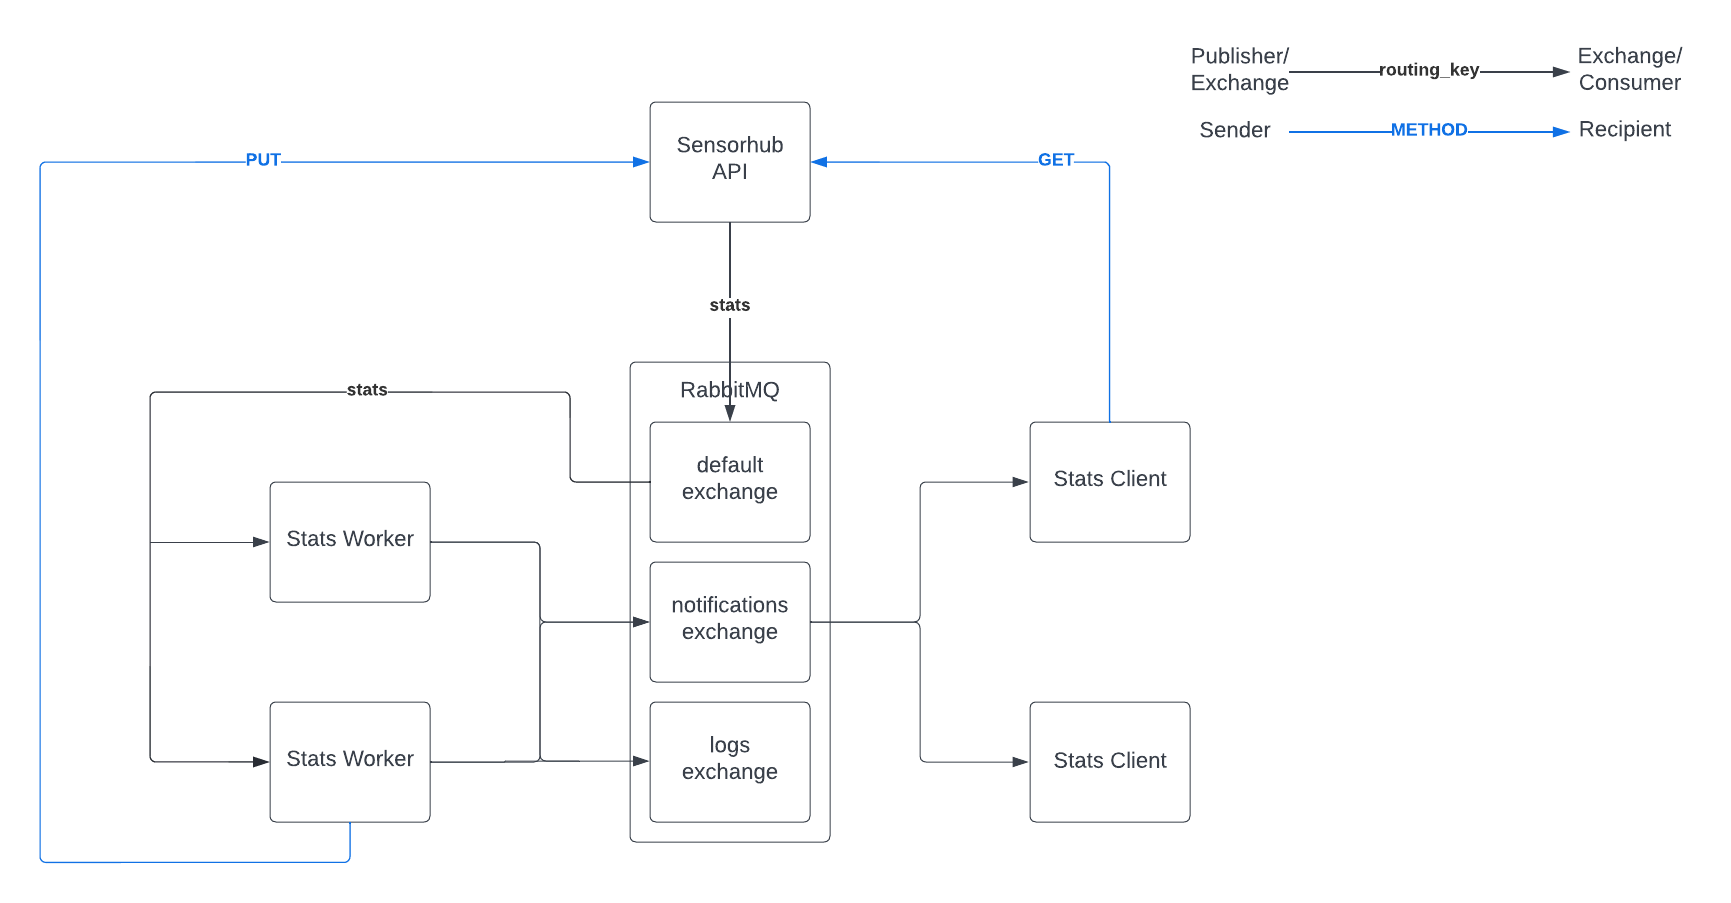
The full system that we are implementing in this material is presented by the diagram below. Details about each component can be found in the sections below. Our system will have one API server and one RabbitMQ server, but can have any number of workers and clients connected to it.
Diagram showing communication between API server, RabbitMQ, workers, and clients
Communication diagram with two workers and clients connected.

Statistics Model

The stats model doesn't have anything that wasn't covered in Exercise 1, but it's shown here to give you an idea what we are working with.
class Stats(db.Model):

    id = db.Column(db.Integer, primary_key=True)
    generated = db.Column(db.DateTime, nullable=False)
    mean = db.Column(db.Float, nullable=False)
    sensor_id = db.Column(
        db.Integer,
        db.ForeignKey("sensor.id"),
        unique=True, nullable=False
    )

    sensor = db.relationship("Sensor", back_populates="stats")
It also has serialize, deserialize, and json_schema methods that are not shown here. A relationship pointing to this model will also be added to the Sensor model.
    stats = db.relationship("Stats", back_populates="sensor", uselist=False)

Statistics Resource

The statistics resource will look like this.
class SensorStats(Resource):

    def get(self, sensor):
        if sensor.stats:
            body = sensor.stats.serialize()
            return Response(json.dumps(body), 200, mimetype=JSON)
        else:
            self._send_task(sensor)
            return Response(status=202)

    def put(self, sensor):
        if not request.json:
            raise UnsupportedMediaType

        try:
            validate(
                request.json,
                Stats.json_schema(),
                format_checker=draft7_format_checker
            )
        except ValidationError as e:
            print(e)
            raise BadRequest(description=str(e))

        stats = Stats()
        stats.deserialize(request.json)
        sensor.stats = stats
        db.session.add(sensor)
        db.session.commit()
        return Response(status=204)

    def delete(self, sensor):
        db.session.delete(sensor.stats)
        db.session.commit()
        return Response(status=204)
There are mostly two things to note here. GET handling depends on whether stats currently exist or not - the mystery method _send_task will be called when stats are not available. We are using PUT to set the stats for the sensor regardless of whether they existed previously or not. This is done to deal with the situation where multiple GET requests are sent to the stats resource before the calculation service has finished processing. It will still result in stats being calculated multiple times, but we will only have one result at the end (the latest one). This issue could be addressed by adding suitable model class fields and logic to mark sensor's stats as being processed.

Sending Tasks

The process of sending a task has the following steps:
  1. Gather the data to be sent
  2. Form a connection to the RabbitMQ broker and get a channel object
  3. Declare a queue
  4. Send the task to the declared queue
The worker is going to need two pieces of information to complete its task: list of measurement values, and how to send the results back. The data can be obtained easily by forming a list of measurement values from the sensor's measurements relationship (this could be done in a more optimized manner, but we're keeping it simple). We also already have an answer for the latter part: we can include a hypermedia control in the payload. We'll also add the sensor's name (unique) for quick identification purposes later. With these things in mind we can look at the _send_task method.
    def _send_task(self, sensor):
        # get sensor measurements, values only
        body = SensorhubBuilder(
            data=[meas.value for meas in sensor.measurements],
            sensor=sensor.name
        )
        body.add_control_modify_stats(sensor)

        # form a connection, open channel and declare a queue
        connection = pika.BlockingConnection(
            pika.ConnectionParameters(app.config["RABBITMQ_BROKER_ADDR"])
        )
        channel = connection.channel()
        channel.queue_declare(queue="stats")

        # publish message (task) to the default exchange
        channel.basic_publish(
            exchange="",
            routing_key="stats",
            body=json.dumps(body)
        )
        connection.close()
We are using the default exchange here to make the example simple. It allows us to declare queues freely. The queue name "stats" is given as routing_key argument to basic_publish. This will publish the message to the "stats" queue so that it can be picked up by workers who are consuming the "stats" queue. In order to be more efficient with connections, the middle part could be done on module level only once.
With this our API side is ready. It will now send requests for stats to the queue. You can already run the server and visit any stats URL. However, as there are no consumers for the queue, the task will simply sit there until a consumer shows up.

Statistic Worker

Next step is implementing the worker that consumes the task queue. To keep the example simple, this will be a Python program that runs from the command line and keeps serving until it is terminated with Ctrl-C. The workflow is roughly:
  1. Define a handler function for received tasks
  2. Connect to the RabbitMQ server and get a channel
  3. Declare the "stats" queue
  4. Enter the consuming loop to serve tasks
Once a task comes in, the following will occur:
  1. Check that the task has all we need (data and "edit" control)
  2. Calculate the stats and add a timestamp
  3. Use the hypermedia control "edit" to check where and how to send the stats
  4. Regardless of result, acknowledge the task as completed
In the first implementation round we won't implement handling for errors. All tasks will be acknowledged regardless of result because we don't want them to go back to the queue. For istance, if we were to receive a task without a usable "edit" control, the task simply cannot be completed, and returning it to the queue would be pointless. In the second implementation round we will add a mechanism to notify other parts of the system that there was a failure in comleting the task.
The full code is available below. Note that it includes the second implementation round additions as well. The example snippets below will only have pass in these spots.
stats_worker.py

Setting Up and Running

First we are going to look at the main function that will connect to the message broker, and start consuming the "stats" queue. Most of this is quite similar to what we did on the sending end in the API side. Prints in this and other functions are simply there to make it easier to follow what is going on. In real life these should be replaced by using the logging module or other logging facilities.
def main():
    connection = pika.BlockingConnection(pika.ConnectionParameters(BROKER_ADDR))
    channel = connection.channel()
    channel.queue_declare(queue="stats")
    channel.basic_consume(queue="stats", on_message_callback=handle_task)
    print("Service started")
    channel.start_consuming()
The call to basic_consume is where we configure what queue will be consumed and how this worker will handle tasks. Note that we are not using auto_ack because we want to be sure our tasks are not lost in void if the worker dies or falls off the network in the middle of processing. This means the task handler needs to acknowledge the message when it has finished processing. With this setup we are ready to implement the actual logic for handling tasks.

Task Handler

The task handler in this case is the function that is responsible for parsing the task from the received message, calculating the statistics, and sending the response back in the designated manner (a PUT request to the address included in the message). If our workers handled more than one type of task, this function's role would be to parse the task and call the appropriate processing function. The code is presented below with comments for handling steps.
def handle_task(channel, method, properties, body):
    print("Handling task")
    try:
        # try to parse data and return address from the message body
        task = json.loads(body)
        data = task["data"]
        sensor = task["sensor"]
        href = API_SERVER + f"/api/sensors/{sensor}/stats/"
    except KeyError as e:
        # log error
        print(e)
    else:
        # calculate stats
        stats = calculate_stats(task["data"])
        stats["generated"] = datetime.now().isoformat()

        # send the results back to the API
        with requests.Session() as session:
            resp = session.put(
                API_SERVER + href,
                json=stats
            )

        if resp.status_code != 204:
            # log error
            print("Failed PUT")
        else:
            print("Stats updated")
    finally:
        # acknowledge the task regardless of outcome
        print("Task handled")
        channel.basic_ack(delivery_tag=method.delivery_tag)
We set the call to the statistics function in a way that it returns a dictionary of whatever stats it was able to calculate, and we add a timestamp afterward. The data is sent back to the API with a PUT request as we designed. Also like we discussed earlier, there's a finally clause in the try structure that will, regardless of what happens, always acknowledge the message.
With this we have a fully operational system where clients can now request stats from the API, and those stats will be generated by the worker. However, if we have really heavy calculations that can take a long time, how would the client know when to check back? Similarly, how will the rest of the system know if something went wrong so that developers can start working on how to fix it?

Publish / Subscribe

The other topic of this material is broadcasting with publish / subscribe. Whereas with task queues only one recipient will consume the message, in publish / subscribe the message will be delivered to all consumers. This communication method is useful when sending events to the system in situations where we do not know the exact recipient, and/or there is multiple of them. In our example we can use it in two ways:
  1. We can broadcast an event when statistics calculation has been completed, and this can be picked up by some notification service to let the user know that the statistics they ordered are ready.
  2. We can broadcast log events so that system admins can notice problems
We can achieve this by creating two exchanges with the fanout type: one for notifications and one for logs. Services that are interested in those can then listen on the exchange of their choice.

Changes to Worker

The worker will need a couple of changes to fulfill these new requirements. The file provided earlier has these changes already included.

Setting Up Exchanges

First we need to introduce the exchanges in our main function. We also need to make the channel globally available. We're just going to be lazy and use the global keyword to achieve this, but generally it would be better to e.g. turn the worker into a class. The changed main function is shown below
def main():
    global channel
    connection = pika.BlockingConnection(pika.ConnectionParameters(BROKER_ADDR))
    channel = connection.channel()
    channel.exchange_declare(
        exchange="notifications",
        exchange_type="fanout"
    )
    channel.exchange_declare(
        exchange="logs",
        exchange_type="fanout"
    )
    channel.queue_declare(queue="stats")
    channel.basic_consume(queue="stats", on_message_callback=handle_task)
    print("Service started")
    channel.start_consuming()
Besides adding the exchanges, the rest is the same. Declaring these new exchanges doesn't interfere with the previous functionality in any way. Also just like queues, exchange declarations are idempotent, and should be declared at both ends.

Broadcast Functions

Once we have the exchanges, we can write functions that will publish to them. We'll make one for the notifications, and another one for logs. The same basic_publish method that was used on the API side to send the task is also used here, but this time we are providing the exchange argument instead of routing_key.
def send_notification(sensor):
    channel.basic_publish(
        exchange="notifications",
        routing_key="",
        body=json.dumps({
            "task": "statistics",
            "sensor": sensor,
        })
    )

def log_error(message):
    channel.basic_publish(
        exchange="logs",
        routing_key="",
        body=json.dumps({
            "timestamp": datetime.now().isoformat(),
            "content": message
        })
    )
After these functions are in place, all that's left is to replace some of the prints with calls to these functions, which you can see in the final code.

Client Example

For the client we are going to make one important shortcut: the client will be allowed to connect and listen on the notifications exchange directly. In a real setup we probably should not be doing this directly, but we are already running three Python programs when we're done, and don't want to add any more intermediate steps to this example. We are going to implement a very simple client. It's going to take a sensor's name as command line argument, send a request to stats and then print them out when they are ready.
stats_client.py

Requesting Stats

The core function is the one that requests stats from the API. This function can do one of two things when it receives a successful response (i.e. in the 200 range):
def request_stats(sensor):
    with requests.Session() as session:
        stats_url = API_SERVER + f"/api/sensors/{sensor}/stats/"
        resp = session.get(
            stats_url
        )
    if resp.status_code == 200:
        print(resp.json())
    elif resp.status_code == 202:
        try:
            listen_notifications()
        except StopListening:
            sys.exit(0)
    else:
        print(f"Response {resp.status_code}")
Under the elif branch we go into the listen mode by calling a function which we'll introduce next. This is also done under a try statement that catches a custom exception which we can use inside the handling logic to notify that we are done listening.

Listening In

In order to listen to notifications, the client needs to undergo a setup process that is quite similar to the one done by the stats worker. There's just a couple key differences because we are listening in on a fanout type exchange.
This is almost directly from the third RabbitMQ tutorial:
def listen_notifications():
    connection = pika.BlockingConnection(pika.ConnectionParameters(BROKER_ADDR))
    channel = connection.channel()
    channel.exchange_declare(
        exchange="notifications",
        exchange_type="fanout"
    )
    result = channel.queue_declare(queue="", exclusive=True)
    channel.queue_bind(
        exchange="notifications",
        queue=result.method.queue
    )
    channel.basic_consume(
        queue=result.method.queue,
        on_message_callback=notification_handler,
        auto_ack=True
    )
    channel.start_consuming()
When we declare a queue without a name, RabbitMQ will generate a queue name for us. Also if it's set to exclusive, it tells RabbitMQ to delete the queue once we disconnect from it. The generated name is available through the response we get from queue_declare. Using that we can bind the queue to the "notifications" exchange. After that we just need to start consuming, and pass any notifications in the channel to our handler.

Handling Notifications

When a notification is received, the client needs to check that it's valid, and then determine if it was the notification we are looking for. In our current designs nofitications for all sensors are sent through the same exchange with no routing key, so it's up to the consumer to figure out if it is interested in the notification. Once we get notification for the sensor we requested stats for, the client can send a new GET request to the API to retrieve the stats. The notification handler code is shown below:
def notification_handler(ch, method, properties, body):
    try:
        data = json.loads(body)
        notification_for = data["sensor"]
    except (KeyError, json.JSONDecodeError) as e:
        print(e)
        raise StopListening
    else:
        if notification_for == sensor:
            href = API_SERVER + f"/api/sensors/{sensor}/stats/"
            with requests.Session() as session:
                resp = session.get(href)

            if resp.status_code == 200:
                print(resp.json())
            else:
                print(f"Response {resp.status_code}")
            raise StopListening
The sensor variable comes from the module level - it was set when we read its value from sys.argv. As discussed previously, this function can raise StopListening exception when either an error is encountered, or we have successfully obtained the stats that were initially requested.

Certified API User

This task is a bit of final exam on the topic.
Learning goals: Interacting with a hypermedia API and RabbitMQ with an automated client.

What to do
The end goal of this task is quite simple. You need to obtain a "certificate" that proves you have accessed the system correctly. Then you simply return the JSON file that contains your certificate and the checker will confirm its validity. This basically involves the following steps:
  1. Access the API to request your certificate
  2. Use the hypermedia response to allow your client to listen to notifications from the certificate worker
  3. Once your certificate is ready, access the API again using the address in the notification to download it
Because we are a little bit evil, we made the time it takes your certificate to be generated random from a few seconds to a couple of hours, and the storage time of the certificate very short. That is to say, you need to actually implement a client that does the whole process by itself so that it can grab the certificate immediately when it's ready.
We also did not document the API, so you need to rely on the hypermedia contents to navigate it. Just like previous examples, the entry point is /api/. Checking out the namespace URL is recommended to get to know what link relations are used by the API.
Configuring your client
Both the API and RabbitMQ are secured. You need the keys from the previous task to access them. The API address is also in the same file. The RabbitMQ address can only be found from the hypermedia response you get when requesting your certificate. Use a configuration file or environment variables to make the secrets available to your client. When sending requests to the API, the key goes into the Pwp-Api-Key header.
Answering the task
Answering this task is simple. Once you are able to obtain a certificate, save the entire document to a file and upload it. The JSON document should have three properites: group, certificate, and generated. The checker will validate the certificate.
API resources (note that you cannot access directly the RabbitMQ)
Name Resource Methods Description
root /api/ GET API entry point.
Group Collection /api/groups/ GET List of groups with their respective URLs.
Group Item /api/groups/{group:group}/ GET Information about a single group. Provide information on how to access the certificate collection of the group.
Certificate Collection /api/groups/{group:group}/certificates/ GET, POST List of certificates of a group. This resource gives information on how to apply for a new certificate. POST method with adequate JSON structure in the request body is used to apply for a new certificate. POST response if succesful is 202 with empty body. In order to access the new certificate you need a token. The token is distributed by RabbitMQ and hence, you would need to have adequate listener. Parameters necessary to set up the listener is also in the GET body response. Check the /link-relations and /profile for more information on how to compose the request.
Certificate Item /api/groups/{group:group}/certificates/{token}/ GET Get a specific certificate. Token is generated in RabbitMQ and is valid for a few minutes.
Link Relations /link-relations/ GET HTML document giving info on the different link relations in the API server.
Profile /profile/ GET Provides info about the properties of the different resources received.
Varoitus: Et ole kirjautunut sisään. Et voi vastata.
?
API Blueprint is a description language for REST APIs. Its primary categories are resources and their related actions (i.e. HTTP methods). It uses a relatively simple syntax. The advantage of using API Blueprint is the wide array of tools available. For example Apiary has a lot of features (interactive documentation, mockup server, test generation etc.) that can be utilized if the API is described in API Blueprint.
Another widely used alteranative for API Blueprint is OpenAPI.
Addressability is one of the key REST principles. It means that in an API everything should be presented as resources with URIs so that every possible action can be given an address. On the flipside this also means that every single address should always result in the same resource being accessed, with the same parameters. From the perspective of addressability, query parameters are part of the address.
Ajax is a common web technique. It used to be known as AJAX, an acronym for Asynchronous Javascript And XML but with JSON largely replacing XML, it become just Ajax. Ajax is used in web pages to make requests to the server without a page reload being triggered. These requests are asynchronous - the page script doesn't stop to wait for the response. Instead a callback is set to handle the response when it is received. Ajax can be used to make a request with any HTTP method.
  1. Kuvaus
  2. Examples
Anonymous functions are usually used as in-place functions to define a callback. They are named such because they are defined just like functions, but don't have a name. In JavaScript function definition returns the function as an object so that it can e.g. passed as an argument to another function. Generally they are used as one-off callbacks when it makes the code more readable to have the function defined where the callback is needed rather than somewhere else. A typical example is the forEach method of arrays. It takes a callback as its arguments and calls that function for each of its members. One downside of anonymous functions is that they function is defined anew every time, and this can cause significant overhead if performed constantly.
  1. Kuvaus
  2. Example
In Flask application context (app context for short) is an object that keeps tracks of application level data, e.g. configuration. You always need to have it when trying to manipulate the database etc. View functions will automatically have app context included, but if you want to manipulate the database or test functions from the interactive Python console, you need to obtain app context using a with statement.
Blueprint is a Flask feature, a way of grouping different parts of the web application in such a way that each part is registered as a blueprint with its own root URI. Typical example could be an admin blueprint for admin-related features, using the root URI /admin/. Inside a blueprint, are routes are defined relatively to this root, i.e. the route /users/ inside the admin blueprint would have the full route of /admin/users/.
Defines how data is processed in the application
Cross Origin Resource Sharing (CORS) is a relaxation mechanism for Same Origin Policy (SOP). Through CORS headers, servers can allow requests from external origins, what can be requested, and what headers can be included in those requests. If a server doesn't provide CORS headers, browsers will browsers will apply the SOP and refuse to make requests unless the origin is the same. Note that the primary purpose of CORS is to allow only certain trusted origins. Example scenario: a site with dubious script cannot just steal a user's API credentials from another site's cookies and make requests using them because the APIs CORS configuration doesn't allow requests from the site's origin. NOTE: this is not a mechanism to protect your API, it's to protect browser users from accessing your API unintentionally.
Callback is a function that is passed to another part of the program, usually as an argument, to be called when certain conditions are met. For instance in making Ajax requests, it's typical to register a callback for at least success and error situations. A typical feature of callbacks is that the function cannot decide its own parameters, and must instead make do with the arguments given by the part of the program that calls it. Callbacks are also called handlers. One-off callbacks are often defined as anonymous functions.
Piece of software that consumes or utilizes the functionality of a Web API. Some clients are controlled by humans, while others (e.g. crawlers, monitors, scripts, agents) have different degree of autonomy.
In databases, columns define the attributes of objects stored in a table. A column has a type, and can have additional properties such as being unique. If a row doesn't conform with the column types and other restrictions, it cannot be inserted into the table.
  1. Kuvaus
  2. Common keywords
In object relational mapping, column attributes are attributes in model classes that have been initialized as columns (e.g. in SQLAlchemy their initial value is obtained by initializing a Column). Each of these attributes corresponds to a column in the database table (that corresponds with the model class). A column attribute defines the column's type as well as additional properties (e.g. primary key).
  1. Kuvaus
  2. Example
In OpenAPI the components object is a storage for reusable components. Components inside this object can be referenced from other parts of the documentation. This makes it a good storage for any descriptions that pop up frequently, including path parameters, various schemas, and request body objects. This also includes security schemes if your API uses authentication.
Connectedness is a REST principle particularly related to hypermedia APIs. It states that there for each resource in the API, there must exist a path from every other resource to get there by following hypermedia links. Connectedness is easiest to analyze by creating an API state diagram.
Container is a virtualization concept where the virtualization is limited to the software layer. Unlike traditional virtual machines (VM) that virtualize a full computer from the hardware up, containers share operating system resources with each other and only provide an isolated run environment. Every container can define what is installed in its running environment, but they have less overhead than VMs. They are faster to work with and easy to replicate as well. Due to the shared hardware layer, it is possible for malicious containers to break out of their isolation and affect the hardware shared by all container running on the same system.
  1. Kuvaus
  2. Example
A hypermedia control is an attribute in a resource representation that describes a possible action to the client. It can be a link to follow, or an action that manipulates the resource in some way. Regardless of the used hypermedia format, controls include at least the URI to use when performing the action. In Mason controls also include the HTTP method to use (if it's not GET), and can also include a schema that describes what's considered valid for the request body.
  1. Kuvaus
  2. Example
  3. Using
A (URL) converter is a piece of code used in web framework routing to convert a part of the URL into an argument that will be used in the view function. Simple converters are usually included in frameworks by default. Simple converters include things like turning number strings into integers etc. Typically custom converters are also supported. A common example would be turning a model instance's identifier in the URL to the identified model instance. This removes the boilerplate of fetching model instances from view functions, and also moves the handling of Not Found errors into the converter.
The term credentials is used in authentication to indicate the information that identifies you as a specific user from the system's point of view. By far the most common credentials is the combination of username and password. One primary goal of system security is the protection of credentials.
Document Object Model (DOM) is an interface through which Javascript code can interact with the HTML document. It's a tree structure that follows the HTML's hierarchy, and each HTML tag has its own node. Through DOM manipulation, Javascript code can insert new HTML into anywhere, modify its contents or remove it. Any modifications to the DOM are updated into the web page in real time. Do note that since this is a rendering operation, it's very likely one of the most costly operations your code can do. Therefore changing the entire contents of an element at once is better than changing it e.g. one line at a time.
  1. Kuvaus
  2. systemctl
Daemons are processes that run independently on the background and are typically started by the system without any user interaction, or if started manually, they will keep running even if the user logs out as long as the system itself is running. The operating system and other programs can communicate with daemons through sockets, and their output is usually found in log files. Most daemons that are installed from package managers are controlled with systemctl. It's also useful to know that Supervisor allows running non-daemon processes as daemons.
Database schema is the "blueprint" of the database. It defines what tables are contained in the database, and what columns are in each table, and what additional attributes they have. A database's schema can be dumped into an SQL file, and a database can also be created from a schema file. When using object relational mapping (ORM), the schema is constructed from model classes.
  1. Kuvaus
  2. Example
Decorator is a function wrapper. Whenever the decorated function is called, its decorator(s) will be called first. Likewise, when the decorated function returns values, they will be first returned to the decorator(s). In essence, the decorator is wrapped around the decorated function. Decorators are particularly useful in web development frameworks because they can be inserted between the framework's routing machinery, and the business logic implemented in a view function. Decorators can do filtering and conversion for arguments and/or return values. They can also add conditions to calling the view function, like authentication where the decorator raises an error instead of calling the view function if valid credentials are not presented.
In HTML element refers to a single tag - most of the time including a closing tag and everything in between. The element's properties are defined by the tag, and any of the properties can be used to select that element from the document object model (DOM). Elements can contain other elements, which forms the HTML document's hierarchy.
For APIs entry point is the "landing page" of the API. It's typically in the API root of the URL hierarchy and contains logical first steps for a client to take when interacting with the API. This means it typically has one or more hypermedia controls which usually point to relevant collections in the API or search functions.
  1. Kuvaus
  2. Use (Linux)
Environment variables are values that are available in the running environment of a process, and are typically used to give processes information about the specific environment they are running in. This can include both configuration parameters, and information that is gathered from the operating system. They are most visible in shell sessions where all processes that are started from the shell inherit its environment variables but processes running without shell also have them, usually set when the process is started. Although sometimes used to replace configuration, their main purpose is to customize how a process is run temporarily. Using environment variables to store secrets is generally not advised, but sometimes done when other options are not available.
Their names are typically written in uppercase. One of the more notable variables is PATH, which indicates what directories should be searched for when the process tries to invoke an executable.
In software testing, a fixture is a component that satisfies the preconditions required by tests. In web application testing the most common role for fixtures is to initialize the database into a state that makes testing possible. This generally involves creating a fresh database, and possibly populating it with some data. In this course fixtures are implemented using pytest's fixture architecture.
  1. Kuvaus
  2. Creating DB
  3. Starting the App
This term contains basic instructions about setting up and running Flask applications. See the term tabs "Creating DB" and "Starting the App". For all instructions to work you need to be in the folder that contains your app.
In database terminology, foreign key means a column that has its value range determined by the values of a column in another table. They are used to create relationships between tables. The foreign key column in the target table must be unique.
For most hypermedia types, there exists a generic client. This is a client program that constructs a navigatable user interface based on hypermedia controls in the API, and can usually also generate data input forms. The ability to use such clients for testing and prototyping is one of the big advantages of hypermedia.
HTTP method is the "type" of an HTTP request, indicating what kind of an action the sender is intending to do. In web applications by far the most common method is GET which is used for retrieving data (i.e. HTML pages) from the server. The other method used in web applications is POST, used in submitting forms. However, in REST API use cases, PUT and DELETE methods are also commonly used to modify and delete data.
HTTP request is the entirety of the requets made by a client to a server using the HTTP protocol. It includes the request URL, request method (GET, POST etc.), headers and request body. In Python web frameworks the HTTP request is typically turned into a request object.
In computing a hash is a string that is calculated from another string or other data by an algorithm. Hashes have multiple uses ranging from encryption to encoding independent transmission. Hash algorithms can roughly be divided into one- and two-directional. One-directional hashing algorithms are not reversible - the original data cannot be calculated from the hash. They are commonly used to store passwords so that plain text passwords cannot be retrieved even if the database is compromised. Two-directional hashes can be reversed. A common example is the use of base64 to encode strings to use a limited set of characters from the ASCII range to ensure that different character encodings at various transmission nodes do not mess up the original data.
Headers are additional information fields included in HTTP requests and responses. Typical examples of headers are content-type and content-length which inform the receiver how the content should be interpreted, and how long it should be. In Flask headers are contained in the request.headers attribute that works like a dictionary.
Host part is the part of URL that indicates the server's address. For example, lovelace.oulu.fi is the host part. This part determines where (i.e. which IP address) in the world wide web the request is sent.
In API terminology hypermedia means additional information that is added on top of raw data in resource representations. It's derived from hypertext - the stuff that makes the world wide web tick. The purpose of the added hypermedia is to inform the client about actions that are available in relation to the resource they requested. When this information is conveyed in the representations sent by the API, the client doesn't need to know how to perform these actions beforehand - it only needs to parse them from the response.
An idempotent operation is an operation that, if applied multiple times with the same parameters, always has the same result regardless of how many times it's applied. If used properly, PUT is an idempotent operation: no matter how many times you replace the contents of a resource it will have the same contents as it would have if only one request had been made. On the other hand POST is usually not idempotent because it attempts to create a new resource with every request.
  1. Kuvaus
  2. Example
The info object in OpenAPI gives basic information about your API. This basic information includes general description, API version number, and contact information. Even more importantly, it includes license information and link to your terms of service.
Instance folder is a Flask feature. It is intended for storing files that are needed when running the Flask application, but should not be in the project's code repository. Primary example of this is the prodcution configuration file which differs from installation to installation, and generally should remain unchanged when the application code is updated from the repository. The instance path can be found from the application context: app.instance_path. Flask has a reasonable default for it, but it can also be set manually when calling Flask constuctor by adding the instance_path keyword argument. The path should be written as absolute in this case.
  1. Kuvaus
  2. Serializing / Parsing
JavaScript Object Notation (JSON) is a popular document format in web development. It's a serialized representation of a data structure. Although the representation syntax originates from JavaScript, It's almost identical to Python dictionaries and lists in formatting and structure. A JSON document conists of key-value pairs (similar to Python dictionaries) and arrays (similar to Python lists). It's often used in APIs, and also in AJAX calls on web sites.
JSON schema is a JSON document that defines the validity criteria for JSON documents that fall under the schema. It defines the type of the root object, and types as well as additional constraints for attributes, and which attributes are required. JSON schemas serve two purposes in this course: clients can use them to generate requests to create/modify resources, and they can also be used on the API end to validate incoming requests.
  1. Kuvaus
  2. Common MIME types
MIME type is a standard used for indicating the type of a document.In web development context it is placed in the Content-Type header. Browsers and servers the MIME type to determine how to process the request/response content. On this course the MIME type is in most cases application/json.
Microservice is a web architecture concept where a system consists of multiple smaller components called microservices, each exposing an API for communication with other components. Typically one microservice is responsibly for just one feature of the system. The main advantage is that each microservice can be developed indepedently of each other, even with entirely different programming languages and frameworks, and one team can be responsible of one microservce. This reduces side effects from changes that often occur in monolithic systems where the entire system is one application with highly coupled components. Microservices also allow the system to be scaled up in a more granular way and be more fault tolerant. Of course nothing comes wihtout a tradeoff. For microservices it is the increased need and complexity of communication and orchestration of the services.
Database migration is a process where an existing database is updated with a new database schema. This is done in a way that does not lose data. Some changes can be migrated automatically. These include creation of new tables, removal of columns and adding nullable columns. Other changes often require a migration script that does the change in multiple steps so that old data can be transformed to fit the new schema. E.g. adding a non-nullable column usually involves adding it first as nullable, then using a piece of code to determine values for each row, and finally setting the column to non-nullable.
  1. Kuvaus
  2. Example
In ORM terminology, a model class is a program level class that represents a database table. Instances of the class represent rows in the table. Creation and modification operations are performed using the class and instances. Model classes typically share a common parent (e.g. db.Model) and table columns are defined as class attributes with special constuctors (e.g. db.Column).
  1. Kuvaus
  2. Example
In API terminology, namespace is a prefix for names used by the API that makes them unique. The namespace should be a URI, but it doesn't have to be a real address. However, usually it is convenient to place a document that described the names within the namespace into the namespace URI. For our purposes, namespace contains the custom link relations used by the API.
Object relational mapping is a way of abstracting database use. Database tables are mapped to programming language classes. These are usually called models. A model class declaration defines the table's structure. When rows from the database table are fetched, they are represented as instances of the model class with columns as attributes. Likewise new rows are created by making new instances of the model class and committing them to the database. This course uses SQLAlchemy's ORM engine.
OpenAPI (previously: Swagger) is a description language for API documentation. It can be written with either JSON or YAML. An OpenAPI document is a single nested data structure which makes it suitable to be used with various tools. For example, Swagger UI is a basic tool that renders an OpenAPI description into a browsable documentation page. Other kinds of tools include using schemas in OpenAPI description for validation, and generating OpenAPI specification from live code.
  1. Kuvaus
  2. Example
Operation object is one of the main parts of an OpenAPI specification. It describes one operation on a resource (e.g. GET). The operation object includes full details of how to perform the operation, and what kinds of responses can be expected from it. Two of its key parameters are requestBody which shows how to make the request, and responses, which is a mapping of potential responses.
With Flasgger, an operation object can be put into a view method's docstring, or a separate file, to document that particular view method.
Pagination divides a larger dataset into smaller subsets called pages. Search engine results would be the most common example. You usually get 10 or 20 first hits from you search, and then have to request the next page in order to get more. The purpose of pagination is to avoid transferring (and rendering) unnecessary data, and it is particularly useful in scenarios where the relevance of data declines rapidly (like search results where the accuracy drops the further you go). An API that offers paginated data will typically offer access to specific pages with both absolute (i.e. page number) and relative (e.g. "next", "prev", "first" etc.) URLs. These are usually implemented through query parameters.
In OpanAPI a path parameter is a variable placeholder in a path. It is the OpenAPI equivalent for URL parameters that we use in routing. Path parameter typically has a description and a schema that defines what is considered valid for its value. These parameter definitions are often placed into the components object as they will be used in multiple resources. In OpenAPI syntax path parameters in paths are marked with curly braces, e.g. /api/sensors/{sensor}/.
In database terminology primary key refers to the column in a table that's intended to be the primary way of identifying rows. Each table must have exactly one, and it needs to be unique. This is usually some kind of a unique identifier associated with objects presented by the table, or if such an identifier doesn't exist simply a running ID number (which is incremented automatically).
Profile is metadata about a resource. It's a document intended for client developers. A profile gives meaning to each word used in the resource representation be it link relation or data attribute (also known as semantic descriptors). With the help of profiles, client developers can teach machine clients to understand resource representations sent by the API. Note that profiles are not part of the API and are usually served as static HTML documents. Resource representations should always contain a link to their profile.
In database terminology, query is a command sent to the database that can fetch or alter data in the database. Queries use written with a script-like language. Most common is the structured query language (SQL). In object relational mapping, queries are abstracted behind Python method calls.
  1. Kuvaus
  2. Example
Query parameters are additional parameters that are included in a URL. You can often see these in web searches. They are the primary mechanism of passing arbitrary parameters with an HTTP request. They are separated from the actual address by ?. Each parameter is written as a key=value pair, and they are separated from each other by &. In Flask applications they can be found from request.args which works like a dictionary.
  1. Kuvaus
  2. Examples
Regular expressions are used in computing to define matching patterns for strings. In this course they are primarily used in validation of route variables, and in JSON schemas. Typical features of regular expressions are that they look like a string of garbage letters and get easily out of hand if you need to match something complex. They are also widely used in Lovelace text field exercises to match correct (and incorrect) answers.
In this course request referes to HTTP request. It's a request sent by a client to an HTTP server. It consists of the requested URL which identifies the resource the client wants to access, a method describing what it wants to do with the resource. Requests also include headers which provide further context information, and possihby a request body that can contain e.g. a file to upload.
  1. Kuvaus
  2. Accessing
In an HTTP request, the request body is the actual content of the request. For example when uploading a file, the file's contents would be contained within the request body. When working with APIs, request body usually contains a JSON document. Request body is mostly used with POST, PUT and PATCH requests.
  1. Kuvaus
  2. Getting data
Request object is related to web development frameworks. It's a programming language object representation of the HTTP request made to the server. It has attributes that contain all the information contained within the request, e.g. method, url, headers, request body. In Flask the object can be imported from Flask to make it globally available.
in RESTful API terminology, a resource is anything that is interesting enough that a client might want to access it. A resource is a representation of data that is stored in the API. While they usually represent data from the database tables it is important to understand that they do not have a one-to-one mapping to database tables. A resource can combine data from multiple tables, and there can be multiple representations of a single table. Also things like searches are seen as resources (it does, after all, return a filtered representation of data).
Resource classes are introduced in Flask-RESTful for implementing resources. They are inherited from flask_restful.Resource. A resource class has a view-like method for each HTTP method supported by the resource (method names are written in lowercase). Resources are routed through api.add_resource which routes all of the methods to the same URI (in accordance to REST principles). As a consequence, all methods must also have the same parameters.
In this course we use the term representation to emphasize that a resource is, in fact, a representation of something stored in the API server. In particular you can consider representation to mean the response sent by the API when it receives a GET request. This representation contains not only data but also hypermedia controls which describe the actions available to the client.
In this course response refers to HTTP response, the response given by an HTTP server when a request is made to it. Reponses are made of a status code, headers and (optionally) response body. Status code describes the result of the transaction (success, error, something else). Headers provide context information, and response body contains the document (e.g. HTML document) returned by the server.
Response body is the part of HTTP response that contains the actual data sent by the server. The body will be either text or binary, and this information with additional type instructions (e.g. JSON) are defined by the response's Content-type header. Only GET requests are expected to return a response body on a successful request.
Response object is the client side counterpart of request object. It is mainly used in testing: the Flask test client returns a response object when it makes a "request" to the server. The response object has various attributes that represent different parts of an actual HTTP response. Most important are usually status_code and data.
In database terminology, rollback is the cancellation of a database transaction by returning the database to a previous (stable) state. Rollbacks are generally needed if a transaction puts the database in an error state. On this course rollbacks are generally used in testing after deliberately causing errors.
  1. Kuvaus
  2. Routing in Flask
  3. Reverse routing
  4. Flask-RESTful routing
URL routing in web frameworks is the process in which the framework transforms the URL from an HTTP request into a Python function call. When routing, a URL is matched against a sequence of URL templates defined by the web application. The request is routed to the function registered for the first matching URL template. Any variables defined in the template are passed to the function as parameters.
In relational database terminology, row refers to a single member of table, i.e. one object with properties that are defined by the table's columns. Rows must be uniquely identifiable by at least one column (the table's primary key).
SQL (structured query language) is a family of languages that are used for interacting with databases. Queries typically involve selecting a range of data from one or more tables, and defining an operation to perform to it (such as retrieve the contents).
Serialization is a common term in computer science. It's a process through which data structures from a program are turned into a format that can be saved on the hard drive or sent over the network. Serialization is a reversible process - it should be possible to restore the data structure from the representation. A very common serialization method in web development is JSON.
In web applications static content refers to content that is served from static files in the web server's hard drive (or in bigger installations from a separate media server). This includes images as well as javascript files. Also HTML files that are not generated from templates are static content.
Swagger is a set of tools for making API documentation easier. In this course we use it primarily to render easily browsable online documentation from OpenAPI description source files. Swagger open source tools also allow you to run mockup servers from your API description, and there is a Swagger editor where you can easily see the results of changes to your OpenAPI description in the live preview.
In this course we use Flasgger, a Swagger Flask extension, to take render API documentation.
  1. Kuvaus
  2. Creating
System user is an operating system concept, particularly in UNIX systems, for users that exist for the sole purpose of processes taking their identity when run. Unlike normal users, they do not have a password and cannot be logged in as. Their primary purpose is to manage permissions so that each process only has access to resources it actually needs for operation, thus reducing the amount of information that an attacker can access if they are able to take control of the process.
In database terminology, a table is a collection of similar items. The attributes of those items are defined by the table's columns that are declared when the table is created. Each item in a table is contained in a row.
In software testing, test setup is a procedure that is undertaken before each test case. It prepares preconditions for the test. On this course this is done with pytest's fixtures.
In software testing, test teardown is a process that is undertaken after each test case. Generally this involves clearing up the database (e.g. dropping all tables) and closing file descriptors, socket connections etc. On this course pytest fixtures are used for this purpose.
Universal resource identifier (URI) is basically what the name says: it's a string that unambiguously identifies a resource, thereby making it addressable. In APIs everything that is interesting enough is given its own URI. URLs are URIs that specify the exact location where to find the resource which means including protocol (http) and server part (e.g. lovelace.oulu.fi) in addition to the part that identifies the resource within the server (e.g. /ohjelmoitava-web/programmable-web-project-spring-2019).
  1. Kuvaus
  2. Type converters
  3. Custom converters
URL template defines a range of possible URLs that all lead to the same view function by defining variables. While it's possible for these variables to take arbitrary values, they are more commonly used to select one object from a group of similar objects, i.e. one user's profile from all the user profiles in the web service (in Flask: /profile/<username>. If a matching object doesn't exist, the default response would be 404 Not Found. When using a web framework, variables in the URL template are usually passed to the corresponding view function as arguments.
Uniform interface is a REST principle which states that all HTTP methods, which are the verbs of the API, should always behave in the same standardized way. In summary:
  • GET - should return a representation of the resource; does not modify anything
  • POST - should create a new instance that belongs to the target collection
  • PUT - should replace the target resource with a new representation (usually only if it exists)
  • DELETE - should delete the target resource
  • PATCH - should describe a change to the resource
In database terminology, unique constraint is a what ensures the uniqueness of each row in a table. Primary key automatically creates a unique constraint, as do unique columns. A unique constraint can also be a combination of columns so that each combination of values between these columns is unique. For example, page numbers by themselves are hardly unique as each book has a first page, but a combination of book and page number is unique - you can only have one first page in a book.
  1. Kuvaus
  2. Registering
View functions are Python functions (or methods) that are used for serving HTTP requests. In web applications that often means rendering a view (i.e. a web page). View functions are invoked from URLs by routing. A view function always has application context.
  1. Kuvaus
  2. Creation
  3. Activation
A Python virtual environment (virtualenv, venv) is a system for managing packages separately from the operating system's main Python installation. They help project dependency management in multiple ways. First of all, you can install specific versions of packages per project. Second, you can easily get a list of requirements for your project without any extra packages. Third, they can placed in directories owned by non-admin users so that those users can install the packages they need without admin privileges. The venv module which is in charge of creating virtual environments comes with newer versions of Python.
Web Server Gateway Interface, WSGI (pronounced whiskey because no one wants to read that abbreviation aloud) is a Python specification that defines how web servers can communicate with Python applications so that an HTTP request gets converted into a Python function call, and the return value of the call is converted into an HTTP response. Its main purpose is to make it easy to create web applications with Python and have them work uniformly. It also has an asynchronous cousin in ASGI if you feel like your application will benefit from using an asynchronous web framework (like FastAPI).
Interface, implemented using web technologies, that exposes a functionality in a remote machine (server). By extension Web API is the exposed functionality itself.
Web server is an application that listens to HTTP and HTTPS traffic, and defines how it is responded to. Typical behaviors can include serving a static file, routing the request to a web application, or routing it to another web server. Web servers can also function as load balancers that distribute traffic to multiple server nodes in order to be able to serve a higher amount of clients simultaneously. When deploying web applications behind web servers, typically the web server takes care of handling encryption, provided the application runs on the same machine as the web server. Presently, the most common web servers are Apache and NGINX.
  1. Kuvaus
  2. Example
YAML (YAML Ain't Markup Language) is a human-readable data serialization language that uses a similar object based notation as JSON but removes a lot of the "clutter" that makes JSON hard to read. Like Python, YAML uses indentation to distinguish blocks from each other, although it also supports using braces for this purpose (which, curiously enough, makes JSON valid YAML). It also removes the use of quotation characters where possible. It is one of the options for writing OpenAPI descriptions, and the one we are using on this course.