NOTE: The project is found at Github
Session 1
Step 1: Virtual machine
For this laboratory exercise, you can use your own computer, or university workstation. We strongly recommend using the university workstations - this way we can ensure that everything works as intended. In any case, at this stage only one member of the team needs to do this setup.
If you use your own computer
Install VirtualBox version 7.2.2 and the matching VirtualBox Extension Pack you can find in the same website. Both components must use the same version. You can install the Extension Pack by following these instructions. After installing these, you can follow the same instructions as the students using university workstations (below).
If you use university workstation
Download the virtual appliance (.ova-file). Files and history can be found in Lovelace
In VirtualBox, choose
After some time, you will see a screen like the one below. Choose the freshly imported virtual machine and press "Start" at the top right.
In VirtualBox, choose
File -> Import appliance and find the previously downloaded .ova-file. In the next screen, choose the directory you want to place the file in, and press "Import".After some time, you will see a screen like the one below. Choose the freshly imported virtual machine and press "Start" at the top right.
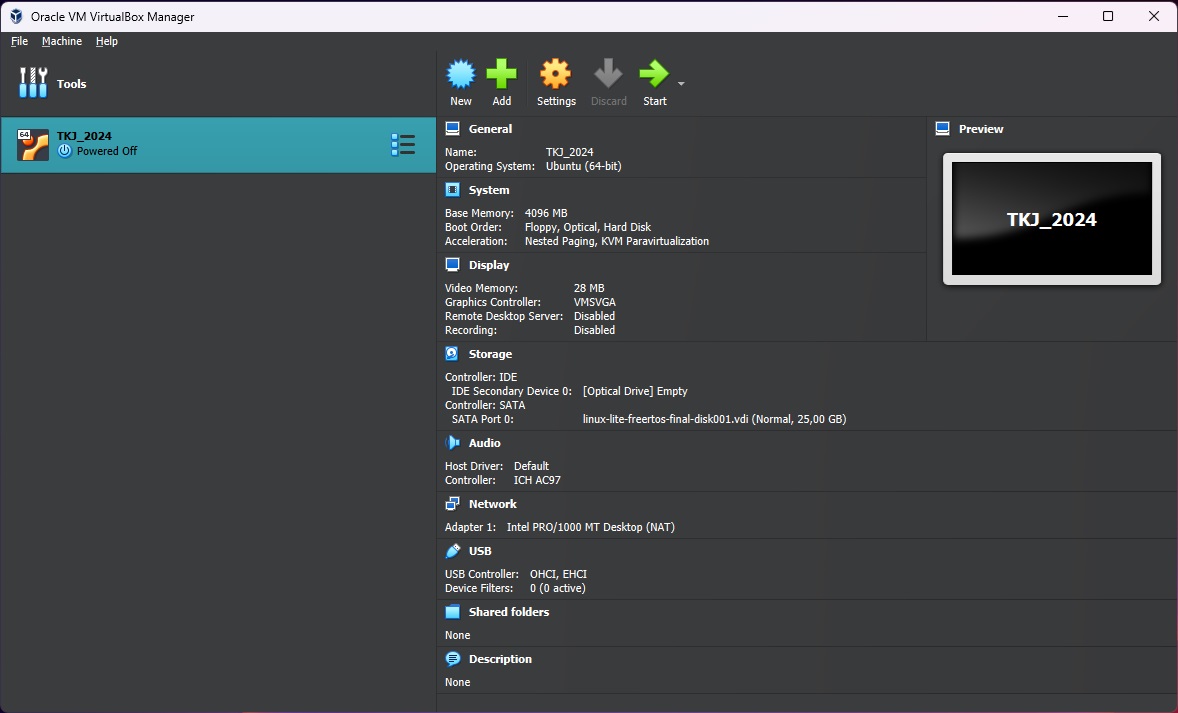
Wait (patiently) for the virtual machine to start. In the meanwhile answer the attendance sheet.
Step 2: Introducing Visual Studio CodeStarting up
1. Open Visual Studio Code. This will be our IDE (Integrated Development Environment), which we use for writing, compiling, debugging, and flashing our device (Raspberry Pi Pico W).

The welcome screen shows the options available. Initially, you can choose to Open Folder, Clone Repository, or Create Pico Project from scratch.
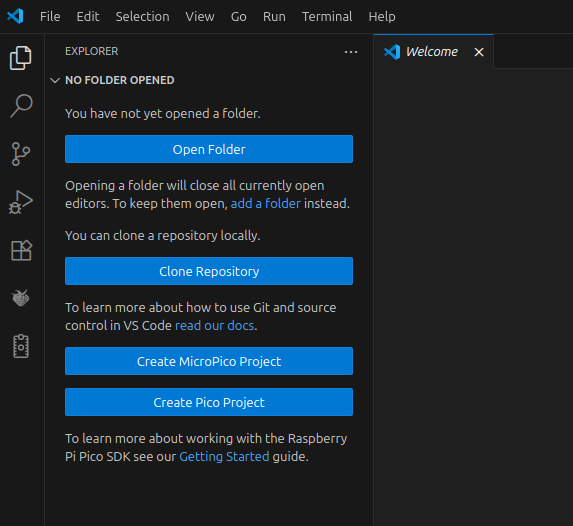
We are not going to create one from scratch, because configuring a new project requires some additional steps that we will skip for now. Instead, we will download the project from the GitHub repository.
Before doing that, let’s explore the different tools available in the menu on the left.
Before doing that, let’s explore the different tools available in the menu on the left.
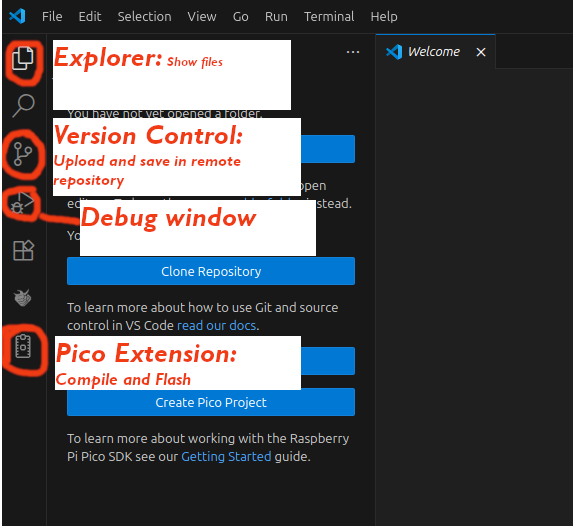
The tools that we are going to use most are Explorer, where we edit our code, and Source Control, which is used if you are working with Git.
2. Let’s download our default project. You have two options. The first one (recommended by the course staff) is using
git, if you have a GitHub account. The second one, if you do not have a GitHub account or do not want to use Git, is to download the files directly. In any case, knowing Git is not required for this course, but it is a tool that you will definitely need later in your studies, since it is widely used in industry. Moreover, we will use a graphical interface, so you do not need to memorize command-line commands.
Option 1: Using GitHub version control system
For this option you should have a Github account:
2.1 Open the repository and fork it by pressing the Fork button at the top-right corner. Only one team member should do this; the others can then join the project.
After you have forked the repository, you no longer need to access the original one — you will use your personal or group repository that was just created.
The team member who created the fork should invite the other members through
Settings -> Collaborators -> Add people. Each member must accept the invitation before they can contribute to the repository.
2.2 The next step is to clone the repository. Open your forked project and copy the repository URL by clicking the Code button. Select the HTTPS URL and copy it.
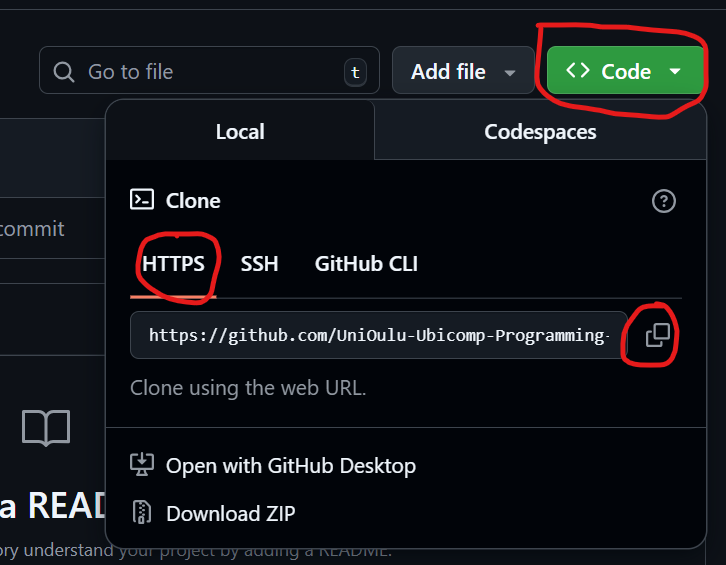
2.3 Now press the Clone Repository button. In the Command Palette, choose
Clone with GitHub, and then paste the URL of your personal repository.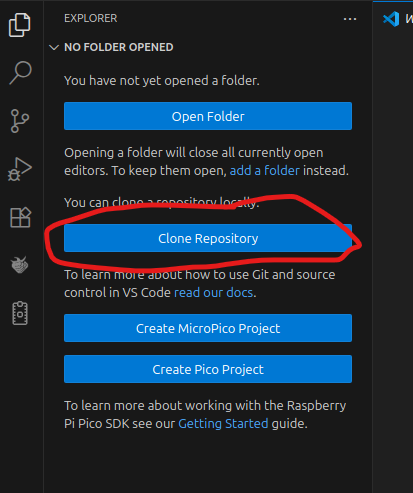

2.4 You might be asked to add your Github account in a new browser window.
2.5 Select the destination folder for the repository. It should be inside
When asked, choose Yes, I trust the authors. The system will start downloading the necessary libraries.
If you are asked which "kit" to use, select "
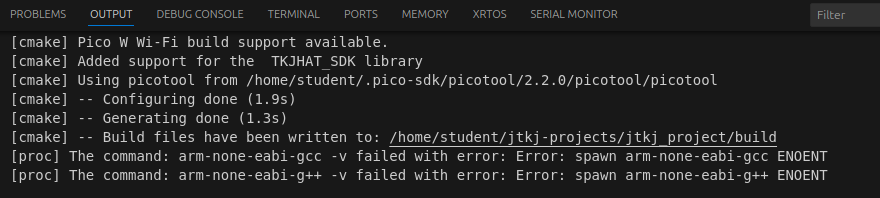
2.6 The system is now ready. Check that the terminal at the bottom shows the following text:
2.5 Select the destination folder for the repository. It should be inside
/home/student/jtkj-projects. Click Set as repository folder.When asked, choose Yes, I trust the authors. The system will start downloading the necessary libraries.
If you are asked which "kit" to use, select "
Pico".2.6 The system is now ready. Check that the terminal at the bottom shows the following text:
Option 2: Download the folder to your computer
NOTE: Use this option only if you did not choose Option 1.
2.1 Open the repository in Firefox (use the browser in the virtual machine).
2.2 Press the green
Code button, then select Download ZIP in the new window. This will download a ZIP file to /home/student/Downloads.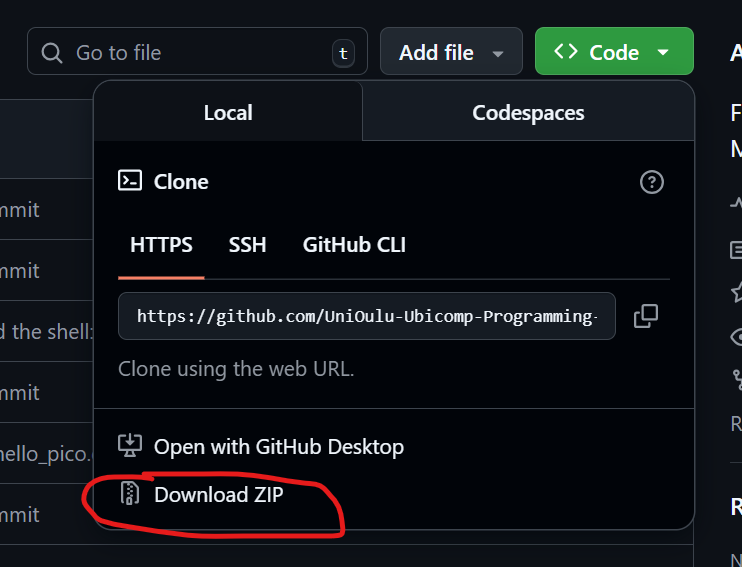
2.3 Extract the folder into your
/home/student directory. We recommend using the folder /home/student/jtkj-projects.2.4 In Visual Studio Code, press the Open Folder button. Select the folder where you extracted the repository and click Open.
When asked, press Yes, I trust the authors. The system will start downloading the necessary libraries.
If you are asked which "kit" to use, select "
If you are asked which "kit" to use, select "
Pico".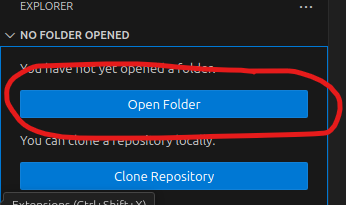
2.5 The system is now ready. Check that the terminal at the bottom shows the following text:
Exploring VSCode
If you have followed carefully previous instructions the Explorer present the following folders:
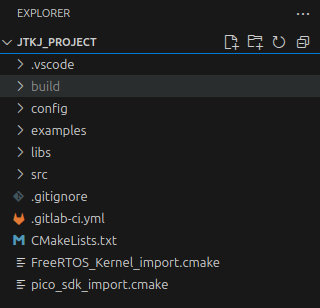
- .vscode: Configuration files for Visual Studio Code and the Pico Extension. In general we are not going to modify any file in that folder.
- build: This folder is generated by the "Visual Studio Code extension". It produce all configuration and output files necessary to build executable
- config: This folder configuration files for different extensions and library. In our case only contains FreeRTOS Configuration
- examples: Some source and configuration files of different applications that we are going to execute in this exercise.
- libs: External libraries / SDK used in the course. It contains the Hat SDK that we will use in Exercise 2 as well as the usb-serial-debug library that will use in the future to send debug commands to the terminal.
- src: The source folder of the root application (
hat_app). It containsmain.c. For the introductory LED-blinking exercise, we will useexamples/hello_blink/src/main.cinstead. - additional files: The
FreeRTOS_Kernel_import.cmakeconfigure our development environment to use FreeRTOS whilepico_sdk_import.cmakeis used to configure our Pico SDK. We are never touching any of those files. TheCMakeLists.txtis a CMake configuration file which defines the libraries to be used as well as the location of our sources. We will learn a bit more about this file later.
At the bottom we can see an important bar that we are going to use a lot:

The button that reads
Let's first quickly compile and upload the first code to the Raspberry Pi Pico. First, open the root
[all] indicates which is the target that we are compiling. A build target tells CMake what to build. In this exercise, we mainly use executable targets (programs containing a main() function), but targets can also be libraries. The all target builds the default set of targets. We will explain later how do you know which are the possible targets (small advance, you would need to check the CMakeLists.txt) The two buttons on the right, are used to compile and flash the compiled code into the device. Let's first quickly compile and upload the first code to the Raspberry Pi Pico. First, open the root
CMakeLists.txt and uncomment add_subdirectory(examples/hello_blink) to enable the example. Reconfigure the project if necessary.Open the file
main.c from examples/hello_blink/src. Have a quick look the file and try to understand the structure. Remember that main() is the entry point of our C application. This code will just toggle the Raspberry Pi Pico LED every second. The code is a bit strange, because the Raspberry Pi Pico W controls the LED using the networking chip (strange, right?), but if you read the comments it should be easy to follow.Compiling and uploading code
First, we need to select which target we are going to compile. On the bottom bar, you can see the text
For this first compilation, let's keep
Build and next to it all. If we keep all selected, the build includes all targets currently enabled in the project and their dependencies. For example, hello_blink is included because we enabled it in the root CMakeLists.txt. Examples whose add_subdirectory() instructions are commented out are not included.For this first compilation, let's keep
all selected. Later, we will select individual build targets so that we only need to compile the applications we are working with.
To start the compilation, press the
Build button on the left side of the bottom bar. If you are asked for a launch target for project jtkj_project, select hello_blink. The launch target indicates which application will be uploaded to the device when we press run. For now, let’s focus on compilation. Select
hello_blink as the launch target and let the system compile all your source files. You can see in the terminal how the .o files are being generated.At the end of the process, you should see a Build completed message, and it should return with status code 0 (meaning everything is OK). If that is not the case, contact the course staff.

Now your files have been compiled, and the executable/binary file (in this case a .bin, .elf, or .uf2 file, depending on the flashing method you are using) is stored in the
build folder. You do not need to worry about the exact location because the VS Code extension handles that for you.Now that we have the file, we still need to upload it to the device. The process is a bit tricky, so please follow the next steps carefully.
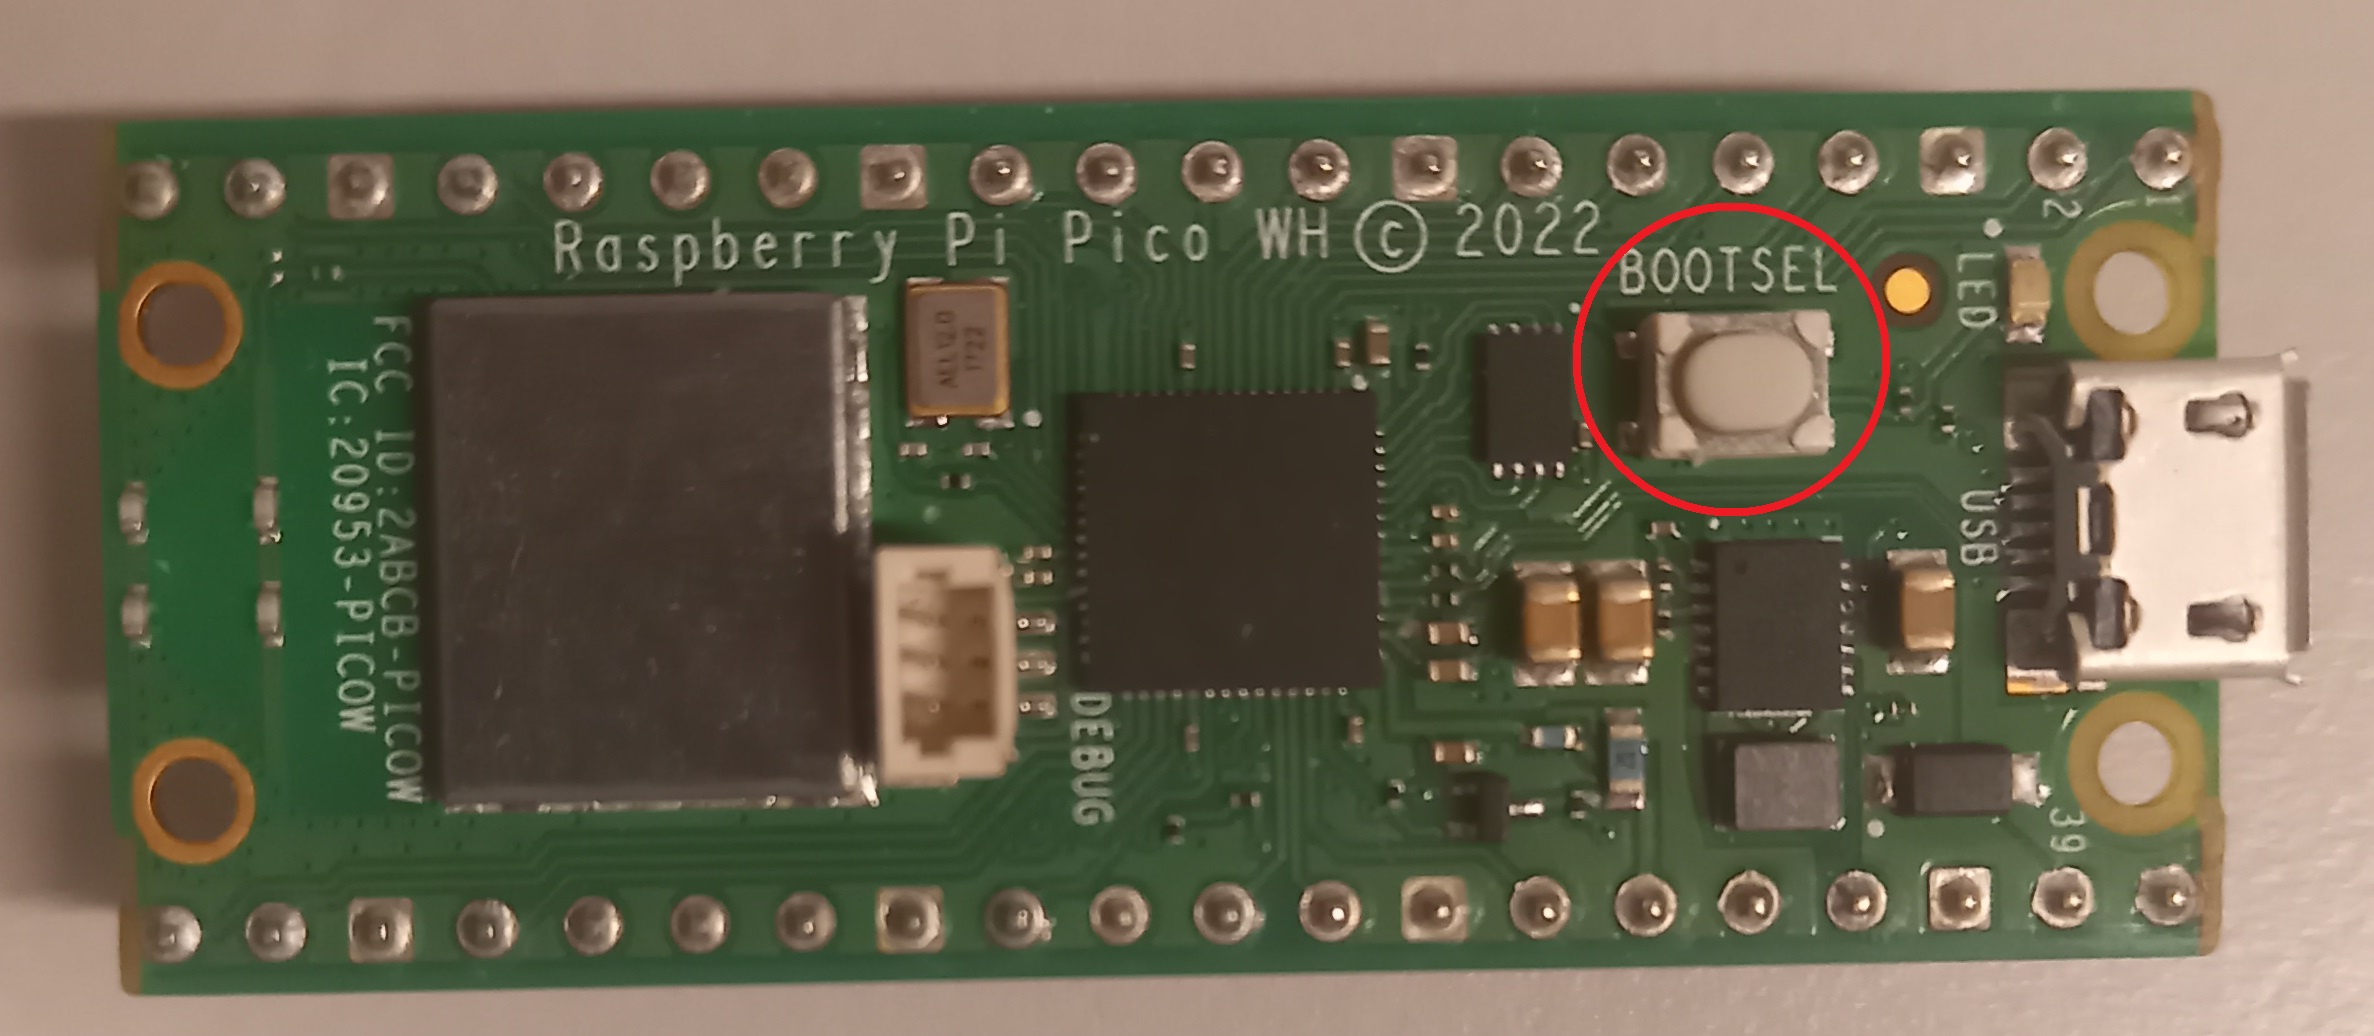
1. Connect the USB cable to your Pico, press the
By doing this, we put the Pico in USB Mass Storage (bootloader) mode. In this mode, the Pico appears as a removable USB drive named RPI-RP2, which allows uploading the binary file. We use BOOTSEL to put the Pico into USB Mass Storage mode for the initial upload. Once the Pico is recognized by the virtual machine and the upload configuration is working, you can normally upload subsequent programs directly from VS Code without disconnecting the USB cable. If an upload fails because the device is not recognized, check the USB connection in VirtualBox and, if necessary, reconnect the Pico while holding BOOTSEL.
BOOTSEL button (image below), and while holding it, connect the other end of the USB cable to the PC.By doing this, we put the Pico in USB Mass Storage (bootloader) mode. In this mode, the Pico appears as a removable USB drive named RPI-RP2, which allows uploading the binary file. We use BOOTSEL to put the Pico into USB Mass Storage mode for the initial upload. Once the Pico is recognized by the virtual machine and the upload configuration is working, you can normally upload subsequent programs directly from VS Code without disconnecting the USB cable. If an upload fails because the device is not recognized, check the USB connection in VirtualBox and, if necessary, reconnect the Pico while holding BOOTSEL.
2. After the Pico is connected to the computer via the USB cable, it will appear in the
Devices -> USB menu of VirtualBox as Raspberry Pi RP2 Boot.You need to explicitly select this device so the virtual machine can interact with the Pico.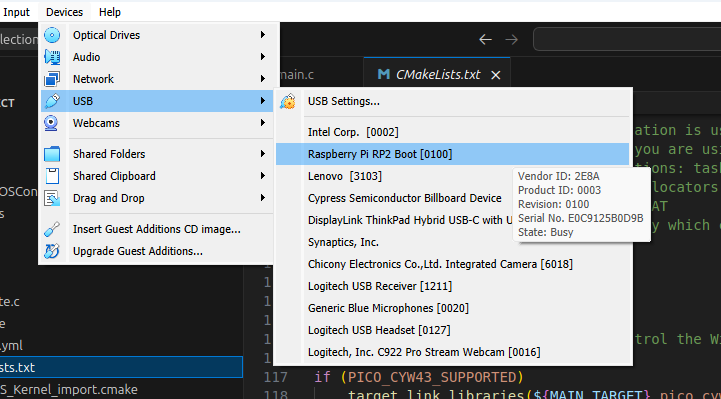
NOTE: You can make the VM automatically recognize your device when it is connected by selecting
Devices > USB > USB Settings in your VM menu and adding the device to the USB Device Filters (see image below).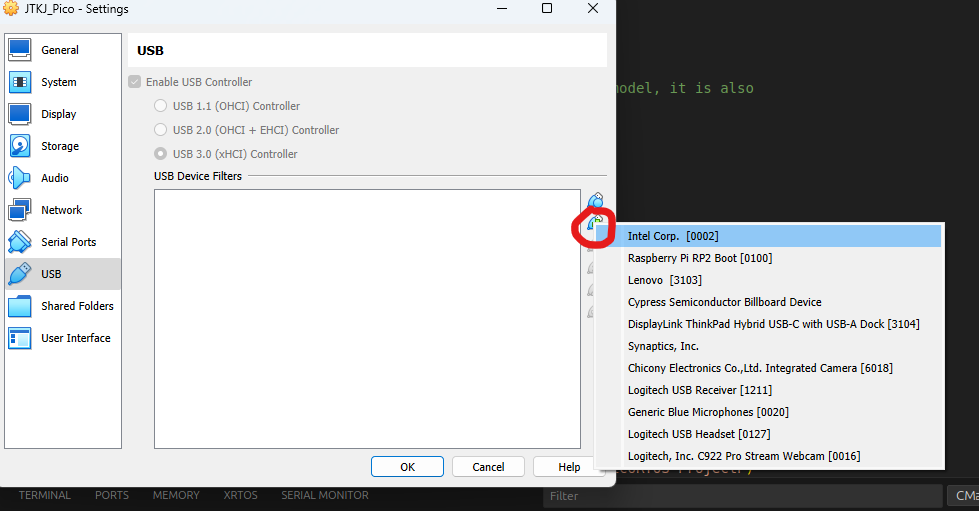
3. Once your device is recognized by the Virtual Machine (NOT by the host computer), press the
Run button on the bottom bar.When the binary file is uploaded to the device, you should see a success message (see below). In addition, you should see the LED on your Pico blinking every second.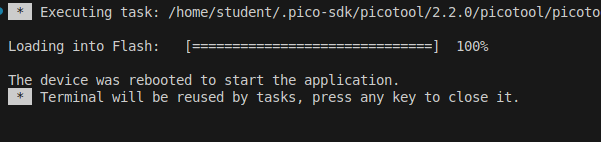
4. Now the device appears as a different USB device to the VM. You should repeat step 2, but this time select Raspberry Pi Pico [0100] as the device.
You should notice that the bottom bar now shows a new element:
You should notice that the bottom bar now shows a new element:

The target on the left is the Compilation target, and the one on the right is the Launch target. This means that from now on, we do not need to compile the entire project, only the specific targets we modify. We can also choose which target to upload to the device. This is useful later when you have, for example, different versions of the software to test.
If you want, you can select
[hello_blink] as the compilation target, modify part of the code (for example, change the value of LED_DELAY_MS), compile, and run again. Try first running the code without disconnecting the USB cable. If you have followed the previous steps, it should not be necessary to remove the Pico from the device.Using the terminal
Ok, ok. But the
main.c is using printf, and you mentioned in the lectures that we are going to use printf and puts to debug our code. So, we should be able to see the printed messages. Actually, you can use any serial terminal. The virtual machine has screen and minicom already installed. But this time, we are using the VSCode integrated serial monitor. Open the "Serial Monitor" tab located at the bottom of the screen.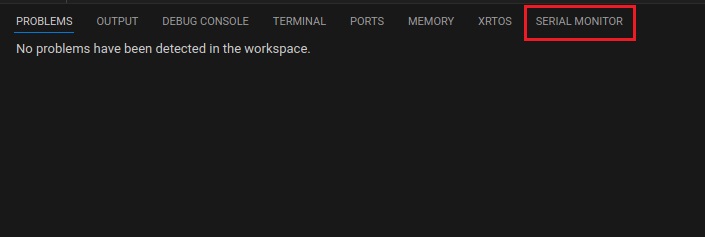
When you open the tab, all settings should already be correct (Monitor mode: serial, View mode: text, Baud rate: 115200, Line ending: None). You just need to select the correct serial port from the "Port" menu. In the Linux operating system used by our virtual machine, this is usually
If the Pico does not appear in the menu, check that it is connected to the virtual machine from VirtualBox’s
/dev/ttyACM0 or /dev/ttyACM1. If the Pico does not appear in the menu, check that it is connected to the virtual machine from VirtualBox’s
Devices -> USB menu, and then press the refresh button next to the "Port" menu. Once the correct port is selected, you only need to press the blue "Start monitoring" button, and the serial connection will open. You should now see a
Tick message approximately every two seconds in the Serial Monitor. The LED stays on for one second and off for one second, completing one full blinking cycle every two seconds.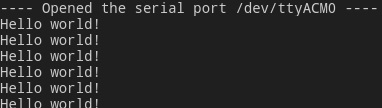
We recommend activating Toggle Autoscroll so that the terminal always displays the latest line sent by the Pico, and also Toggle Automatic Reconnection.
If that is activated, try disconnecting and reconnecting the Raspberry Pi Pico.
If you have followed the previous steps and the USB device is already added to the VM’s filter list, the Serial Monitor should automatically reconnect.
If you have followed the previous steps and the USB device is already added to the VM’s filter list, the Serial Monitor should automatically reconnect.
A walk through the CMakeLists. Executing examples
We promised to explain the
CMakeLists.txt file in more detail. This file describes the project configuration used by CMake. CMake uses this information to generate the build system needed to compile our code on different platforms.The
CMakeLists.txt performs the following functions:- Define the project name and its targets (executables or libraries).
- Specify which source files belong to each target.
- Tell CMake which SDKs, libraries, and include paths are required.
- Configure how to build and link those files (for example, whether to enable USB or Wi-Fi).
- Generate the build system that actually compiles your code.
We will see that we can have several nested
CMakeLists.txt files: one that defines the general settings, and others that define settings for specific folders (for example, a folder containing additional examples).Let's have a quick look at the
CMakeLists.txt file located in the root folder. Open the CMakeLists.txt. The file has the following sections:- The first part initializes and sets up the pico_sdk, as well as creates a new project.
- The second part includes the necessary library and configuration files required to run FreeRTOS.
- The third part specifies where additional libraries and example applications are located.
- Finally, the last part defines the settings required to create the main target (the one under the root
srcfolder). This is the section that you might need to edit later. Please note that the variablesMAIN_TARGETandAPP_NAMEare defined at the top of the project:set(APP_NAME JTKJ_app)andset(MAIN_TARGET hat_app). You can change them if you wish. Let’s check the most important commands: add_executable: Defines an executable target and specifies the source files used to build it.target_link_libraries: Lists all the libraries that will be used. The C SDK provides names for different hardware libraries, such ashardware_adcorhardware_gpio. The pico_stdlib library provides common functionality needed by many applications. Additional libraries, such ashardware_adc, may be required depending on the peripherals you use. To use a library, you normally include its header file in your C code (for example,#include "hardware/adc.h") and link the corresponding library to your target in CMake (in this case,hardware_adc).pico_enable_stdio_usb: Indicates that you want to sendstdiooutput through USB. In general, we use this unless we are using theusb-serial-debuglibrary.pico_add_extra_outputs: Generates additional output files for programming the Pico and inspecting the compiled program.
We have already enabled
examples/hello_blink in the root CMakeLists.txt. Other examples can be enabled in the same way when needed.At some point, we mentioned that you could use the
The
CMakeLists.txt to generate additional targets. In the root CMakeLists.txt, there are several add_subdirectory() commands. When one of those subdirectories is opened, we expect to find another CMakeLists.txt file inside that provides additional build instructions.The
examples folder includes some additional examples (more will come in Lecture 2). Please, in the Explorer view, open the
Before compiling, open the root
hello_blink_freertos folder. You can see a new CMakeLists.txt file and a src folder containing main.c. If you open the main.c file, you will notice that it performs the same LED-blinking operation as the code currently running on your Pico, but this time the functionality is implemented using a FreeRTOS task. If you open the CMakeLists.txt file, you will see that it contains the four instructions we summarized before. In this case, the target name is hello_blink_freertos, and the target_link_libraries section includes the libraries FreeRTOS-Kernel and FreeRTOS-Kernel-Heap4, which are required to call FreeRTOS functions (see the #include "FreeRTOS.h" and #include "task.h" lines in main.c).Before compiling, open the root
CMakeLists.txt and uncomment add_subdirectory(examples/hello_blink_freertos). Reconfigure the project if necessary, then select hello_blink_freertos as the build and launch target.Since you know the target name, please, compile and run the
hello_blink_freertos target. The LED on the board should start blinking. Open the Serial Monitor. You should now see the text Tack-FreeRTOS printed approximately every two seconds.If you have time, you can also explore and run the following examples:
- hello_pico
- hello_freertos
To run these optional examples, uncomment
add_subdirectory(examples/hello_pico) or add_subdirectory(examples/hello_freertos) in the root CMakeLists.txt, depending on the example you choose. Reconfigure the project if necessary.The others are a little bit more complex, and we will explore them in the next session.
Solving compilation problems
Imagine the following scenario: a first-year student was helping with the programming, but wrote the code with several errors. Your task is to find and fix those errors so the project compiles, runs on the device, and prints meaningful output.
You can complete this exercise in two ways:
- Copy the example code into the root
src/main.cand use thehat_apptarget. Be careful, as this replaces the existing application code and uses the root target's CMake configuration. - Build the example separately using the
compilation_errortarget. This keeps the original application unchanged and uses the CMake configuration provided with the example.
We recommend the second option. The following instructions describe this method.
1. Uncomment the line
2. After enabling the example, select
3. Open the files in
4. Identify and fix the main problem in the code, by checking and understanding compilation errors and warning.
5. Rebuild the project until the build completes with status code 0 and no warnings.
6. Flash and run the corrected program on the device.
7. Open the Serial Monitor and verify that the output appears once the program is running.
If everything is fixed and working, you should see lines similar to the following in the serial monitor:
1. Uncomment the line
add_subdirectory(examples/compilation_errors) in the root CMakeLists.txt2. After enabling the example, select
compilation_error as both the compilation and launch target in the VS Code bottom bar. If the target does not appear, reconfigure the CMake project. You can now compile the example and start identifying the errors.3. Open the files in
/examples/compilation_errors and read the error messages shown in the terminal when you try to build.4. Identify and fix the main problem in the code, by checking and understanding compilation errors and warning.
5. Rebuild the project until the build completes with status code 0 and no warnings.
6. Flash and run the corrected program on the device.
7. Open the Serial Monitor and verify that the output appears once the program is running.
If everything is fixed and working, you should see lines similar to the following in the serial monitor:
    time:2494951,temp:19,lux:1281
    time:2496451,temp:18,lux:791
    time:2497951,temp:34,lux:575
When you change the
CMakeLists.txt you might need to reload the cache. To do that, press F1 (or Ctrl+Shift+P) and select: CMake: Delete Cache and Reconfigure. This will reload the build folder. Sometimes, you need to even remove the whole build folder, but let's hope we do not need to do that in this exercise.When you finish upload the file
main.c already with changes done to the following return box.Visualizing data using Arduino plotter
Sometimes, we would like to visualize a graph with the sensor data. One option would be to print the values in the terminal, copy them to a file, and then process them using any Time Series tool. However, Arduino environment offer a very simple tool for doing that: The Serial Plotter.
In order to make it work we would need to send a string of the following format:
variable1:xxx,variable2:xxx\n. We will continue using the compilation_error target from the previous exercise.Open
examples/compilation_errors/src/main.c and find the printTask function. Modify its output to match the format shown below. temp:xxx,lux:yyy\n where xxx and yyy are simulated sensor values generated by the program and stored in global variables.After making the changes, compile and upload the
compilation_error target again. Open the Serial Monitor to verify that the new format is correct. Remember to stop monitoring before opening the same serial port in the Arduino Serial Plotter.After that, open Arduino IDE environment and follow next steps:
- In
Tools > Portchoose the/dev/ttyACM0(or whatever port your code is running) - Go to
Tools > Serial Plotterand open the Serial Ploter. Voila! you can see your sensor data.
This does not allow operate with the data, nor for instance, define the time scale. But might be interesting to detect thresholds or some basic behaviours.
Please, take a screenshot of the figure you have obtained and include it in the following return box.
Using external libraries. The serial-usb-debug
Great progress! But know, let's explain how to include libraries that are defined in the same project. We are going to provide you with libraries for WiFi connectivity, to interact with the Pico HAT (much more of this in session 2) and to create two different serial communication ports: one for writing debug messages and the other to send raw data (e.g sensor data).
We have defined libraries in the same way as we have defined examples. In this way the libraries are in their respective folder inside
libs. If you open usb-serial-debug you observe similar structure to a project, but the CMakeLists.txt is slightly different (Come on!, open the CMakeLists.txt inside the usb-serial-debug, if you have not done it yet). Instead of using
add_executable we use add_library. Libraries do not have a main so they cannot be a "Launch target", but they can be a compilation target. The name of the library is given also in the
add_library. In target_link_libraries, PUBLIC dependencies are used by the library and propagated to targets that link it. PRIVATE dependencies are used internally by the library and are not exposed as part of its public interface.In other to show how the library is working, we have included an example:
hello_dual_cdc. If you open its CMakeLists.txt you can see that the target_link_libraries includes the usb_serial_debug. If you want to include this library in your project, you should do something similar. If you open the src/main.c in the hello_dual_cdc you can see that it includes #include "usbSerialDebug/helper.h". The hello_dual_cdc folder contains the example application, while libs/usb-serial-debug contains the library. The header usbSerialDebug/helper.h is located inside the library's include directory. This is why the application can use #include "usbSerialDebug/helper.h". It looks a bit complicated, but if you understood how libraries work in C should be easy to grasp.You can have a look to the code. It is explained in the Serial Communication Chapter. At some point you should be able to understand what is happening there for your final project. But today we are just interested in running the code and visualizing the data. In this example, the
CMakeLists.txt file uses pico_enable_stdio_usb(..., 0) to disable the Pico SDK's standard USB output for this target. Instead, the usb-serial-debug library provides its own USB serial interface. To send messages through this interface, use usb_serial_print rather than printf. Other stdio functions can still be used. Before compiling, open the root
CMakeLists.txt and uncomment add_subdirectory(examples/hello_dual_cdc). Reconfigure the project if necessary, then select hello_dual_cdc as the build and launch target.Compile and run the
hello_dual_cdc target. This time you should open two different serial monitors: one for debug messages and another for raw data. Typically, these interfaces appear as /dev/ttyACM0 and /dev/ttyACM1, respectively. However, the port numbers may vary. If necessary, check the output of each port to identify which one is used for debug messages and which one sends raw data.IMPORTANT NOTE: Since the library modifies the USB profile of the device, it is recognized with a different name:
Take a screenshot of your screen showing the two serial monitors running in parallel.
University of Oulu TKJHAT. You need to select this device in the VM -> Devices -> USB menu.Take a screenshot of your screen showing the two serial monitors running in parallel.
Storing the files
If you want to save your files you have two options:
Save all the files you have modified, including files in the
examples directories and the CMakeLists.txt file. We recommend compressing them into a ZIP file. IMPORTANT: Do not drag and drop files from the virtual machine to the host computer, as this may cause the system to crash. To transfer your files, use a USB memory stick or an online storage service such as Google Drive or OneDrive, accessed from inside the virtual machine. You can also use the Temporary Code Sharing Space for the Module 2 project 2026.
The best option is using the proper method: GIT (AGAIN, THERE ARE OTHER ALTERNATIVES, THIS IS NOT A MANDATORY METHOD, BUT RECOMMENDED).
During this lecture we do not need to save anything else, but when working on your project you might need it. So, we include here additional instructions. Just follow these instructions, if you want to push the project to the repo you likely created at the beginning of the session.
The mandatory part of the exercise is finished. You can read further if you want to learn GIT in more depth.
The mandatory part of the exercise is finished. You can read further if you want to learn GIT in more depth.
APPENDIX: Storing files with GIT
NOTE: These instructions assume that you cloned the project using Git (Option 1). If you downloaded the project as a ZIP file (Option 2), the folder does not contain Git version history, so the following Git commands will not work directly.
Open your local Git repository folder in VS Code. Then open a new terminal in VS Code and check that you are inside the repository by running
git status. If Git displays the repository status, configure your name and email using the following commands:git config --local user.email "myemail@gmail.com" git config --local user.name "Myname" git config --local --list
- Open the Git view by pressing the Git-icon located at the left-hand side of the window:

- You can see the files modified since the last commit. To create a new commit, you need to enter a message that describes, what kind of changes you made to the code. In this case, the message could just state that this is the first commit of the repository. The easier option is to choose all files, but you can choose individual files by pressing the + button after each file. Once everything is ready, click the big, blue "Commit"-button, and your changes will be saved locally, in the virtual machine you are currently using.
- You can select also
"Commit+Push"that will upload the code to the remote repository and sharing with others. You can also press thePushbutton in the Graph view. - To continue working on code created previously, you need to either clone the project repository, or synchronize your local repository. The choice between these two options depends on if you are continuing your work in the same virtual machine/device as before or starting in a new one.
Cloning
If you are continuing your work in a new virtual machine or device, you need to clone the project repository, so that you get a copy of the latest version of your code and its change history. Cloning happens the easiest by using the GitHub-integration of VSCode (if your repository is saved in GitHub).
Upon opening VSCode in the new virtual machine, you can clone a repository located in GitHub by clicking "Clone Git Repository" at the start screen of VSCode.
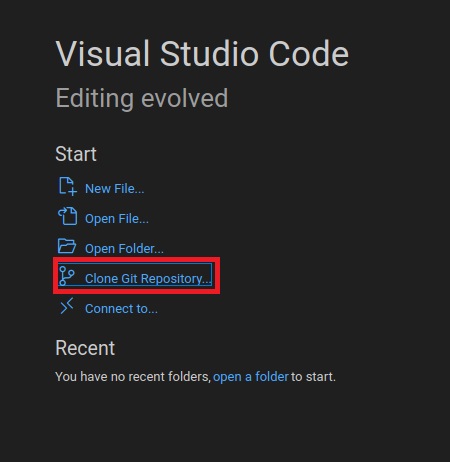
Following view will open at the top of the window:

Here we choose the option "Clone from GitHub", after which the browser opens and you can login to GitHub. Follow the instructions given, and give VSCode the access to your GitHub-repositories. After completing the login, the browser will guide you back to VSCode, where you can select a repository to clone from the list containing all of your GitHub repositories. Choose the home folder of the virtual machine as the saving location for your repository.
Synchronizing
If you are continuing your work in the same virtual machine or device as before, you need to open the previous project folder where you created the Git-repository. It is a good practice to download the latest changes from the version control system server, so that you can avoid conflicts. This process, also called synchronizing, can be done in VSCode by clicking the synchronize-button located at the bottom left corner of the window:

When the synchronization is ready, you have the latest version of the project's code in your local Git-repository. Now you can start making changes, and be sure that changes made by for example other group members are included.