The Primary Instance of a course is a special nomination that can be given to one instance of each course at a time. It gives the instance a special URL that has the course name slug twice instead of having the course name slug followed by the instance name slug. The main use case is to be able to get a shareable link that will always point to the most recent course instance. This way links to Lovelace courses from other sites will not become obsolete whenever a new course instance is created.
File Upload Exercises
File upload exercises are the primary feature of Lovelace. They are exercises where students return one or more (usually) code files that are checked by running them or - more often - using a testing program to run the student's code in such a way that its functionality can be tested with more detail. Since anything that runs in the Linux command line can act as the testing backend, file upload exercises have almost limitless potential. The downside of course is that someone needs to implement checking programs.
In the past file upload exercises worked by comparing the output of the student program to the output of the reference program. However due to this having multiple issues, modern exercises generally work by outputting a test log as JSON which shows a summary of all testing that was done. Just like other exercise types, file upload exercises also support hints. However, the output formatting for file upload exercise feedback is richer than that of other exercises.
Creating File Upload Exercises
Unlike other exercise types, file upload exercises use a completely custom admin page (it's still accessed from the admin site). Besides having a more optimized layout, the form also doesn't show both languages side by side. The language is changed from a selector at the bottom of the page instead. Remember that the usual translation fallback rules apply, so always edit the default language fields first.
Just like other exercise types, the content is divided into the content box itself and the question box. The default text for the question box will be "Submit your files here:". You also need to set the number of points given for passing this exercise. The other fields are explained below:
- Evaluation group - you can include this task in an evaluation groupby inputting the group's tag here.
- Allow group submissions - check this to enable group submissionmode for courses that allow working in group.
- Evaluated by hand - instead of using the result of the checked to deem the final score of this task, use manual evaluationinstead. Automatic checking can still be ran for feedback etc.
- Accepted file names - list of comma-separated filenames or wildcard patterns that are accepted for this task.
- Maximum number of files - you can limit the number of files that can be submitted.
- Answer mode - this determines how students enter their answer, the options are to upload a file, or to use a text field. If text field is selected, the next field becomes mandatory.
- Save answer as - filename to save the file as if text field answer mode is selected. In the future this can also be used to force rename a single submitted file, but this is currently not implemented.
You can also include feedback questions from the box on the right.
Included Files
Note: whenever you upload files, you must press Save from the bottom of the exercise edit form to actually upload them. You can actually use this to your advantage in some browsers (at least Chrome). If you change the file on your computer and press save again, it uploads the changed version without having to click through the upload dialogs again.
The most important part are the included files. There are two categories of files that can be used in file upload exercises. The first set of files are specific for this exercise. These should include the testing program and potentially reference implementation. Although reference implementation is not used in modern checkers, having it available for TAs could be a good idea. Generally speaking files that are only needed by this particular exercise should go here.
When you add a file to this group, the following dialog is shown.
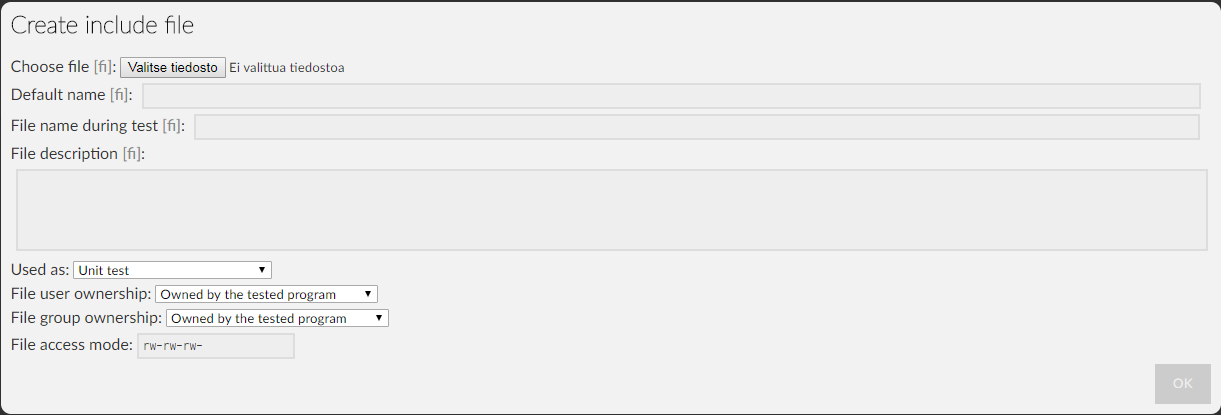
Generally the only fields that you need to touch are "Choose file", "Default name", "Name during test" and "Used as". The default name is the name that is used by the system as this file's name while name during test is the name the file is given when it's copied to the temporary directory where the test is run. They can usually be the same. Note that neither of these is the same as the file's name on disk. Just like media files, files on disk are never replaced - new versions are given a generated unique tail instead.
The "used as" field is mostly used for labeling the file. Currently the only behavior that is different between all of the roles is that files marked as reference implementation are not copied to the temporary directory when the student's answer is tested. Instead, they are copied for a reference run where the student's answer is replaced by the reference implementation. This is only relevant for exercises that use the legacy evaluation mode. Normally you don't need to touch the file ownership and permission fields.
The second group of files are shared across the entire
course
. This means all kinds of library files and testing frameworks that are used by more than one exercise. This group is extremely important for maintenance: if you change a shared file for one exercise, the change will affect all exercises that use the file. Shared files use context models similar to media files
. Therefore version information is maintained by instance
- archived versions of the exercise will use an archived version of each instance file.The dialog that is opened when "Add and edit" is clicked is a bit more complex as it allows you to both edit and add instance files, and also choose which of them to link to the exercise. All files needed by the exercise must be linked - otherwise they will not be copied to the temporary folder when the tests are executed. The dialog is shown below:
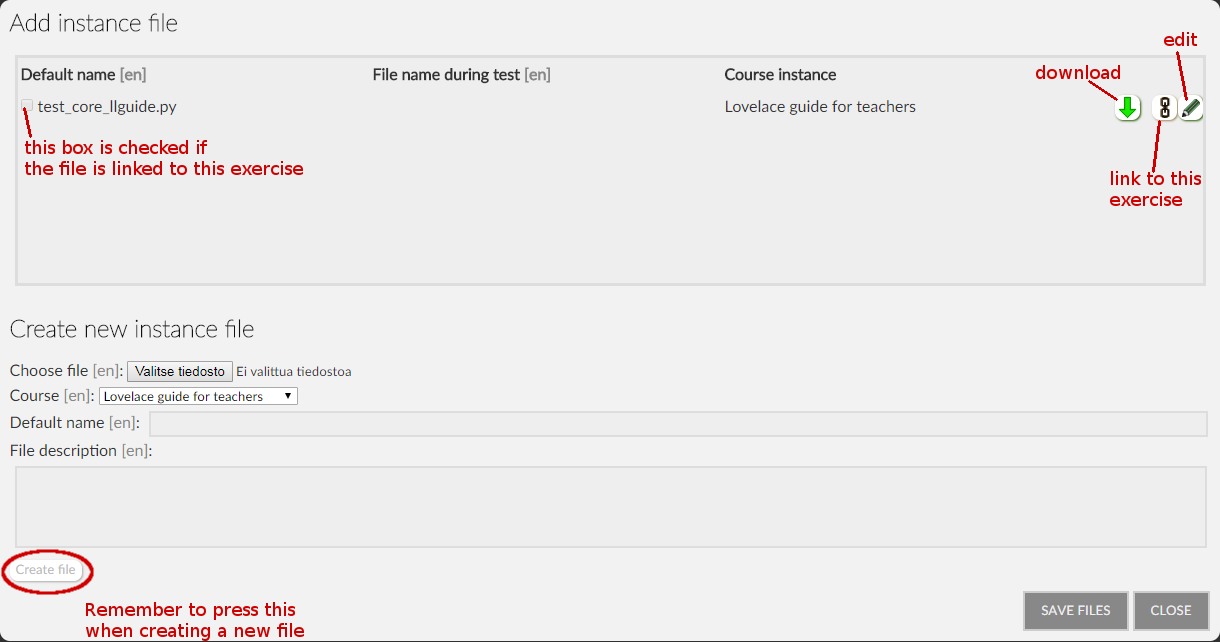
From this dialog window you can create new instance files. An instance file itself contains no context information, but each of them is tied to a
course
. This is done to avoid conflicts and to control access to these files. Beyond that, an instance file is just an uploaded file with a given default name (again, not the same as its name on disk). You can use the edit button to modify the shared file itself. Remember that doing so will affect all exercises that use the file (unless they have been archived to use a fixed
revision
). The edit dialog is the same as the one for creating a new instance file. Finally, in order to link the file to this exercise you need to press the link button. This is where you define the context information for the file - i.e. how it is used in this exercise. Usually this only involves setting a local name, and the file's role (usually "Library file"). Remember to click "Add link", otherwise the link will not be saved. 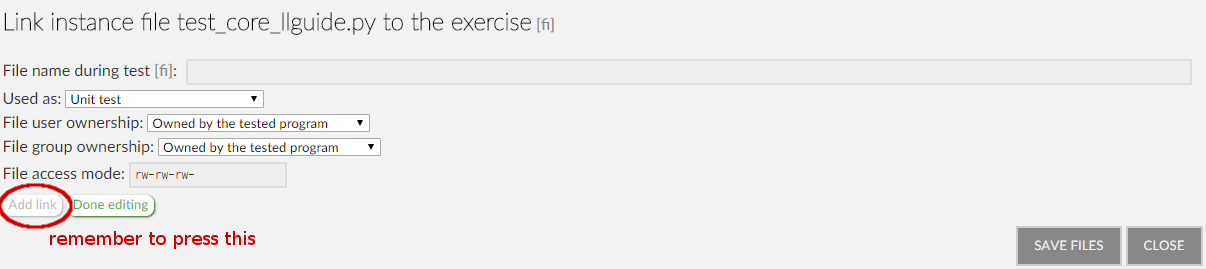
Tests
File upload exercises can have multiple tests, and tests can have multiple stages. However, these features were primarily designed with
legacy checkers
in mind. In modern checkers, running multiple tests has been moved to the backend code. The only reason to include multiple tests is if you want to mix the two types of tests. When you add a test you will be asked to give the test a name (this will be shown in the student's interface), and to select which of the exercise files will actually be used in this test. You can use Ctrl and Shift to select/deselect multiple files. 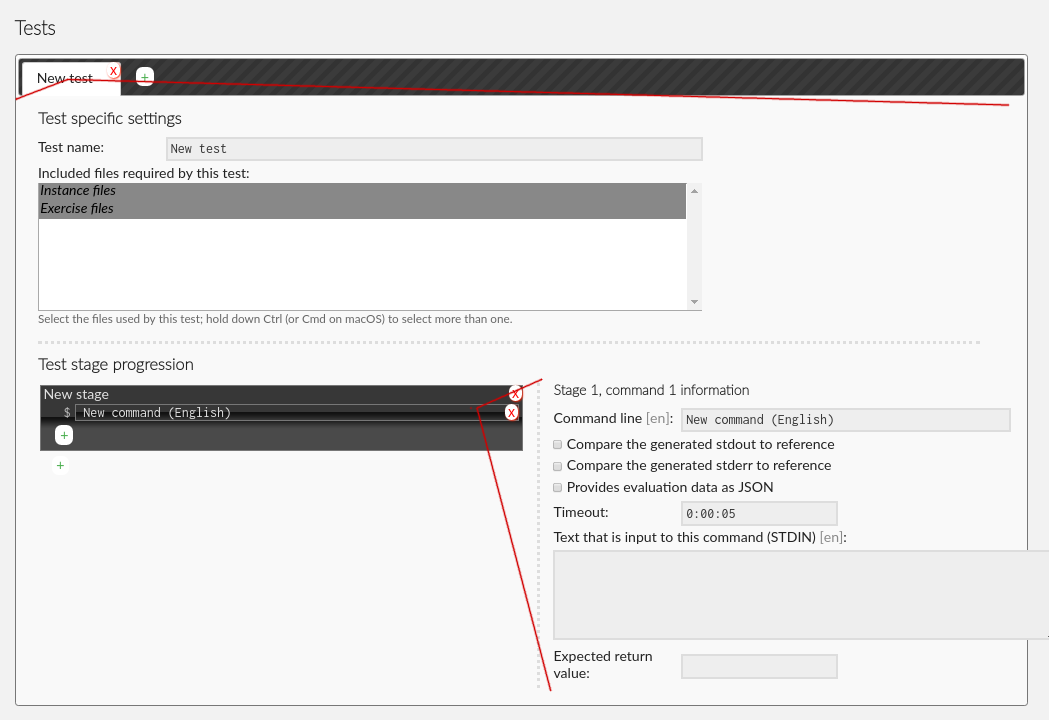
After filling in the basic information, you need to add at least one stage with at least one command. In many cases the only command that needs to be run is the one that starts the checking program. Simply type the command into the "Command line" field. When writing the command use
$RETURNABLES where you want the names of the returned files to be. E.g.python3 alku_func_test.py -l fi $RETURNABLES
is the command to start one exercise's checker in the Elementary Programming course. Let's assume the student returns two files, main.py and functions.py. The final command that is executed would then be
python3 alku_func_test.py -l fi main.py functions.py
The checkboxes below define whether the stage is run in legacy mode or in modern mode. If "Provides evaluation data as JSON" is checked, modern mode is used. Otherwise this stage will be treated as a legacy check.
For legacy checks you can type inputs that will be written to the STDIN before running the command. This allows crude testing of programs that prompt user inputs. For legacy checks, pass or fail is determined by comparing with the reference output, and 1:1 similarity is required. You can also define an expected return value for the code execution. Note that while checking itself should be done with JSON evaluation data, legacy mode is still useful for certain pre-check operations such as code compiling. You can add multiple commands by either adding new commands to the current stage, or by adding a new stage. By default stages are dependent on the previous stages being successful. You can edit stage information by clicking its name.
Modern checkers are expected to take care of generating their inputs, and doing the checking internally. If you tick the JSON evaluation box, the other fields should be left empty. Generally the entire testing report with all tests and runs will be in the JSON returned by the checking program. It is also currently rendered separately in the test output in the student's view (see below). Note that only one JSON document from all tests combined will be actually rendered - currently multiple tests that output JSON are not supported.
The timeout field should be used wisely. In particular if a student code has infinite loops, it will run for the entire duration of the timeout. Obviously you don't want legit solutions to timeout however. Most tests run just fine in 5 seconds, but if your exercise requires more complex code, make sure to do some timing test runs. Also keep in mind that students aren't always writing as optimized code as you are. If you want to grade the performance, then do the measuring for scoring in the checking program, and set this value to something slightly higher than the worst acceptable execution time.
File Upload Exercise Output
The output displayed to students when they return a file is split into two parts: test information which shows the tests, stages and commands ran; and the messages rendered from JSON evaluation (if available). If any commands were checked in
legacy mode
, stdout and stderr comparisons from those commands are shown in the test information area. If there are multiple tests, students can switch between them using the tabs. Currently switching tabs will not affect the messages area at all.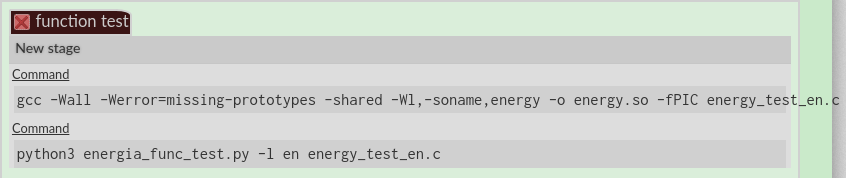
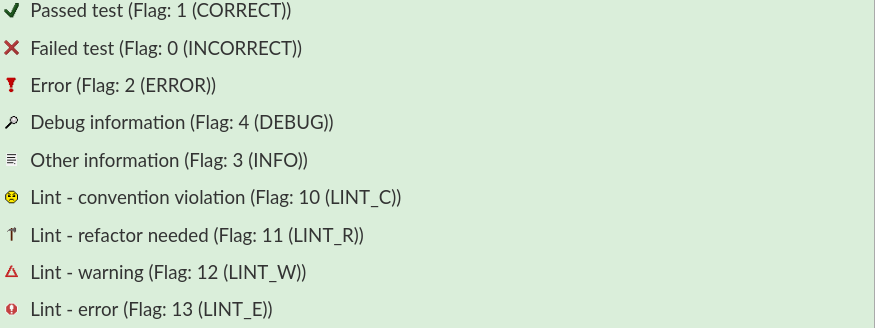
The messages area which renders the JSON evaluation is much better designed for displaying detailed information about the testing. It's divided into tests, and each test is divided into runs. Each run is a collapsible panel that can be expanded/collapsed by clicking anywhere within it. Initially only the first run of each test is expanded to save space. Runs are also always sorted so that passed tests are in the bottom, drawing student attention to failed tests. Each run contains one or more messages where the first line is always the test result (pass, fail or error). Messages include flags which determine what icon is used as the message bullet.
The messages are rendered though Lovelace's
markup parser
. You can use markup to make feedback cleaner. There are some limitations. If you include media files
such as images in the messages, they must exist in the Lovelace database. If you want to use dynamic images that are generated by the checker, you can generate SVG and include it with the SVG-markup.
Implementing Checkers
Checkers can be implemented with anything that runs on the checking server and is capable of outputting JSON into stdout (the
checking daemon
captures the test process' stdout and stderr). You can check the JSON specification below. While it's possible to write each checker from scratch, it is highly recommended to use a framework for creating checkers as that makes them more consistent, less error-prone and easier to maintain. The recommendation is to use PySenpai
, a library/framework that's been developed alongside Lovelace. While originally created for Python exercises, it has extensions for C, Y86 assembly and Matlab. See the sub-chapters for more information about PySenpai and its supported languages.Evaluation JSON Format
The evaluation is a JSON document with the following structure with optional attributes marked.
tester (string) - optional
tests (array)
-- test (object)
---- title (string)
---- runs (array)
------ run (object)
-------- output (array)
---------- message (object)
------------ msg (string)
------------ flag (integer)
------------ triggers (array) - optional
-------------- trigger (string)
------------ hints (array) - optional
-------------- hint (string)
result (object)
-- correct (boolean)
-- score (integer)
-- max (integer)
Where test objects are test scenarios that contain multiple runs. Each run is done with the same setup (same evaluator, same reference etc.) but under different conditions (arguments, inputs etc.). Each run contains one or more messages - these are the feedback given to the student. Messages are objects that contain four attributes, each treated differently when rendering the evaluation:
- msg - this is the message that will be displayed in the evaluation log
- flag - indicates which bullet to use with the message (see above)
- triggers - list of trigger names to fire triggerable highlights
- hints - list of messages that will be shown in the hints box
Log messages should be used to describe the testing process and provide details to the student. This includes letting the student know which part of the program is being tested, what arguments it was tested with and what was expected of it. All of this information should help the student when debugging their code. On the other hand, hints should be more immediate description of actions that are most likely to help the student (e.g. "Check the order of parameters in your function definition."). Triggerable highlights should be used to attract student attention to details in the exercise description that they may have missed, or to draw attention to specific answers in the task's
FAQ
.Here is an example JSON document with the first message of the rendered evaluation shown above.
{
    "tester": "energia_func_test",
    "tests": [
        {
            "title": "Loading source code file energy_test_en.c as library for testing...",
            "runs": [
                {
                    "output": []
                }
            ]
        },
        {
            "title": "Testing function calculate_kinetic_energy",
            "runs": [
                {
                    "output": [
                        {
                            "msg": "The function returned incorrect value(s)",
                            "flag": 0
                        },
                        {
                            "msg": "Function call used:\n{{{highlight=c\ncalculate_kinetic_energy(46.4, 77.3);\n}}}",
                            "flag": 4
                        },
                        {
                            "msg": "Your function returned: 83211.9140625",
                            "flag": 4
                        },
                        {
                            "msg": "Expected result: 83211.904",
                            "flag": 4
                        },
                        {
                            "msg": "Performing additional tests that may suggest cause for the error...",
                            "flag": 3
                        },
                        {
                            "msg": "There was a rounding error caused by insufficient precision. Remember to use double instead of float",
                            "flag": 3,
                            "hints": ["You need to use double for sufficient precision"],
                            "triggers": ["energy-precision-hint"]
                        }
                    ]
                }
            ]
        }
    ],
    "result": {
        "correct": false,
        "score": 0,
        "max": 1
    }
}
Anna palautetta
Kommentteja materiaalista?