The Primary Instance of a course is a special nomination that can be given to one instance of each course at a time. It gives the instance a special URL that has the course name slug twice instead of having the course name slug followed by the instance name slug. The main use case is to be able to get a shareable link that will always point to the most recent course instance. This way links to Lovelace courses from other sites will not become obsolete whenever a new course instance is created.
Managing Your Course Instance
Course instance
is the primary unit of teaching in Lovelace. In typical use cases, a single course instance corresponds to a single time span the course is run (e.g. semester). Course instance management includes the following topics:- Managing when the course is open, and how enrollments are handled
- Setting course contact email, and automated welcome messages
- Setting point thresholds for grades
- Meta-information such as tags to be shown in the system front page, and content license information
- Managing contents of the course in the form of the course index
The last part is a wider topic that will be handled in more detail later in this document. Before that, we will go through the various fields in the course instance settings form.
In order to see the various staff controls, you must first enable staff mode from the top navigation bar, next to the language selector. This mode stays on until you either click on it again to disable it, or close the browser tab.
Course Instance Settings Form
This is the primary form where most of the general course setting information can be added and/or modified. Some fields are translated, and in the current version of Lovelace you will be editing the field that matches your current site language. This will likely change in a future version to use forms that have fields for all enabled languages.
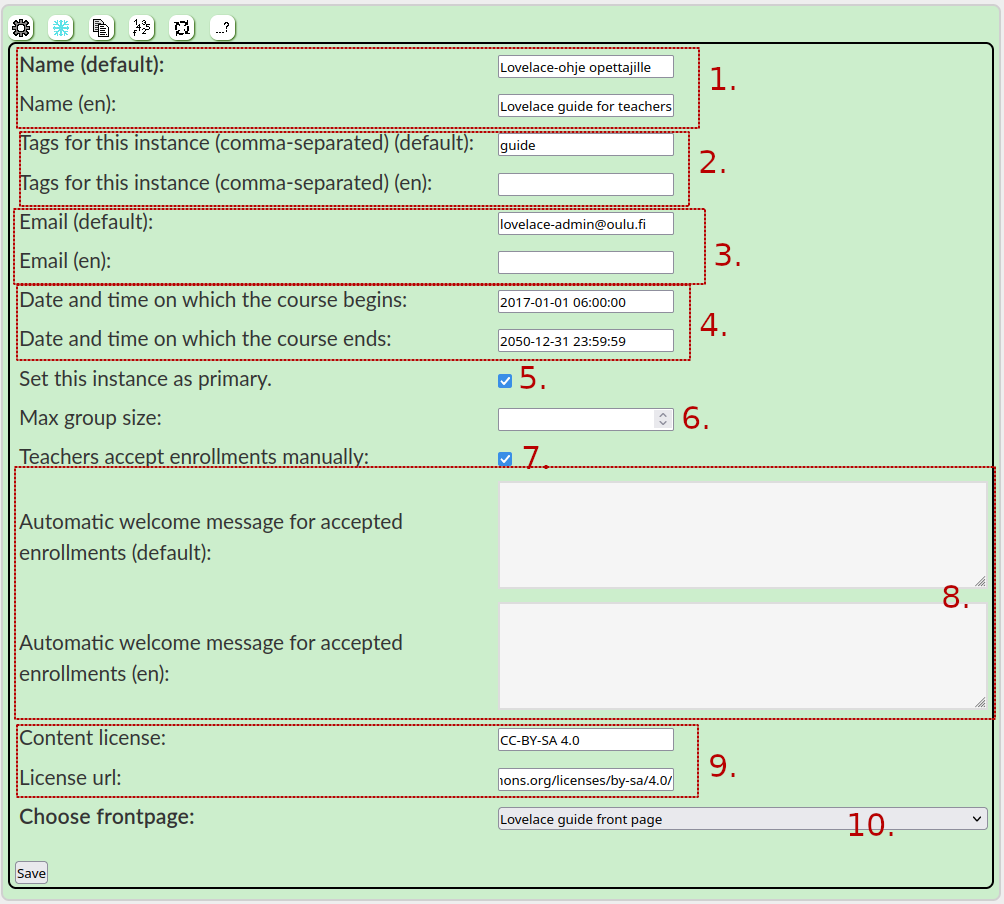
1. Instance Name
This is the displayed name of your course instance. It is typically course name + some context information, e.g. "My Awesome Course Spring 2023". Course instance names are unique across the entire system. Furthemore, the URL of your course instance is based on the slugified form of this name. Unlike content pages that never change their slug once created, course instance slug will be updated every time the name is changed. In other words, care must be taken if changing the name while it is in active use. However, it is worth noting that if this is the
primary instance
then the system will prioritize using primary URLs where your course instance name is not part of the URL. 2. Instance Tags
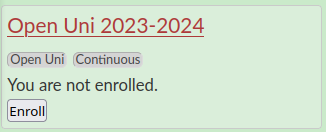
The primary use of instance tags is to display extra context information on the system front page about this particular course instance. Their main intended use case is to help students pick the correct instance for courses that have multiple parellel instances, but they can also provide some additional hints about the level of the material etc.
This field is a text field that is split from commas into individual tags for display. This field is also translated.
3. Email
This field should have the contact email for the course instance. This should be either the email address of the main responsible teacher of the course, or an email list address that reaches the entire staff. Lovelace will send error reports to this email address when there are crashes in
backend checkers
. While not mandatory, this field is highly recommended for any course that uses the checking backend in any form.4. Start and End Dates
These two fields take ISO datetime values (
YYYY-MM-DD HH:MM:SS) and they will determine the window during which this course instance is active. When an instance is active, it will be displayed in the system front page, and students can enroll to it. Note that it does not control submitting answers to the course, so it is more akin to registration period. Students who have enrolled to the course instance can still access it after the end date. 5. Primary Instance
Checking this box will make the course instance the
primary instance
of this course. The main purpose of this feature is to give you a permanent URL that is not dependent on the course instance name, and will instead always lead to the primary instance. Such an URL can be distributed easily without worrying about its expiration. This checkbox controls which instance this permanent URL will lead to. If there are no parallel course instances, simply check this box for the latest version. This check will automatically be cleared from other instances when it is set in one of them. 6. Max Group Size
This field determines the maximum size of
student groups
in the course. If empty, groups cannot be formed by students. If set to a number, students are able to form groups up to that size. The life-time of a student group is intended to be the entire course duration. If your implementation has a need for ad hoc groups, it is not currently supported by the system and you will have to manage them elsewhere.7. Manual Acceptance
When students enroll to a course in Lovelace, they will either be automatically accepted, or they will have to apply to enroll. If this field is checked, enrollments need to be approved by the teacher from the enrollments manager (see: -- WARNING: BROKEN LINK --managing enrollments guide).
8. Welcome Email
If this field has content, the system will automatically send it as an email to a student's registered email address when they enroll to the course (or when their enrollment is accepted). The email will be sent with
[your-course]-notices@[lovelace-server] as the sender address, and your course instance's contact email as the reply-to address. The main use of this field is to give students additional information, and links that you might not want to show publicly on the site. This field is translated, and the content to be sent is determined by the student's selected language when they enroll.
9. License Information
These fields can be filled to display license information about the course instance contents at the bottom of the page. The first field is the license name (e.g. CC-BY-SA), and the second field is the URL that contains the license text. This will be displayed as a link at the bottom of the page.

The current implementation assumes that all of your content is under the same license. If there are exceptions, you should notify about them on the page itself. We encourage the use of Creative Commons licenses to keep education readily available for everyone.
10. Front Page
This allows you to select a front page for your course, from existing pages that you have access to. The selected page's contents will be displayed underneath the table of contents on your course's front page. The frontt page should contain mostly generic information about the course. We have discovered that students do not always scroll down to it, and information there might be go unread by them. Putting really important information like course completion rules into a separate, accurately named page in the table of contents has been more successful.
Grade Thresholds Form
This form allows you to specify point thresholds for automatic grading. It is a relatively simple system where you can add grades and the minimum score for each. Grades can be any short strings to account for different grading systems. When using
course completion
to calculate grades, each student's line will display the highest grade they can achieve with their current points total. In addition, you can display the grade thresholds in content pages. This allows you to let students know what the thresholds are without worrying about remembering to update pages if you change the thresholds. It is however worth noting that these references are not tracked, so the system cannot currently refresh cache automatically for pages that display the thresholds. Remember to
refresh cache
on your grading information page after changing these thresholds. Refer to the -- WARNING: BROKEN LINK --markup guide on how to include grade thresholds in pages.Table of Contents Editing
The staff controls in the table of contents allow you to add content pages to your course, and organize them into a clean table of contents where pages can have sub-pages. It also allows you to configure the
context node
for each page. The context node determines rules for displaying the content, and answering tasks in that content.
Adding Content
The green plus button adds a new page. The page's placement depends on which button you press. If you press the button from the controls of an existing page, the new page will be added either after that page on the same level, or as its sub-page. The button on top of the table of contents adds a new page to the beginning. Please refer to -- WARNING: BROKEN LINK --the content settings section of this document for information about what different fields in the form mean.
Unlinking Content
You can unlink content from the course by pressing the unlink button. This is not a delete. It will simply unassociate the content from this course instance. The page can no longer be viewed as part of this course instance, but if it was linked to a past instance, it can still be accessed that way. Deletion of pages is only possible from the
admin site
and is generally discouraged. If a page is not referred to from any course instance, it will not be viewable, and is effectively soft-deleted.Moving Content
You can reorganize course contents by moving. To initiate a move, click and hold the left mouse button on the move button of the page you want to move. Doing this will display landing markers on other pages. Drag the move button into the landing marker of your choice to move the content. These markers will place the content either above or below the target content, or as its sub-page.

Content Settings
Content settings allow you to specify rules about displaying content, and answering tasks contained within it. These settings are saved on the
context node
that associate the content with the course instance. This means that different course instances can have different settings for the same content. There are two version of the form with small enough differences that they are represented here with only one example. When adding new content, the form has two extra fields that are not present when editing settings later.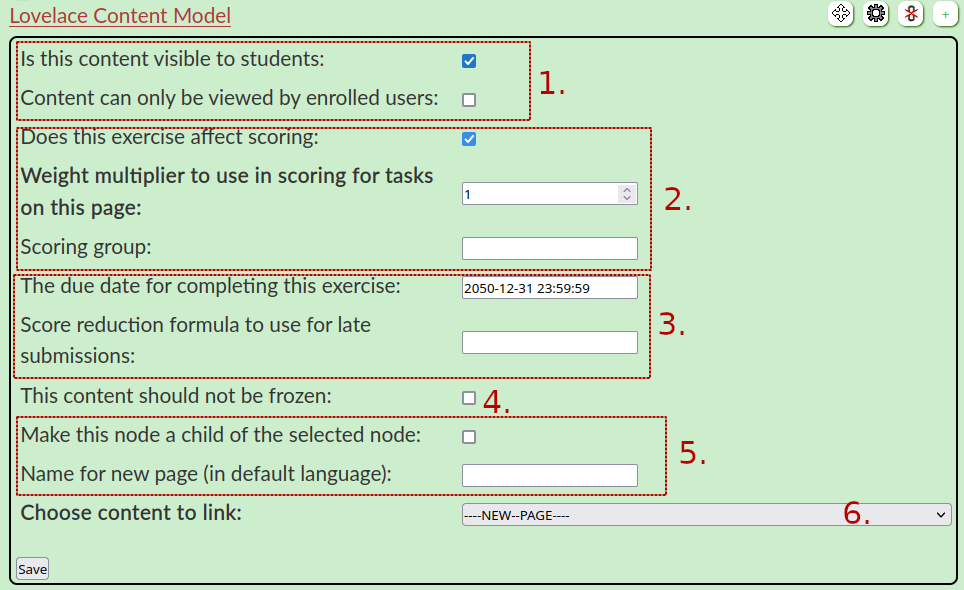
1. Viewing Settings
The first checkbox determines whether the content is shown in the course table of contents for students. When viewing the table of contents as a staff member, any pages that are not visible to students will have purple background. While in this state, content can only be viewed by course staff members.
The second checkbox allows you to make pages that cannot be viewed unless the viewer is enrolled to the course (or a staff member). Generally keeping study materials open to the public is encouraged, but the option to lock pages behind enrollment exists for pages that have content you do not want to expose publicly. When viewing the table of contents as a staff member, a black lock icon will be displayed in front of pages that have been locked behind enrollment. For viewers who are not enrolled, these pages will not be visible in the table of contents.
2. Scoring Settings
This group of settings affects scoring of tasks on the page. The first field determines whether any tasks on the page contribute to course grade or not. It is largely useful for pages that contain surveys you want students to answer, but do not want them to show up in grading results. Pages that are not included in scoring do not affect students' total points regardless of whether tasks on the page have point values or not, and they also are not displayed in the summary page when viewing course completion or a single student's completion records.
Weight multiplier is used to do more or less what you'd expect from the name. It is a weight that is applied to the raw scores of tasks on the page when calculating the students' total points for grading. This field supports up to two decimal spaces.
Pages can be grouped together into
scoring groups
to create mutually alternative assignments. This is achieved by giving the same group identifier to all pages that are supposed to be alternatives to each other. For instance, if your course has three chances to take an online exam, and only highest result is used, you can group the exam pages together by using e.g. my-course-exam as the value of this field.3. Deadline Settings
These settings allow you to set a deadline for tasks on the page, and also configure how students are penalized for submitting tasks late. The deadline field takes an ISO datetime string (YYYY-MM-DD HH:MMS:SS). The second field takes a mathematical formula written as a Python format string with the following variables available as placeholders.
{p}- task points given for the answer{m}- maximum points of the task{q}- quotient, points / max{d}- amount of days the submission is late by
Practical examples values:
{q} / 2- this rule halves points awarded for late submissions0- this rule sets points to zero for late submissions{q} * 0.9 ** {d}- this rule penalizes late submissions at a rate of 10% per day
4. Freeze Prevention
This checkbox setting is mostly for very specific use cases. When you archive the course instance, any pages that have been configured to not be frozen will remain in the most recent version. This means any edits done to those pages after the archiving will be visible in the archived course instance. This is mostly relevant if you need to make something like a meeting calendar available for students who are completing a past course instance late. For most scenarios it's best to leave this unset.
5. New Page Settings
These two settings are only present when adding a new page. The first field makes the page a sub-page of the page where the add page button was clicked. If not set, the new page will be placed after that page on the same level; if set it will be placed as its child with an extra level of indetation. The second field allows you to specify a name when adding a new empty page. The name is provided in the default language, and the page's
slug
will be generated from it. When choosing a name, keep in mind that page names are unique across the system.6. Page Selector
This select field allows you to select what content to show in the page. It allows you to choose any page that you can access (see access model for more details). There aren't a lot of situations where you would want to change this value, but it can be relevant when making parallel instances.