Assembly-kieli
Osaamistavoitteet: Tämän materiaalin luettuaan opiskelija tuntee y86-assembly-kielen syntaksin ja keinoja miten ylemmän tason ohjelmointikielten toiminnallisuutta voidaan toteuttaa assemblyllä.
Kurssilla opetellaan ensin y86-assembly- ja konekieli, joita sitten käytetään havainnollistamaan käskyn suoritusta prosessorissa ja esitellään suorittimen sisäiset osat jotka liittyvät käskyn suorittamiseen. Lisäksi y86-assembly-kieltä käytetään kurssin harjoitustehtävien ja -työn tekemisessä assembly-kääntäjän (engl. assembler) ja -simulaattorin avulla.
y86-64:sen assemblyn syntaksi ja käskykanta ovat perusteiltaan ja käytännössä hyvin samankaltaisia kuin x86 assembly. Näin olen itseasiassa pienillä muutoksilla ohjelmia voi käyttää molemmissa suorittimissa! Toki on huomattava merkittävä ero käskykannan laajuudessa, koska y86 on opetuskäyttöön kehitetty hyvin yksinkertaistettu suoritin. Lähellekään kaikkia toista tuhatta x86-suoritinperheen assembly-käskyjä ole toteutettu y86-64-suorittimeen.
Yleistä
Nyt y86-assemblyllä ohjelmoidessa pelaamme tietysti edellisessä materiaalissa esittelyn y86-suoritinarkkitehtuurin pohjalta. Meillä on siis käytössä:
- 64-bittinen arkkitehtuuri, jossa:
- Tavujärjestys on little endian, joten vähiten merkitsevä tavu on ensin. Esimerkiksi heksaluvun
0x12345678tavut esitettäisiin muistissa järjestyksessä0x78,0x56,0x34,0x12 - Bittijärjestys on tuttu big endian, eli MSB vasemmalla puolen
- Rekisterit:
- Yleiskäyttöiset
%rax,%rcx,%rdx,%rbx,%rsi,%rdi,%r8-%r14 - Pinorekisterit: alkupään osoite
%rbpja pino-osoitin%rsp - Tilaliput: nollalippu
ZF, merkkilippuSFja ylivuotolippuOF - Muistin osoitustavat suora-, rekisteri- ja epäsuora osoitus.
Huomataan, että y86-assemblykäskyt päättyvät usein kirjaimeen
q, joka tarkoittaa sitä että käskyn käsittelemä operandi on 64-bittinen (quad). Yleisesti 32-bittistä operandia merkitsee kirjain l (long word) ja 16-bittistä operandia kirjain w (word), mutta y86:sessa on siis käytössä vain 64-bittiset luvut.Näillätiedoin lähdetäänpä katsomaan y86-assemblyn syntaksia..
Siirto-operaatiot
Aloitimme JTKJ-osuudessa C-kielen ohjelmoinnin opettelun ottamalla muuttujat käyttöön ohjelmassamme, joten tehdään nyt sama y86-assemblyllä. Yleisesti assembly-kielissä ei ole käytössä loogisia nimiä muuttujille, tyyliin
uint8_t kalansaalis = 3;, vaan sen sijaan käytämme muuttujina suorittimen rekistereitä ja muistia suoraan muistiosoitteiden kautta. Muistamme arkkitehtuurikuvasta, että ALU tekee operaatiot suorittimen sisäisessä muistissa (=rekistereissä) oleville operandeille. Joten,
- Sijoitusoperaatioilla voimme asettaa ja lukea rekisterien arvoja, jotka ovat käskyjen operandeja.
- Vastaavasti kuin C-kielellä osoittimilla katsotaan mitä muistipaikasta löytyy, assembly-kielen siirtokäskyille voidaan antaa muistiosoite, josta operandi ensin haetaan, ja viedään annettuun rekisteriin.
Siirtokäskyjä y86-assemblyssä on neljä. Yleinen käsky on
movq, jonka eteen tarvitaan kaksi kirjainta ilmaisemaan molempien operandien tyypit, eli mi(s)tä siirretään ja minne. Käskyt ottavat tyypin mukaan kaksi operandia, eli juurikin mistä arvo siiretään ja minne. irmovq: siirtää vakioarvon (i=immediate) rekisteriin (r=register)irrrmovq: siirtää arvon rekisteristä rekisteriinrrmrmovq: siirtää arvon muistista (m=memory) rekisteriinmrrmmovq: siirtää arvon rekisteristä muistiinrm
Huomioitavaa y86-assemblyssä on, ettei siirtoja voi tehdä muistiosoitteesta toiseen tai vakioarvoa ei voi viedä suoraan muistiin. Aina pitää mennään jonkin rekisterin kautta. Selitys tähän tulee myöhemmässä materiaalissa..
Koodiesimerkki.
#.pos 0
   irmovq $4,%rax      # Suora osoitus: sijoitus %rax = 4
   rrmovq %rax,%rcx    # Rekisteriosoitus: sijoitus %rcx = %rax
   mrmovq (%rdi), %r10 # Epäsuora osoitus: haetaan arvo %rdi:n osoittamasta muisti-
                       # paikasta ja sijoitetaan se rekisteriin %r10
   rmmovq %rsi,8(%rdx) # Epäsuora osoitus: sijoitetaan %rsi:n arvo
                       # muistiosoitteeseen, joka on %rdx:n arvo + 8
#  halt
Siirto-operaatioissa kaikki aiemmassa materiaalissa esitetyt muistin osoitustavat ovat käytössä, mutta palataan niihin hetken päästä tarkemmin..
Aritmeettiset operaatiot
Aritmeettisiä operaatiota on käytössä vain neljä erilaista, tarkoittaen että monimutkaisemmat operaatiot kuten kerto- tai jakolasku tulee toteuttaa itse aliohjelmina!
Käskyt ottavat kaksi rekisterioperandia, jotka voivat olla mitä tahansa rekistereitä (alla esimerkin vuoksi satunnaisia rekistereitä).
addq %rax,%r9: yhteenlaskur9 = r9 + raxsubq %r9,%r12: vähennyslaskur12 = r12 - r9andq %rax,%rbx: JA-operaatiorbx = rbx & raxxorq %rax,%rsi: ERI-operaatiorsi = rsi ^ rax
Lisäksi tietysti suorittimen tilabitit asettuvat operaation tuloksen mukaan.
Koodiesimerkki.
#.pos 0
   irmovq $4,%rax      # 1. operandi luku 4
   irmovq $3,%rbx      # 2. operandi luku 3
   addq   %rbx,%rax    # %rax = %rax + %rbx = 4 + 3 = 7

   irmovq $7, %rbx     # 2. operandi luku 7
   subq   %rbx,%rax    # %rax = %rax - %rbx = 7 - 7 = 0
                       # Nyt ZF-lippu asettui
#  halt
Hox! Vakioarvoja (=numeroita) ei voi operandeina käyttää, koska muistetaan jälleen että ALU operoi aina rekisterien kanssa.
Ehdolliset siirto-operaatiot
Jahas, emme päässeetkään siirto-operaatioista eroon ihan niin helposti.. assemblykielessä on myös suorien siirto-operaatioiden lisäksi ehdollisia siirto-operaatioita, joiden toiminta riippuu tilalippujen tiloista. Ehdolliset siirto-operaatiot ovatkin kätevä (=joskus ainut) tapa toteuttaa ohjelmaan korkean tason kieliä vastaavia ehto- ja ohjausrakenteita.
Ehdolliset siirtokäskyt ottavat operandeikseen rekistereitä. Ehdollisuus käskyssä toteutuu siten, että ennen sen suoristusta tarkistetaan käskykohtaisen tilalipun tila, ja jos se on haluttu, suoritetaan siirtokäsky.
Ehdolliset siirtokäskyt, jossa r1 ja r2 sen operandirekisterit:
cmove(equal): siirto toteutuu kun nollalippu on asetettu (ZF=1)cmovne(not equal): siirto toteutuu, kun nollalippu ei ole asetettu (ZF=0)cmovl(less): toteutuu kun merkkilippu tai nollalippu on asetettu (SF^OF)cmovle(less or equal): toteutuu kun ((SF^OF) | ZF)cmovge(greater or equal): toteutuu kun (~(SF^OF))cmovg(greater): toteutuu kun (~(SF^OF) & ~ZF)
Ehdollisten siirtokäskyjen toteutuksen takana on idea saada ALUn digitaalilogiikan toteutus mahdollisimman yksinkertaiseksi. Seurauksena tästä sitten assembly-ohjelmoijan täytyykin itse miettiä vertailuoperaatiot tilabittien näkökulmasta, eikä totutusti helppolukuisina vertailuoperaatioina.. Tämä toimintatapa ei ole mitenkään riippuvainen suorittimen käskykannasta vaan on yleisesti käytössä kaikissa assemblykielissä.
Koodiesimerkki. C-kielen ehtolauseke..
if (a == 10) {
   b = a;
}
..toteutettuna y86-assemblyllä:
#.pos 0
   irmovq $10,%rax     # a = 10
   irmovq $10,%rcx     # Vakio vertailuarvo 10
   subq %rax,%rcx      # "vertailu"operaatio
   cmove %rax,%rbx     # jos ZF=1, sijoitus %rbx = %rax, eli tässä b = a
#  halt
Ehdolliset siirtokäskyt voivat optimoida prosessorin toimintaa, josta lisää myöhemmin..
Hyppykäskyt
Hyppykäskyjä y86-assemblyssä onkin käytössä laajempi valikoima eli kokonaista seitsemän erilaista. Vastaavasti kuten ehdollisissa siirto-operaatioissa, hyppykäskyssä ei itsessään vertailla mitään, vaan ne tekevät hyppypäätöksen tilabittien perusteella. Operandiksi hyppykäskylle annetaan muistiosoite / muistiosoitteen looginen nimi, mihin hypätään.
jmp: Hyppää ehdoittajeyhtäsuuri (equal) toteutuu kun (ZF=1)jneerisuuri (not equal) toteutuu kun (ZF=0)jlepienempi tai yhtäsuuri (less or equal) toteutuu kun ((SF^OF) | ZF)jlpienempi (less) toteutuu kun (SF^OF)jgesuurempi tai yhtäsuuri (greater or equal) toteutuu kun (~(SF^OF))jgsuurempi (greater) toteutuu kun (~(SF^OF) & ~ZF))
Koodiesimerkki. C-kielen kuvitteellinen silmukkarakenne..
a = 10;
while(a > 0) {
   a--;
}
..toteutettuna y86-assemblyllä.
#.pos 0
    irmovq $10,%rax    # silmukkamuuttuja
    irmovq $1,%r8      # Vakio 1
loop:
    subq %r8,%rax      # %rax = %rax - 1
    jg loop            # hyppy takaisin, jos %rax > 0 (ZF=0)
#   halt
Koodiesimerkki. C-kielen ehtolauseke..
a = 9;
if (a > 10) {
   b = 1;
} else {
   b = 0;
}
..toteutettuna y86-assemblyllä:
#.pos 0
   irmovq $9,%rax      # a = 9
   irmovq $10,%r8      # Vakio vertailuarvo 10
   subq %r8,%rax       # if (a > 10)
   jg suurempi         # ehtolause totta, hypätään "suurempi"
   irmovq $0,%rbx      # muutoin b = 0
   jmp ohitus          # ohitetaan "suurempi"
suurempi:
   irmovq $1,%rbx      # b = 1
ohitus:                # ohjelman suoritus jatkuu
#  halt
Muita käskyjä
Lisäksi y86-assemblyssä on muitakin ohjelman suoritukseen liittyviä käskyjä.
Käsky
nop ei tee mitään paitsi kasvattaa PC-rekisteriä. Oikeissa prosessoreissa käskyllä on silti useita käyttötarkoituksia, mm. ajan mittaaminen ja koodin ryhmitys muistiin. Asiasta lisää myöhemmin, suorittimen toiminnan optimoinnissa käskyllä, joka ei tee mitään, on tärkeä rooli.. Käsky
halt pysäyttää ohjelman suorituksen. Ohjelman suorituksen tilarekisteri muuttuu tilaan STAT=HLT.Hox! Yllä esimerkkiohjelmissa halt-käsky oli kommentoitu pois, jos ajatte esimerkkejä emulaattorissa niin käsky on syytä ottaa pois kommenteista.
Pinon käyttö
Yleisesti pinomuisti, eli ohjelmien ajonaikainen muisti, on integroitu (lähes) kaikkiin moderneihin suorittimiin. Pinomuistiin tallennetaan sellaisia tietoa, jota tarvitaan lähitulevaisuudessa ohjelmassa ja jonka tallennukseen ei haluta käyttää rekistereitä. Esimerkkinä aliohjelmien paluuosoitteet ja argumentit, joista lisää hetken päästä..
Pinomuisti on LIFO (Last in, First out) -tyyppinen muisti, eli nimensämukaisesti pino johon kirjaimellisesti pinoamme tietoa aina toistensa päälle. Pino kasvaa näin ylöspäin ja vastaavasti pino tyhjennetään alaspäin eli päältä alkaen ylimmäinen tieto ensin.
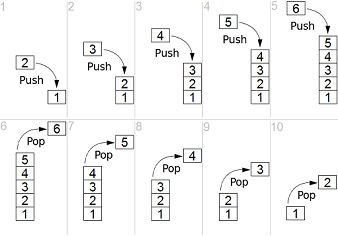
Jotta pinon käyttö ei olisi yksinkertaista, itseasiassa muistissa taas pino kasvaa alaspäin. Toisinsanoen, pinon ensimmäinen muistipaikka on sen ylimmässä muistiosoitteessa. Kun pinoon lisätään tavaraa, viedään se aina edelliseen muistipaikkaan. (Tähän käytäntöön on lähinnä historiallisia syitä, pino usein sijoitettiin alkamaan koko muistialueen lopusta joten liikkumavaraa ei ollut kuin alaspäin tai muinaisen suorittimen käskykannassa indeksointi oli helpompaa alaspäin.)
Pinon käyttöön on kone/assemblykielissä omat käskynsä, eli y86:sessa:
pushq, jolla viemme rekisteristä sanan pinoon.popq, jolla poistamme päällimmäisen sanan pinosta.
Lisäksi pinon hallintaan tarvitaan avuksi rekistereitä:
- Pinomuistin alkuosoite
%rbp - Pino-osoitinrekisteri
%rsp, jossa on aina pinon päällimmäisen muistipaikan osoite.
Nyt siis pinokäskyt ensin automaattisesti katsovat muistiosoitteen
%rsp-rekisteristä ja päivittävät rekisteriarvoa suorituksensa jälkeen. Jokaisessa y86-assemblyohjelmassa meidän tulee ensin määrittää pinomuistin paikka. Ok, kirjaimellisesti ihan välttämätön se ei ole, pystymme toteuttamaan pieniä ohjelmia ilmankin. Kurssilla käytämme ohjelmissa aina pinoa, koska ilman pinoa aliohjelmat eivät toimi, kts alla.
y86-assemblyohjelmassa pinon alustus tapahtuu seuraavasti, asettamalla piorekisterit viittaamaan haluttuun pinon alkuosoitteeseen (tässä
0x400). Sen jälkeen voimme ohjelmassa käyttää pinoa:.pos 0
irmovq pino,%rbp # pinon alkuosoite
irmovq pino,%rsp # pinon ylimmän muistipaikan osoite
main:
irmovq $1,%rax # pinoon talletettava arvo
pushq %rax # rekisteriarvoon pinoon
irmovq $2,%rax
pushq %rax
irmovq $3,%rax
pushq %rax
popq %rax # pinon päällimmäinen arvo rekisteriin
popq %rax
popq %rax # tallennettiin 3 arvoa, joten poistetaan ne kaikki
halt
.pos 0x400
pino:
Hox! Esimerkkikoodia voi ajaa y86-simulaattorissa niin näkee miten pinorekisterit ja pino muistissa käyttäytyy.
Hox2! Kurssilla tyypillinen virhe on aluksi jättää pino alustamatta ja sitten ihmetellä miksi aliohjelmakutsut eivät toimi.
Hox3! Koska pino sijaitsee samassa muistissa kuin koodi ja data, pitää olla tarkkana ettei pinoon viedyt arvot ylikirjoita koodia tai muuta dataa!
Aliohjelmat
Assembly-kielissä voidaan toki luodaan ohjelmaan aliohjelmia (ts. funktioita), mutta niiden kirjoittamiseen ja käyttöön liittyy monta huomioitavaa seikkaa.
Aliohjelma muistissa
Aliohjelman paikka muistissa on täysin ohjelmoijan päätettävissä. Käyttäen direktiiviä
.pos ja muistiosoitteen loogista nimeä, ohjelmoija voi sijoittaa aliohjelmansa minne tahansa ohjelman käytettävissä olevaan muistiin. Esimerkki. Sijoitetaan aliohjelma/funktio nimeltä
yhteenlasku alkamaan muistiosoitteesta 0x100..pos 0x100
yhteenlasku:
addq %rax,%rbx
ret
Aliohjelman suoritus
Aliohjelman suoritetaan hypyllä muistiosoitteeseen, mutta se tehdään omalla
call-käskyllään. Aliohjelmasta kutsuvaan ohjelmaan palataan myös erityisellä ret-käskyllä. Lisäksi pitää ohjelmassa esitellä sen pinomuisti, jotta nämä käskyt toimisivat oikein. Esimerkki. Sijoitetaan aliohjelma/funktio nimeltä
yhteenlasku alkamaan muistiosoitteesta 0x100 ja pino alkamaan osoitteesta 0x400..pos 0
irmovq pino,%rsp # pino-osoitin
irmovq pino,%rbp # pinon alkuosoite
call yhteenlasku # aliohjelmakutsu
halt # ohjelman suoritus seis
.pos 0x100
yhteenlasku: # aliohjelma alkaa tästä
addq %rsi,%rdi
ret # paluu aliohjelmasta
.pos 0x400
pino: # pinon alkuosoite
Ok.. mutta miksi aliohjelmien kutsumiseen tarvitaan omat käskyt ja pino, eivätkä pelkät hyppykäskyt käy? Vastaus ei ilmene yo. esimerkeistä, mutta kyse on siitä että ennen aliohjelmaan hyppyä, suoritin itseasiassa tallentaa nykyisen tilansa, esimerkiksi yleiset rekisterit ja PC, pinomuistiin jotta täsmälleen sama suorittimen tila voidaan palauttaa aliohjelmasta paluun jälkeen.
Tähän on yksi hyvin oleellinen syy, nimittäin nyt voidaan uudelleenkäyttää samoja rekistereitä aliohjelmissa. Kun nk. pääohjelmassa talletetaan rekisterien arvot pinoon, rekisteri vapautuu aliohjelman käyttöön, ja aliohjelman lopttua pinosta saadaan palautettua "vanhat" rekisterien arvot. Kätevää varsinkin laajemmissa ohjelmissa ja kun rekistereitä on vähäinen määrä käytössä. Myöskin itseasiassa keskeytyksen käsittelijät (ja jotkut laiteohjelmiston kutsut) toimivat samalla tavoin, mutta tästä lisää myöhemmin..
Nyt, y86-assemblyssä siis:
- Käsky
calltallentaa automaattisesti paluuosoitteen aliohjelmasta pinomuistiin. Esimerkissä pinoon menee siis kutsua seuraavanhalt-käskyn osoite. - Käsky
retkaivaa paluuosoitteen pinosta ja siirtää ohjelman suorituksen siihen osoitteeseen. - Yksinkertaistettu y86-suoritin ei tallenna pinoon muuta kuin paluuosoitteen. Tässä jätetään siis ohjelmoijan tehtäväksi tallettaa rekisterien arvot tarvittaessa pinoon aliohjelman suorituksen ajaksi.
Aliohjelman argumentit
Myös assembly-kielissä voidaan välittää aliohjelmille argumentteja sekä rekisterien että pinomuistin avulla. Kuten arvata saattaa, niin tässäkin joutuu assembly-ohjelmoija vääntämään enemmän koodia.. mutta onneksi tässä on yleisesti sovittuja periaatteita.
1. Argumenttien välittäminen rekisterien kautta. Nyt x86-suoritinarkkitehtuureissa (kyllä, x86) on sovittu mitä rekistereihin yleensä tulisi käyttää argumenttien tallentamiseen. Kun asia on sovittu, on koodin / yleiskäyttöisten funktion uudelleenkäyttö astetta helpompaa, kun ei tarvitse alkaa miettimään rekistereiden käyttöä.
- Argumentit pyritään välittämään seuraavissa rekistereihin ja tässä järjestyksessä:
%rdi, %rsi, %rdx, %rcx, %r8, %r9. Nyt siis max kuusi parametriä voitaisiin välittää rekisterien kautta. - Lisäksi tarvittaessa voidaan valita myös rekisteri funkt.. *köh köh* aliohjelman palautusarvoa varten. Tämä rekisteri voi säästömielessä olla esimerkiksi joku tai jotkut argumenttien välitykseen valituista rekistereistä.
Esimerkki. Rekisterien
%rdi ja %rsi käyttö kahden argumentin ja palautusarvon (rekisterissä %rdi) välittämiseen..pos 0
irmovq $100,%rdi # 1. argumentti
irmovq $200,%rsi # 2. argumentti
call yhteenlasku # aliohjelmakutsu
halt # ohjelma seis
.pos 0x100
yhteenlasku: # aliohjelman toiminnallisuus
addq %rsi,%rdi # nyt %rdi:ssä on laskun tulos eli palautusarvo
ret # paluu aliohjelmasta
2. Argumentit voidaan myös tallentaa pinoon ennen aliohjelmakutsua ja lukea pinosta aliohjelman suorituksen aikana. Näin saadaan välitettyä enemmän kuin 6 parametriä. Tämä on varsin kätevä tapa, mutta huomatkaa että myös aliohjelmasta paluuosoite menee pinoon. Joten tällöin joudutaan arvojen lukemiseen pinosta käyttää epäsuoraa osoitusta.
.pos 0
   irmovq pino,%rsp      # pino-osoitin
   irmovq pino,%rbp      # pinon alkuosoite
   irmovq $10,%rax        # 3 argumenttia (10,20 ja 30) pinoon
   pushq %rax
   irmovq $20,%rax
   pushq %rax
   irmovq $30,%rax
   pushq %rax
   call yhteenlasku      # aliohjelmakutsu
   popq %rax             # tyhjennetään pino,
   popq %rax             # jotta ei jää ylimääräistä tavaraa
   popq %rax
   halt                  # ohjelman suoritus seis
                         # ilman lopetusta ohjelman suoritus jatkuisi
                         # aliohjelman koodista!

.pos 0x100
yhteenlasku:             # aliohjelma alkaa tästä
   mrmovq 8(%rsp),%rax
   addq %rax,%rbx
   mrmovq 16(%rsp),%rax
   addq %rax,%rbx
   mrmovq 24(%rsp),%rax
   addq %rax,%rbx
   ret                   # paluu aliohjelmasta

.pos 0x400
pino:                  # pinon alkuosoite
Tarkastellaanpa tässä ohjelmassa pinomuistia y86-64-emulaattorista kaapatun kuvan avulla.
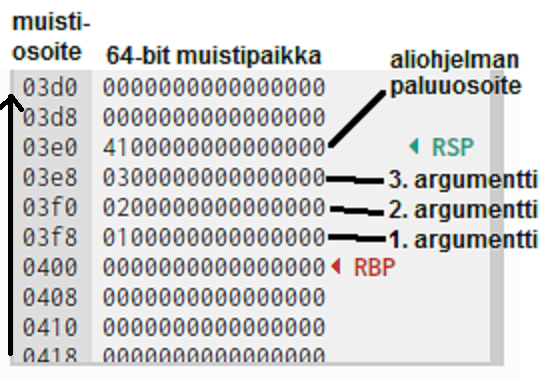
Kuvan vasemmassa laidassa siis muistiosoitteet, joista huomataan että pinon alku reisterissä
%rbp on tosiaan asetettu muistipaikkaan 0x400. Seuraavaksi ohjelmassa viedään argumentit 1, 2 ja 3 pinoon yksi kerrallaan pushq-käskyillä. Pinoon tavaraa viedessä pino-osoitin %rsp muuttuu (=kasvaa ylöspäin) aina talletetun arvon koon (tässä 64-bittiä = 8 tavua) verran. Eli alussa %rsp:llä on arvo 0x400 ja kun ensimmäinen argumentti (1) on viety muistiin, siirtyy pino-osoitin yhden muistipaikan verran ylöspäin ja osoittaa nyt muistiosoitteeseen 0x3f8. Samoiten kun 2 ja 3 viedään muistiin, kasvaa pino-osoitin taas vastaavasti muistipaikan verran ja lopuksi osoittaa muistipaikkaan 0x3e8. Tämän jälkeen ohjelmassa tehdään call-kutsu ja sitä suorittaessa paluuosoite, eli halt-käskyn osoite (0x41) tallentuu pinoon. Nyt aliohjelmaan mennessä siis pinossa on neljä muistipaikkaa käytössä.Aliohjelmassa käytämme pinoa seuraavasti.
- Nyt
%rsp = 0x03e0ja haluamme lukea yhtä ylempää muistipaikkaa, niin lisäämme %rsp:n arvoon 8 (tavua) jolla saadaan muistiosoite0x3e0 + 8 = 0x3e8ja sieltä luettua 3. argumentin%rax-rekisteriin. - Sitten kun
%rsp = 0x03e0ja haluamme lukea kahta ylempää muistipaikkaa niin lisäämme %rsp:n arvoon 16 (tavua), jolla haemme 2. argumentin rekisteriin. - Ja vielä, kun
%rsp = 0x03e0ja haluamme lukea kolmea ylempää muistipaikkaa niin lisäämme %rsp:n arvoon 24 (tavua), jolla haemme 1. argumentin rekisteriin. - Aliohjelman lopussa vielä tallennamme yhteenlaskun lopputuloksen rekisterille
%rbx
Ohjelman lopuksi meidän tulee vielä tyhjentää pinosta sinne talletetut arvot, joka tapahtuu siis
popq-käskyllä. Aina pinoa käyttäessä pitää huolehtia, että pinosta haetaan täsmälleen sama määrä dataa, kun mitä sinne tallennettiin. Hox! Pinosta voi myös itseasiassa varata muistia käsittelemällä
%rsp-rekisterin arvoa suoraan. Esimerkiksi jos tarvitsee aliohjelmassa paikallisia muuttujia niin siirtämällä pino-osoitinta eteenpäin riittävä määrä muistipaikkoja, voi epäsuoralla osoituksella käsitellä näitä ikäänkuin varattuja muistipaikkoja epäsuoralla muistiosoituksella. Tosimaailman assembly-ohjelmoinnissa pino tyypillisesti jaetaankin osiin joilla on oma käyttötarkoituksensa esimerkiksi juuri aliohjelman yhteydessä. Kääntämistä ohjaavat käskyt
Kääntämistä ohjaavat käskyt ovat seuraavat:
nimi:Symbolinen/looginen nimi tätä seuraavalle koodilohkolle. Tällä tavoin voidaan siis merkitä muistiosoitteita. Esimerkiksi aliohjelmalle voidaan antaa symbolinen nimi. Nimi häviää koodista käännösvaiheessa ja korvautuu varsinaisella muistiosoitteella.
Nimet eivät ole millään tavoin pakollisia, niitä voidaan käyttää auttamaan koodin jäsentämisessä. Ohjelmoijalla on tässä vapaat kädet. Yhtähyvin alla voisi lukea
oa_juttu eikä main. Esimerkissä alla varataan muistiosoitteet main:lle ja kahdelle funktiolle:main:
...
funktio1:
...
funktio2:
...
.posAsettaa tätä seuraavan koodin / koodilohkon alkavan mistä tahansa annetusta muistiosoitteesta.
.pos 0 # Pääohjelma (ts. main-funktio) alkaa osoitteesta 0
main:
    ...
.pos 0x100 # funktio1 alkaa muistiosoitteesta 0x100
funktio1:
    ...
Ohjelman muistiosoitteiden ei tarvitse olla peräkkäin, välissä voi olla "tyhjää" tilaa.. tämä on varsin hyödyllistä, jos halutaan myöhemmin esim. päivittää aliohjelmaa, niin ei tarvitse siirtää koko koodia tai sen muistiosoitteita.
.aligntasaa muistiosoitteen annettuun sanan pituuteen, tässä siis 8 tavua. Jos muistiin asetattavan arvon koko on pienempi kuin sana, align:n avulla arvosta ikäänkuin tehdään sanan mittainen täyttämällä se nollilla. Tämä on hyödyllinen ominaisuus esimerkiksi taulukkojen yhteydessä, mutta kurssilla sitä ei yleensä tarvita.
.quad-käskyllä voidaan muistiin viedä valmiiksi tietoa, esimerkiksi taulukkoja. Asetus tapahtuu ennen koodin ajamista, eli tämä toimii ikäänkuin massamuistina josta voimme lukea dataa keskusmuistiin.
Esimerkki. Ensin
.pos-käskyllä voidaan asettaa haluttu muistipaikka, .align käskyllä saadaan haluttu tasaus ja .quad-käskyllä viedään muistipaikkaan dataa..pos 0x80
.align 8 # ryhmitellään muisti 8:n tavun mittaisiin osoitteisiin
.quad 0x1234 # 2-tavuinen luku
.quad 0x5678 # 2-tavuinen luku
Muisti näyttää seuraavalta, koska luku tasataan sanan pituuteen.
...
0x80: 0x3412000000000000
0x88: 0x7856000000000000
...
Muistin käytöstä ohjelmissa
Lopuksi vielä pari kätevää vinkkiä miten y86-assembly-ohjelmissa voi käyttää muistia muuttujien kanssa pelaamiseen.
Omat muuttujat
Kuten aiemassa materiaalissa opimme, muuttujahan on vain muistipaikka tietokoneen muistissa. Joten assemblykielissä voidaan käyttää ohjelman muistia vapaasti (mutkan kautta) myös omien muuttujien esittelyyn ja käyttöön.
Esimerkki. Esitellään kaksi omaa muuttujaa
oma1 ja oma2 muistipaikoissa 0x300 ja 0x308 ja tallennetaan ja luetaan niistä arvoja..pos 0 irmovq $1,%rax # muistipaikkaan tallennettava arvo irmovq oma1, %rbx # muistipaikan osoite rekisteriin rmmovq %rax, (%rbx) # rekisterin arvo muistiin (epäsuora osoitus) irmovq $2, %rax # muistipaikkaan tallennettava arvo irmovq oma2, %rbx # muistipaikan osoite rekisteriin rmmovq %rax, (%rbx) # rekisterin arvo muistiin (epäsuora osoitus) irmovq oma1, %rcx # muistipaikan osoite rekisteriin mrmovq (%rcx), %rdi # luetaan muistipaikan arvo rekisteriin .pos 0x300 # muistipaikka oma1: # muuttujan oma1 "esittely" .pos 0x308 # muistipaikka oma2: # muuttujan oma2 "esittely"
Taulukkomuuttujat
Vastaavasti voimme tietenkin esitellä ja käyttää assemblyohjelmassa taulukoita, kuten korkeamman tason kielissä, mutta niiden käytössä tarvitsee myös hallita eri muistin osoitusmuotoja indeksoinnin toteuttamiseksi.
Nyt, epäsuora muistiosoitus on tässä erittäin kätevä, koska voimme käyttää valittua rekisteriä (=indeksirekisteri) muistiosoitteella operointiin. Ts. kirjoitamme taulukon indeksia vastaavan muistiosoitteen rekisteriin ja päivitämme osoitetta aina liikkuessamme taulukossa.
taulukko[0] # 1. alkion muistipaikka 0x300
taulukko[1] # 2. alkion muistipaikka 0x308
taulukko[2] # 3. alkion muistipaikka 0x310
...
# Miksi osoite kasvaa aina 8 (tavua)?
# Koska arkkitehtuuri on 64-bittinen
Esimerkki. Taulukko alkaa osoitteesta
0x300, johon sijoitamme muuttujanarvoja.pos 0
irmovq taulukko, %rdi # indeksirekisteri, taulukon alku
irmovq $8, %rcx # Vakio 8, indeksi kasvaa/pienenee 8 tavua
irmovq $1, %rax # 1. alkioon tallennettava arvo
rmmovq %rax, (%rdi) # sijoitus 1. alkion muistipaikkaan
addq %rcx, %rdi # seuraavan (2.) alkion osoite +8 tavua
irmovq $2, %rax # 2. alkioon tallennettava arvo
rmmovq %rax, (%rdi) # sijoitus 2. alkion muistipaikkaan
addq %rcx, %rdi # seuraavan (3.) alkion osoite +8 tavua
irmovq $3, %rax # 3. alkioon tallennettava arvo
rmmovq %rax, (%rdi) # sijoitus 3. alkion muistipaikkaan
.pos 0x300
taulukko:
Vastaavasti taulukosta alkion arvon lukemiseen tarvitsee nyt vain muuttaa indeksinä käytettävän rekisterin (tässä)
%rdi arvoa. Esimerkiksi toisen alkion osoite olisi taulukko + 16 ja neljännen taulukko + 32, jne.Assemblyohjelman rakenne
Alla oppikirjasta (Bryant, s. 403) ja simulaattorista löytyvä esimerkkikoodi, josta näemme y86-assemblykielisen ohjelman rakenteen pääpiirteissään.
- Alustus: Tässä riittää pinon muistiosoitteen asetus
- Pääohjelma
main - Vastaa ikäänkuin C-kielen funktiota
main() - Aliohjelmat
- Tässä
sum, C-kielellä funktio (long *array, long count) - Muistialueiden varaus
- Tässä taulukko, jossa 4 alkiota
# Ohjelma alkaa muistiosoitteesta 0
.pos 0
# Alustukset
    irmovq pino, %rbp   # Pinon alustus
    irmovq pino, %rsp   # Pino-osoitin
# Pääohjelma
main:
    irmovq array,%rdi   # Aliohjelman argumentit
    irmovq $4,%rsi      #
    call sum            # kutsutaan aliohjelma sum(array, 4)
    halt                # lopetetaan pääohjelma

# Aliohjelma sum(long *array, long count)
# start in %rdi
# count in %rsi
sum:
    irmovq $8,%r8        # Vakio 8
    irmovq $1,%r9        # Vakio 1
    xorq %rax,%rax       # sum = 0
    andq %rsi,%rsi       # Liput pois päältä
    jmp     test         # Hypätään test-lohkoon
loop:
    mrmovq (%rdi),%r10   # Taulukon alku (*array)
    addq %r10,%rax       # Lisää alkio summaan
    addq %r8,%rdi        # Seuraavan alkio osoite (array=..)
    subq %r9,%rsi        # Taulukon pituus (count--)
test:
    jne    loop          # Silmukka palaa alkuun jos count != 0
    ret                  # Paluu aliohjelmasta

# Pinon paikka muistissa
.pos 0x200
pino:

# Taulukko: 4 alkiota
.pos 0x300
.align 8
array:
    .quad 0x000d000d000d
    .quad 0x00c000c000c0
    .quad 0x0b000b000b00
    .quad 0xa000a000a000
Lopuksi
Kuten materiaalista nähdään, assemblyä ohjelmoidessa täytyy ohjelmoijan mennä todella lähelle suoritinta ja näin ollen monen C-kielessäkin tavanomaisen asian toteuttaminen täytyy pohtia matalan tason konekielen käsky kerrallaan ja lisäki täytyy osata joukko tekniikoita esimerkiksi muistin käyttöön.
Kurssilla y86-assembly-ohjelmointia varten löytyy kätevästi simulaattorin verkkoversio. Mutta lukekaa ensin lisätietoa assemblyohjelmoinnista harjoitustehtävämateriaalissa.
Anna palautetta
Kommentteja materiaalista?