Sessio 1
Vaihe 1: Virtuaalikoneen käynnistäminen tai ympäristön valmistelu
Tähän laboratorioharjoitukseen voit käyttää omaa tietokonettasi tai yliopiston työasemia. Me suosittelemme vahvasti käyttämään yliopiston työasemia. Valitsemastanne vaihtoehdosta huolimatta vain yhden ryhmän jäsenen pitää tehdä tämä valmistelu.
Jos haluat käyttää omaa tietokonettasi
Tässä tapauksessa sinulla on kaksi vaihtoehtoa:
- Vaihtoehto 1 Asenna Virtual Box and Virtual Box Extension Pack . Extension Packin saa asennettua seuraamalla näitä ohjeita. Sen jälkeen seuraa samoja ohjeita kuin opiskelijat, jotka käyttävät yliopiston työasemia (katso alempaa)
- Vaihtoehto 2 Valmistele CCS Cloud IDE ja CCSStudio IDE:
Tämä on pidempi vaihtoehto. Sinun täytyy seurata ohjeita Lovelacessa CCS Cloud (vapaaehtoinen) ja CCStudio IDE (jota sinun olisi pitänyt seurata jo kotona)
Jos käytät yliopiston työasemaa
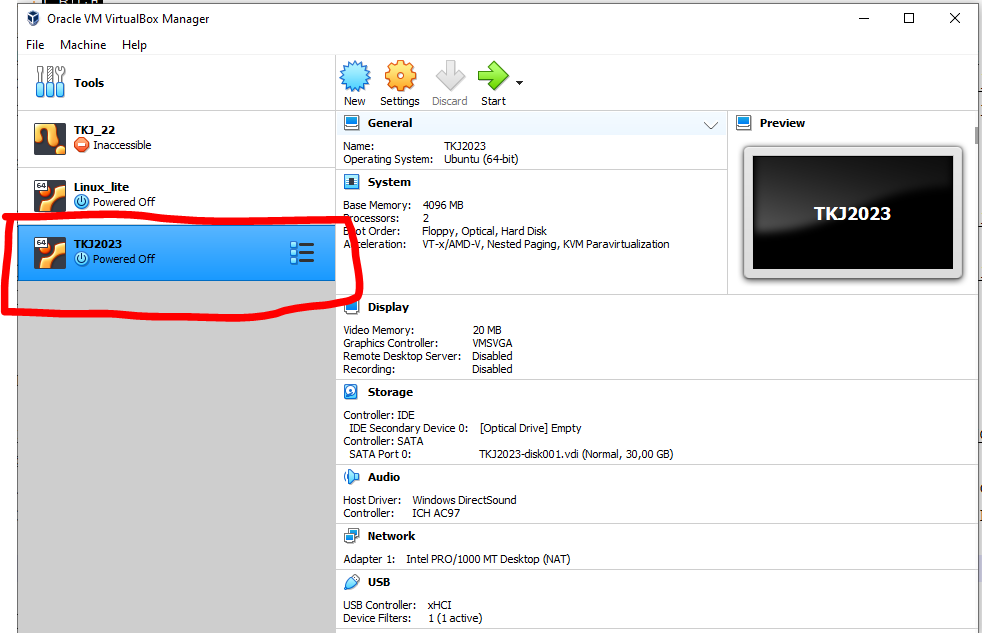
- Lataa virtuaalinen levykuva (.ova-tiedosto) joko lataamalla Onedrivesta tai käytä Windows File Exploreria ladataksesi sen sijainnista
\\kaappi\Virtuaalikoneet$\VMware\TKJ_Harjoitukset_2023\TKJ2023.ova(Luultavasti nopeampi kuin edellinen vaihtoehto.) - VirtualBoxissa valitse
File -> Import applianceja valitse edellinen .ova-tiedosto. Seuraavassa ruudussa valitse kansio, johon haluat tiedoston sijoittaa ja paina "Import". - Jonkin ajan kuluttua näet allaolevan kaltaisen ruudun. Valitse oikea virtuaalikone ja paina Start yläoikealla.
.
Näin käynnistät virtuaalikoneen ja olet valmis seuraavaan vaiheeseen.
Näin käynnistät virtuaalikoneen ja olet valmis seuraavaan vaiheeseen.
Vaihe 2: Esittelyssä CCSStudio IDE
IDE:n käynnistäminen
- Käynnistä Code Compose Studio koneellasi.
- Voit luoda uuden työtilan jos haluat, mutta voit käyttää myös valmista (sijainti
/home/linuxlite/workspace_v10]Jos käytät virtuaalikonetta). Jos luot uuden työtilan, tee se kotihakemiston sisällä (/home/linuxlite/virtuaalikoneessa), muulloin sinulla saattaa ilmetä ongelmia oikeuksien kanssa. - Voit tarkastella tiedostoja työtilassasi käyttäen File Manageria, mutta suosittelemma aina käyttämään IDE:ä tiedostojen lisäämiseen.
- Tutki käyttöliittymää nopeasti itseksesi. Tarkastele kaikkia valikkoja. Tutustu eri työkaluihin.
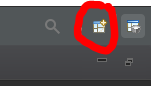
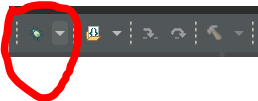
- Tarkastele CCS Studion eri näkymiä. Voit avata uuden näkymän painamalla
Open Perspective-nappiayläoikealla (katso oheinen kuva). Avaa ainakin CCS Debut-, CCS Simple- ja Git-näkymät. Sinun ei vielä tarvitse tehdä mitään, tutki vain käyttöliittymää.
Siirry CCS Edit-näkymään. Olet nyt valmis luomaan uuden projektin. Ennen kuin teemme sen, tarkistetaan kuitenkin että käytettävien kirjastojen versiot ovat riittävät.
Kirjastojen versioiden tarkastaminen
Joskus kurssin henkilökunta saattaa kysyä mikä on käyttämäsi TI-RTOS-kirjaston versio tai mitä XDCtoolsin versiota käytät (joukko työkaluja, joita käytetään koodin kääntämiseen, linkittämiseen ja optimointiin TI-mikrokontrollereille.) Voit tarkistaa version katsomalla
Window->Preferences->Code Composer Studio -> ProductsTI-RTOS:in version pitäisi olla 2.21.1.08 ja XDC Tools:in version pitäisi olla 3.62.1.15_core.
Jos sinun pitää asentaa ohjelmiston uusi versio joskus tulevaisuudessa, tee se tämän ikkunan kautta.
Tyhjän projektin tuonti
- On paljon konfiguraatiotiedostoja, jotka pitäisi ottaa huomioon, kun luo uutta tiedostoa CCS Studioon (riippuen toki laitteesta, jota käytät). Yleensä, CCSStudio tarjoaa erilaisia ohjattuja luontitoimintoja uuden projektin luomiseen riippuen mikrokontrolleristasi. Tällä kurssilla käyttämämme mikrokontrolleri ei tarjoa kuitenkaan enää hyvää tukea alustalle, joten tuomme tyhjän projektin.
- Lataa .zip joka sisältää tyhjän projektin ja pura se johonkin kansioon, joka sijaitsee kotihakemistossasi.
- Mene
Project-valikkoon ja valitseImport CCS Projects. Lisää paikka, johon äsken purit tyhjän projektin. Valitse myös vaihtoehtoCopy projects into workspace. Me haluamme, että projekti on työtilassamme. - Tärkeä huomautus: Jos käytät kurssin virtuaalikonetta, tulet näkemään virheviestin
A Project with the same name already exists. Tämä tarkoittaa, että sinun täytyy ensin poistaa jo olemassa oleva projekti työtilastasi. MeneProject Explorer:iin (Avaa se valitsemallaView -> File Explorer), valitse projekti, painaDeleteja valitseRemove files from disk-vaihtoehto.
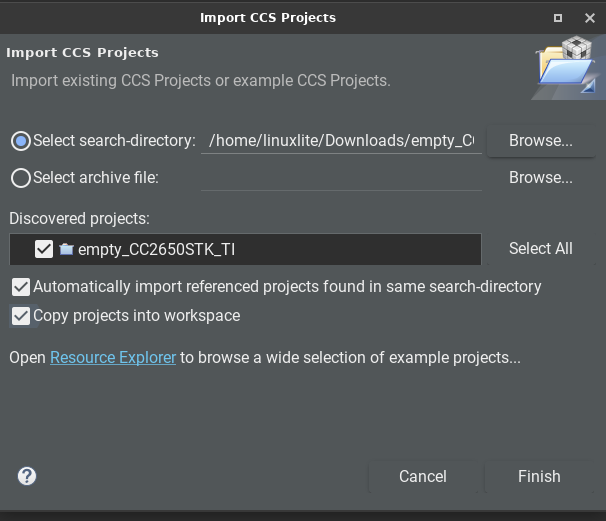
- Tuo projekti.
- Avaa
Project Explorerja avaa tiedostoempty.c. Tarkista, että tässä projektissa onmain-funktio. On tärkeää tietää, että projektilla voi olla vain yksi main-funktio. Myöhemmin näemme, miten voit tuoda projektiisi useampia tiedostoja, joissa onmaindebuggauksen yhteydessä. - Tarkasta myös kaksi tärkeää tiedostoa:
Board.hjoka sisältää vakiot, jotka tekevät TI-RTOS:ista yhteensopivan monien eri alustaperheiden kanssa. Huomaa, että se sisältää aliaksia erilaisille pinneille ja rekistereille piirilevylläsi. Avaa myösCC2650STK.hjaCC2650STK.c. Ensimmäinen tiedosto sisältää kaikki SensorTagin pinnien nimet. Toisen tehtävä on tuoda kaikki tarpeelliset ajurit ja asettaa oletusasetukset eri ulostuloille, kommunikaatiokanaville ja oheislaitteille, kuten UART. Älä muokkaa mitään näistä tiedostoista - Mennäänpä takaisin tiedostoon
empty.c. Huomaa#include:t. Jos haluaisit luoda uuden tiedoston alusta asti, sinun pitäisi sisällyttää kaikki samat includet (tarpeelliset ajurit ja otsikkotiedostot). - Tässä vaiheessa sinun ei vielä tarvitse ymmärtää koodia (me käymme sen läpi Sessiossa 2). Nyt riittää, jos tiedät että
empty.c:n sisältämä koodi sytyttää ja sammuttaa SensorTagin LED:iä vaihdellen joka sekunti.
Koodin kääntäminen ja lataus SensorTagiin
Nyt kun koodi on valmis, sinun pitää kääntää se ja tämän tuloksena luoda
.out-tiedosto (binary), joka ladataan SensorTagiin. Kääntäminen tehdään joko valitsemalla Project -> Build Project tai painamalla vasarakuvaketta ylälaidassa. 
- Koodin kääntäminen
- Kannattaa tarkkailla tulosteita kahdessa ikkunassa:
Console, jaProblems. Console-ikkuna tarjoaa yksityiskohtaista tietoa prosessista, kuten varoitukset ja käännösvirheet.Problemsnäyttää sinulle ne ongelmat ja virheet, jotka sinun kannattaisi ratkaista järjestelmällisesti. Sinun pitää edetä seuraavasti: - Yritä ensin ratkaista warning:it jotta ne poistuisivat näkymästä (poikkeuksena tilanteet, joissa varoitukset eivät johdu omasta koodistasi)
- Aloita virheistä joiden Resource on sinun tiedostosi (
empty.c). Aloita ongelmien ratkaiseminen pohjalta ylös. Monesti virheet seuraavat toisiaan, joten yhden ongelman ratkaiseminen voi poistaa loputkin virheet.

- Tässä tapauksessa koodin ei pitäisi tuottaa mitään virheitä ja voit jatkaa.
- Seuraavaksi ladataan koodi SensorTagiin. Koodi voidaan ladata painamalla
Flash-nappiaCompile-napin vieressä. Lataa koodi.

- Jos unohdit yhdistää SensorTagin tai tietokoneesi ei tunnista sitä, näet seuraavanlaisen virheen:
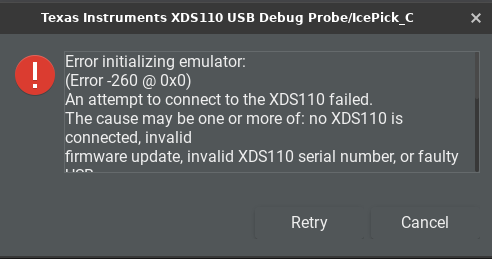
- Joskus sinun täytyy päivittää XDS110:n ohjelmisto (debuggeri, joka on SensorTagin mukana). Ohjelmaa ohjeistaa sinua tässä toimenpiteessä.
- Seuraavaksi yhdistä SensorTag tietokoneeseen ja paina
Flash-painiketta. Toimenpiteen päätyttyä sinun pitäisi nähdä sen onnistumisesta kertova viesti. SensorTagin vihreän LED:in tulisi vilkkua. Tarkista, että vilkkuva LED on SensorTagin, eikä XDS110:n. - Tärkeä muistutus jos käytät virtuaalikonetta: Varmista, että SensorTag on yhdistetty virtuaalikoneeseen. Tehdäksesi tämän, mene VirtualBoxin valikkoon ja valitse
Devices -> USBja valitseTexas Instruments XDS110 - Tärkeää: Joskus Flash-painike ei toimi. Tässä tapauksessa käytä
Debug-vaihtoehtoa.
Lisää kääntämisestäMäärittele, mitä tiedostoja haluat sisällyttää kääntämiseen.
Kuvittele, että haluat testata kahta eri ohjelmaa SensorTagissa (tai kahta eri versiota samasta ohjelmasta, kummatkin eri tiedostoissa) Tässä tapauksessa sinulla ei voi olla
main-funktiota kummassakin tiedostossa, tai seuraa käännösvirhe. Katsotaan seuraavaksi esimerkki siitä, miten voimme korjata tämän.- Lataa HelloWorld.c
- Lisää se projektiin:
Project -> Add Files - Yritä kääntää se. Linkkauksen jälkeen näet virheen:
error #10056: symbol "main" redefined: first defined in "./empty.obj"; redefined in "./helloWorld.obj"Tämä tarkoittaa käytännössä sitä, että sinulla on kaksi
main-funktiota ohjelmassasi. - Ei käännetä vanhaa
empty.c-tiedostoa, vaan käytetään vainhelloWorld.c:tä. Tehdäksesi tämän, klikkaa hiiren oikealla painikkellaempty.c:tä ja valitseExclude from Build. Nyt käännä projekti uudestaan. Sinun pitäisi pystyä kääntämäänhelloworld.c. Jos tarkastelet koodia, se ainoastaan tulostaa ruudulle. - Lataa projekti SensorTagiin. Tässä tapauksessa sinun pitäisi pystyä näkemään Console-ikkunassa jotain samanlaista kuin:
[Cortex_M3_0] Hello World. Huomaa, että Console-ikkuna on oikeastaan neljä erilaista ikkunaa. Voit vaihtaa käännöskonsolin ja debuggauskonsolin välillä (se, josta näetSystem_printf) käyttämälläDisplay Selected Console-painiketta Console-ikkunan yläosassa.

Virheiden korjaus
- Lataa task_example.c-tiedosto, lisää se projektiisi ja varmista että tiedostot joita muokkasit aiemmin eivät ole sisällytetty käännökseen.
- Ensimmäiseksi, sisällytä kaikki tarpeelliset kirjastot. Käytä
empty.c:tä esimerkkinä. - Suorita ohjelma ja korjaa eri virheet. Sinun pitää käyttää
Console:a jaProblems-ikkunaa löytääksesi virheet. Keltaiset nuolet konsolin yläosassa auttavat sinua liikkumaan virheiden seassa. Lisäksi, voit käyttääSave Build to Log File-painiketta tarkastellaksesi koko lokia tekstieditorissa. Tämän lisäksiProblems-ikkunassa tuplaklikatessasi jollain rivillä sinut johdatetaan siihen kohtaan koodia, joka virheen aiheuttaa.
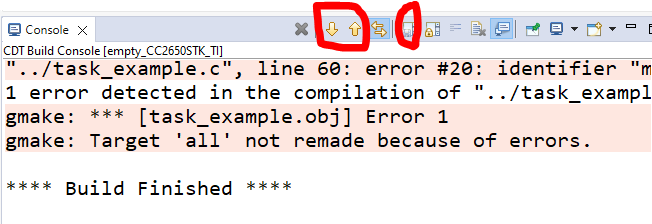
- Varmista, että pystyt ajamaan ohjelman laitteellasi, jos et, kysy apua kurssin henkilökunnalta
Tarkastele muistia
Joskus koodisi kaatuu tai sitä ei saa ladattua laitteeseen. Voit aina tarkastaa muistin, jossa koodiasi säilytetään (Flash-muisti) ja sen osan muistia, jota käytetään koodisi suorittamiseen (SRAM) (myös pinomuisti). Voit nähdä Memory Allocation-ikkunan projektissasi (kun se on käännetty) valitsemalla
View -> Memory allocation. Voit tarkastella myös pinon käyttöä valitsemalla View->Stack usage Compile vs Clean
Toinen tärkeä asia. compile-vaihtoehto yrittää kääntää ne tiedostot, joita on muutettu edellisen käännöksen jälkeen. Kuitenkin, jos sinulla on useampia tiedostoja, tämä voi olla ongelma. Jos haluat kääntää koko projektisi uudelleen, sinun täytyy valita
Project -> Clean. Monesti tämä ratkaisee monia käännökseen liittyviä ongelmia, joten yritä käyttää sitä myös omaa projektia tehdessäsi.Debuggaus
Joskus haluat varmastikin tietää, mitkä ovat eri muuttujien arvot eri kohdissa ohjelman suoritusta tai miten eri funktioita kutsutaan (esim. milloin tietty funktio suoritetaan, missä järjestyksessä funktiot suoritetaan...). Tähän kannattaa käyttää debuggeria joka on samanlainen kuin -- WARNING: BROKEN LINK --kurssimateriaalissa on kuvailtu yleisille C-ohjelmille käytettäväksi.
- Vaihda näkymää CCS Debug:iin. Muista että näkymien vaihtoon sinun kuuluu käyttää painiketta oikealla ylhäällä:
Breakpointien asettaminen
Ensimmäiseksi meidän tulee määritellä ne rivit, joiden koodia haluamme tarkastella. Debuggeri pysäyttää ohjelman suorituksen, kun se saavuttaa nämä kohdat. Tämän jälkeen voimme tarkastella eri muuttujien arvoja, siirtyä seuraavaan breakpointiin tai tarkastella koodia rivi riviltä.
- Avaa
task_example.c-tiedosto jota muokkasit aiemmin. - Asetetaanpa breakpoint funktioon
myTaskFxn, täsmälleen siihen kohtaan, jossa lukee:System_printf("This is task %ld\n", arg0);. Tehdäksesi tämän, tuplaklikkaa rivinumeron vasemmalta puolelta, tai klikkaa hiiren oikealla painikkeella samasta kohtaa ja valitseTogle Breakpoint

- Oikeassa ylänurkassa pitäisi näkyä lista riveistä, joilla on breakpoint. Voit laittaa ne päälle tai pois klikkaamalla laatikkoa. Pidetään nykyinen breakpoint aktiivisena.

- Katsotaan, miten breakpoint toimii: Paina
Debug-painiketta (nappia, jossa on ötökän kuva).
- Koodi käännetään uudestaan, linkataan, lähetetään laitteeseen ja suoritetaan.
- Huomaa, miten koodi pysähtyy
main-funktiossa. Tämä tapahtuu aina kun käytät debuggeria, vaikka et asettaisi yhtäkään breakpointtia - Yläosassa voit nähdä kutsupinon (eli mitä funktioita on kutsuttu), ja muutamia ohjaimia joiden avulla voit ohjailla koodin suoritusta. Vihreä kolmio tarkoittaa Resume (siirry seuraavaan breakpointtiin), punainen neliö tarkoittaa pysäytä. Oikealla on kolme nuolta, ja niistä kaikista kiinnostavin meille (vaikkakin saatat käyttää niitä kaikkia kurssin aikana) on keskimmäinen: sitä käytetään seuraavalle riville siirtymiseen(sen nimi on
Step over).
<!image=jtkj-harjoitus-16|alt=Debug control|caption=Debuggerin ohjaimet>
- Paina
Resume-painiketta, jotta koodin suoritusta jatketaan breakpointtiin, jonka asetimme aiemmin. - Kun breakpoint on saavutettu, paina
Step over-painiketta. Näet, että se siirtyy seuraavalle riville. Toista tämä kahdesti. Nyt sen pitäisi pysähtyä rivilleTask_sleep(1000000L / Clock_tickPeriod); - Paina
Resume-painiketta uudelleen. Taskia kutsutaan uudelleen ja se pysähtyy samaan pisteeseen. Seuraavaksi katsotaan mitä muuta voimme tehdä kun koodimme pysähtyy breakpointin kohdalla.
Muuttujien arvojen tarkastelu
Kun koodisi on pysähtynyt breakpointin kohdalla, voit tarkastella ja muokata paikallisten muuttujien arvoja. Nämä arvot ilmaantuvat yläoikealla olevaan ikkunaan,
<!image=jtkj-harjoitus-17|alt=Visualizing variables|caption=Muuttujinen tarkastelu>
Variables-välilehdelle. <!image=jtkj-harjoitus-17|alt=Visualizing variables|caption=Muuttujinen tarkastelu>
- Katso paikallisten muuttjien arg0 ja arg1 arvot. Tässä tapauksessa niiden pitäisi olla 2 ja 0.
- Klikkaa
Value-vaihtoehtoaarg0:lle ja muuta se arvoon 3. - Paina Resume. Konsolissa pitäisi lukea:
This is task 3
Voit myös nähdä globaalien muuttujien arvot, tai määrittää lausekkeiden arvoja. Tämän voit tehdä
Expressions-välilehdellä.- Katsotaan muuttujan
programStatearvoa. KirjoitaprogramStatelausekkeeksi. Arvon pitäisi ollaIDLE - Lauseketta käyttäen, vaihda
programState:n nykyinen arvo arvoon READY. Muista, että lauseke voi olla muuttujan nimi tai mikä tahansa C-kielinen lauseke joka tuottaa lopputuloksen. - Jos nyt jatkat koodin suoritusta, muuttujan programState arvon tulisi olla nyt READY. Huomaa, että voit myös katsoa sen muistissa olevan arvon valitsemalla
View Memory
Ohjelman uudelleenkäynnistys
Joskus on hyödyllistä ajaa sama koodi useampaan kertaan tekemättä mitään muutoksia. Tässä tilanteessa olisi ajantuhlausta kääntää ohjelma uudelleen ja käynnistää debuggeri uudestaan. Voit tehdä tämän nopeammin yksinkertaisesti painamalla
Restart-painiketta. - Paina
Restart-painiketta
<!image=jtkj-harjoitus-18|alt=Restart and Reset|caption=Restart ja Reset>
Restart käyttää vain debuggeria mennäkseen takaisin alkuperäiseen tilaan. Joskus on myös hyödyllistä lähettää reset-signaali prosessorille. Tämän voit tehdä painamalla CPU Reset-painiketta Restart-painikkeen vieressä. Terminaaliin kirjoittaminen UART:ia käyttäen
Joskus tulee eteen tilanne, jossa haluat lähettää komentoja toiselle laitteelle tai vaan debugata omaa koodiasi UART:ia käyttäen (se mahdollistaa vuorovaikutuksen ja voit lähettää komentoja laitteelle) Tätä tarkastelemme seuraavassa sessiossa mutta katsotaan nyt miten voimme luoda UART-yhteyden nopeasti.
Käyttääksesi UART:ia, sinun tulisi seurata ohjeita Lovelacessa. Olemme tehneet teille valmiiksi tiedoston, koska tässä tehtävässä olemme vain kiinnostuneita siitä, että tiedätte, kuinka luoda uusi terminaali. Seuraavassa sessiossa teidän tulee toteuttaa oma UART-taski.
- Lataa tiedosto uart_task.c, lisää se projektiisi ja varmista että se kääntyy.
Tämä ohjelma sisältää vain yhden taskin, joka kertoo mikä on ohjelman nykyinen tila. Se käyttää UART:ia lähettääkseen tilan ulkoiseen laitteeseen. Tässä tapauksessa, sinun tietokoneesi. Katsotaan, miten voimme lukea tämän datan, kun SensorTag lähettää sen.
- Tarkastele koodia
   UART_Params_init(&uartParams);
   uartParams.writeDataMode = UART_DATA_TEXT;
   uartParams.readDataMode = UART_DATA_TEXT;
   uartParams.readEcho = UART_ECHO_OFF;
   uartParams.readMode=UART_MODE_BLOCKING;
   uartParams.baudRate = 9600; // nopeus 9600baud
   uartParams.dataLength = UART_LEN_8; // 8
   uartParams.parityType = UART_PAR_NONE; // n
   uartParams.stopBits = UART_STOP_ONE; // 1
Se määrittelee käytettävät yhteysparametrit.
- CCS:ssä voit avata sarjaterminaalin, jota voi käyttää SensorTagin kirjoittaman datan lukemiseen.
- Valitse
View -> Terminal - Uudessa terminaalissa valitse
Open Terminalja valitse terminaaliksiSerial Terminal - Aseta oikeat asetukset, niiden pitää olla samat kuin koodissasi. Oikean portin löytäminen riippuu siitä, käytätkö Linuxia vai Windowsia. Linuxissa
/dev/ttyACM0 tai /dev/ttyACM1on hyvä arvaus. Windowsissa sinun pitää käyttää laitehallintaa ja tarkastaa, mitä USB-porttia käytät.
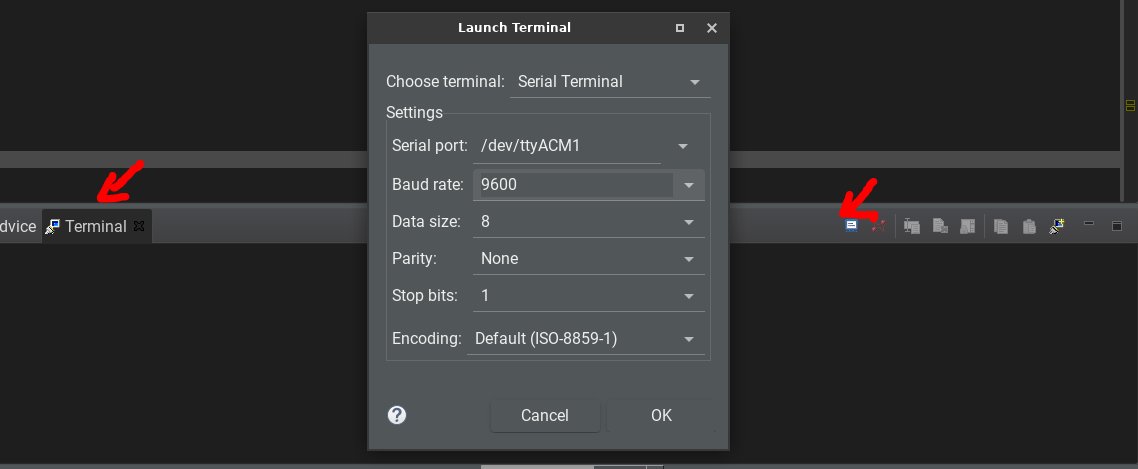
Suorita koodi. Sinun pitäisi nähdä terminaalissa: Current state: 0
- Pidetään tämä juuri näin, mutta me voisimme myös lähettää komentoja terminaalia käyttäen. Tutkitaan tätä seuraavassa sessiossa.
Projektin tallentaminen GIT:iä käyttäen
Jos haluat tallentaa projektisi tilan työskennellessäsi virtuaalikoneessa ja jakaa tekemäsi muutokset koodiin muun tiimin kanssa, paras vaihtoehto on käyttää Git repoa. Git on integroitu CCS studioon. Katsotaan miten voit synkronoida muutoksesi etärepoon Gitlabista tai Githubista:
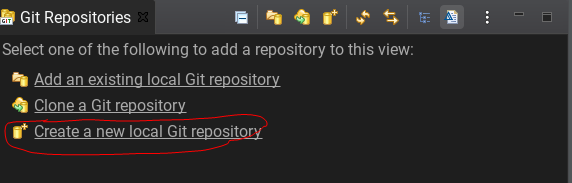
1. 'Luo local repo:
- Avaa GIT-perspective(alhaalta ylös -nappi)
- Valitse vasemmasta valikosta
create a new local git repository
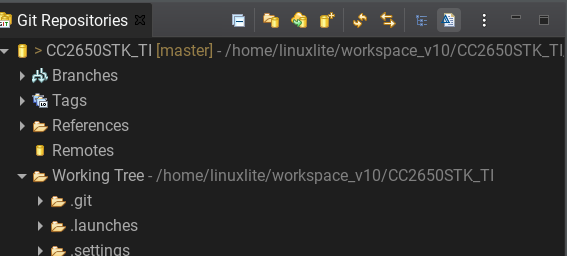
- Valitse projektisi kansio (jos käytät virtuaalikonetta, sen pitäisi olla
linuxlite/workspace_v10), ja napsautaOpenja sittenCreate. - Vasemmalla pitäisi nyt näkyä GIT-repo, jossa on Tags, Branches, Remote ja Working tree.
2. Tallenna nykyinen tila paikallisessa repossa:
- Valitse projekti.
- Seuraavaksi sinun on lisättävä projekti näyttöalueelle. Alaosan ikkunassa (
Git Staging) katso muuttamattomat muutokset ja napsautaAdd all files-> tämä vastaagit add --all
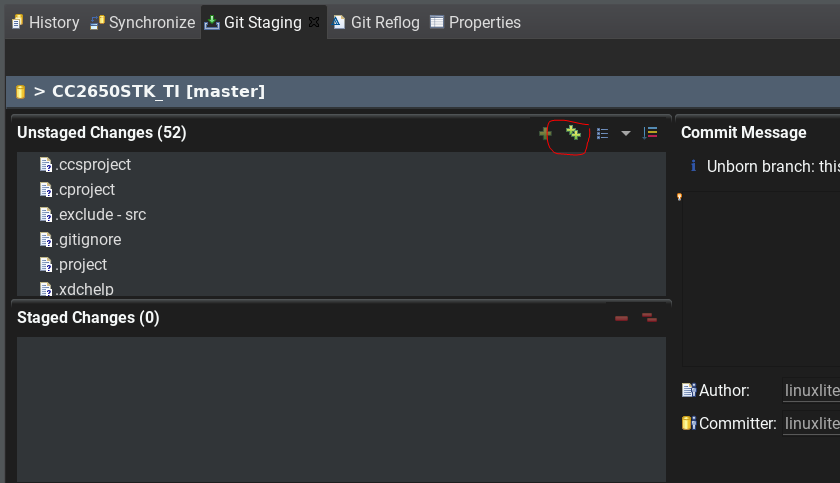
- Nyt pitäisi nähdä kaikki tiedostosi
Staged Changes-ikkunassa. Tehdään niistä sitoutuminen: - Kirjoita sitoutumisviesti kohtaan
Commit Message - Kirjoita nimesi ja sähköpostisi sekä kohtiin
AuthorettäCommiter - Paina
Commit-nappia. - Koko tämä prosessi vastaa
git commit -m "Initial Commit" - Nimeä haara uudelleen
main:ksi: Avaa projektin kontekstivalikko (hiiren oikea painike) ja napsautaRename branch.

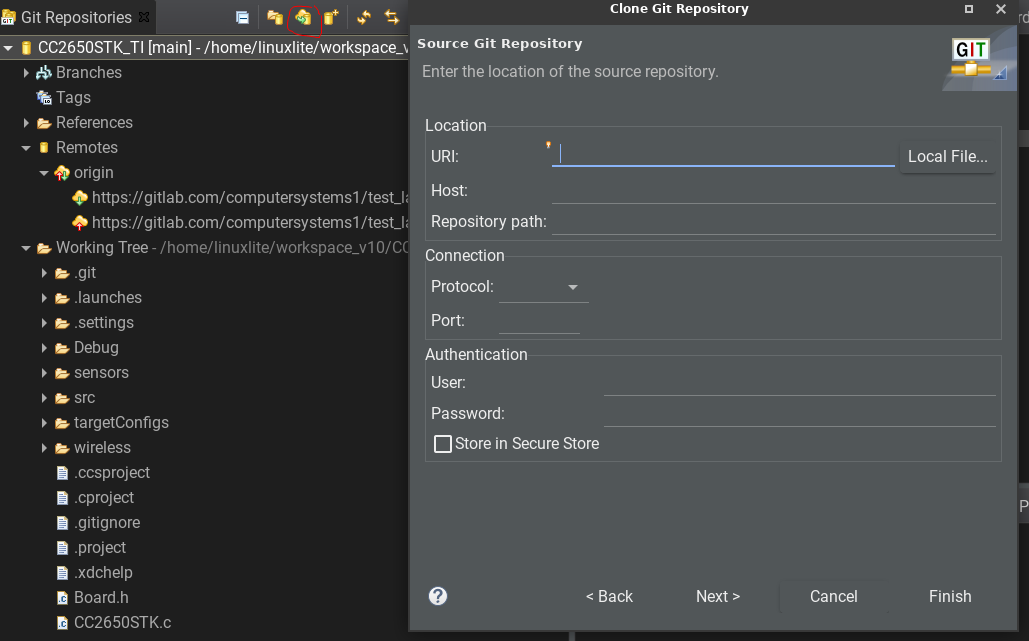
3. 'Luo etärepo.:
- Avaa Github tai Gitlab ja luo
New Project. Projekti tulisi olla tyhjä eikä siinä tulisi olla yhtään tiedostoa (ei edes README.md). Olemme testanneet sitä vain julkisilla projekteilla. - Hanki reposta klooniosoite. Valitse HTTPS ja kopioi se leikepöydälle.
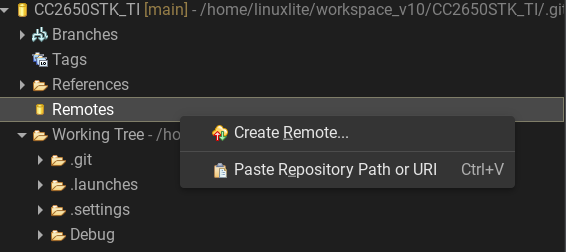
- Palaa takaisin CCS Studioon ja valitse Remotes.
- Kontekstivalikosta (hiiren oikea painike), valitse
Create Remoteja nimeä se origin.
- Seuraavassa näytössä, URI:n vieressä, napsauta
Change.
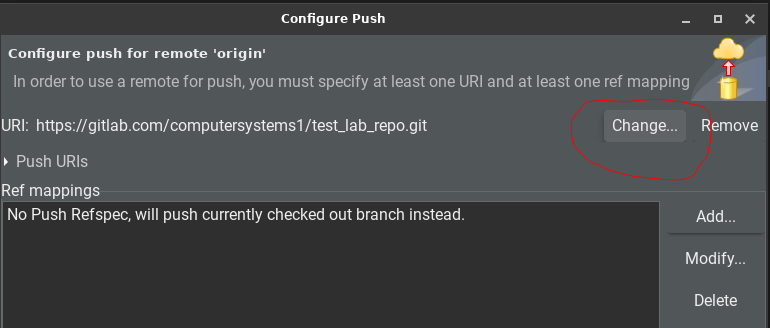
- Uudessa ikkunassa, sisällytä etärepon URL. Voit myös lisätä autentikointiparametrit (Gitlab/Github kirjautumistietosi). Jos haluat lisätä ne tähän, varmista, että ne ovat
Secure Store

- Napsauta
Save - Nyt
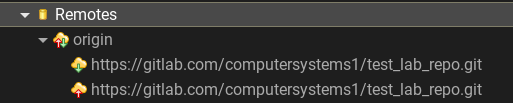
originpitäisi näkyäRemotes-listassasi.
4. Työnnä etärepooon
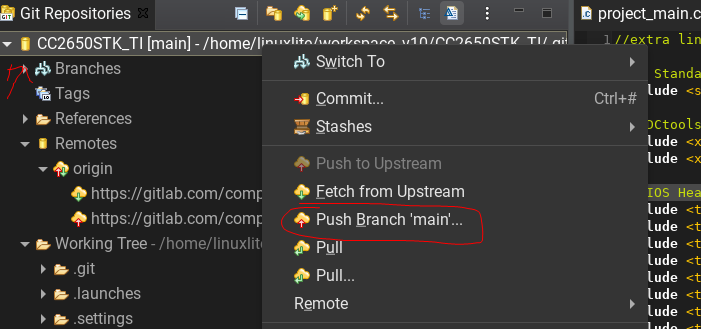
- Valitse projekti uudelleen ja kontekstivalikossa (hiiren oikea painike) valitse
Push branch main
- Tarkista seuraavassa näytössä, että etä on oikein ja että haara on
main. Paina Esikatselu-painiketta.
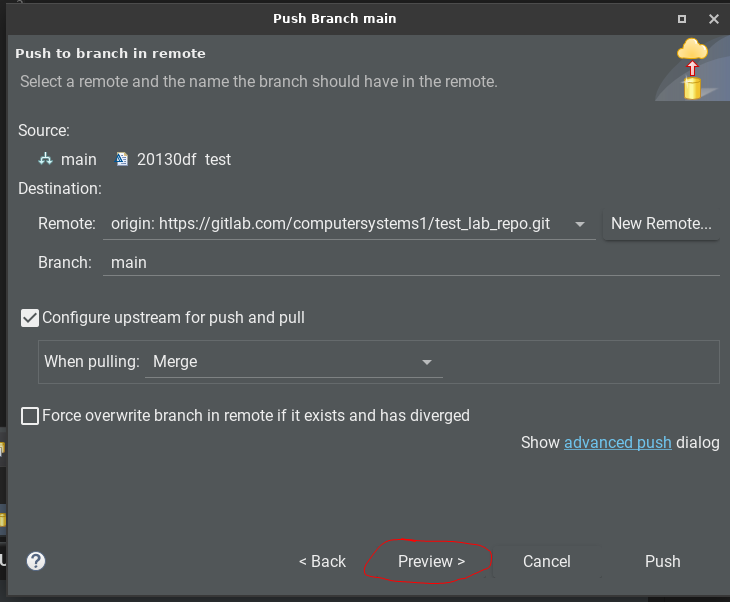
- Seuraavassa näytössä paina
Push-painiketta. - Nyt GIT on valmis
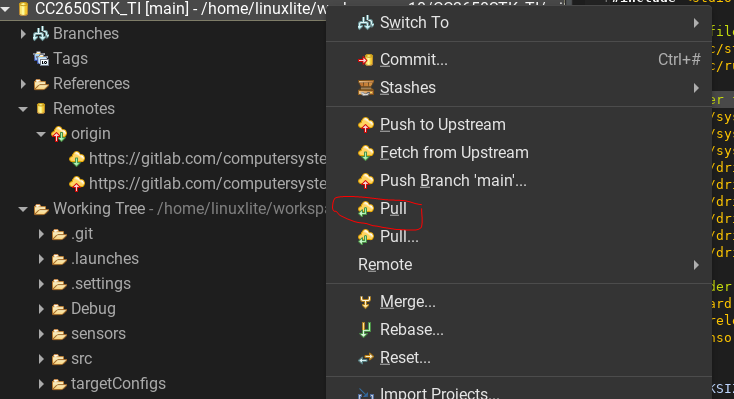
5. Normaali workflow
- Sinun tulisi toistaa vaiheet 2 ja 4 aina kun haluat tallentaa uutta tietoa etärepositorioon.
- Jos haluat luoda paikallisen repoon eri tietokoneessa, sinun pitäisi:
- Ensin kloonata Git-repo uudessa tietokoneessa.
- Tämän jälkeen, aina kun haluat hakea tietoja etärepositoriosta, käytä
Pull
Vaihe 3: (vapaaehtoinen) Tutustuminen CCS Cloudiin
CCS Cloudin avaaminen
- Avaa Chrome-selain. Tarkista, että TICloudAgent Bridge on asennettu Chromeen laajennuksena. Mene Chromen valikkoon, ja valitse
Extensions -> Manage Extensions
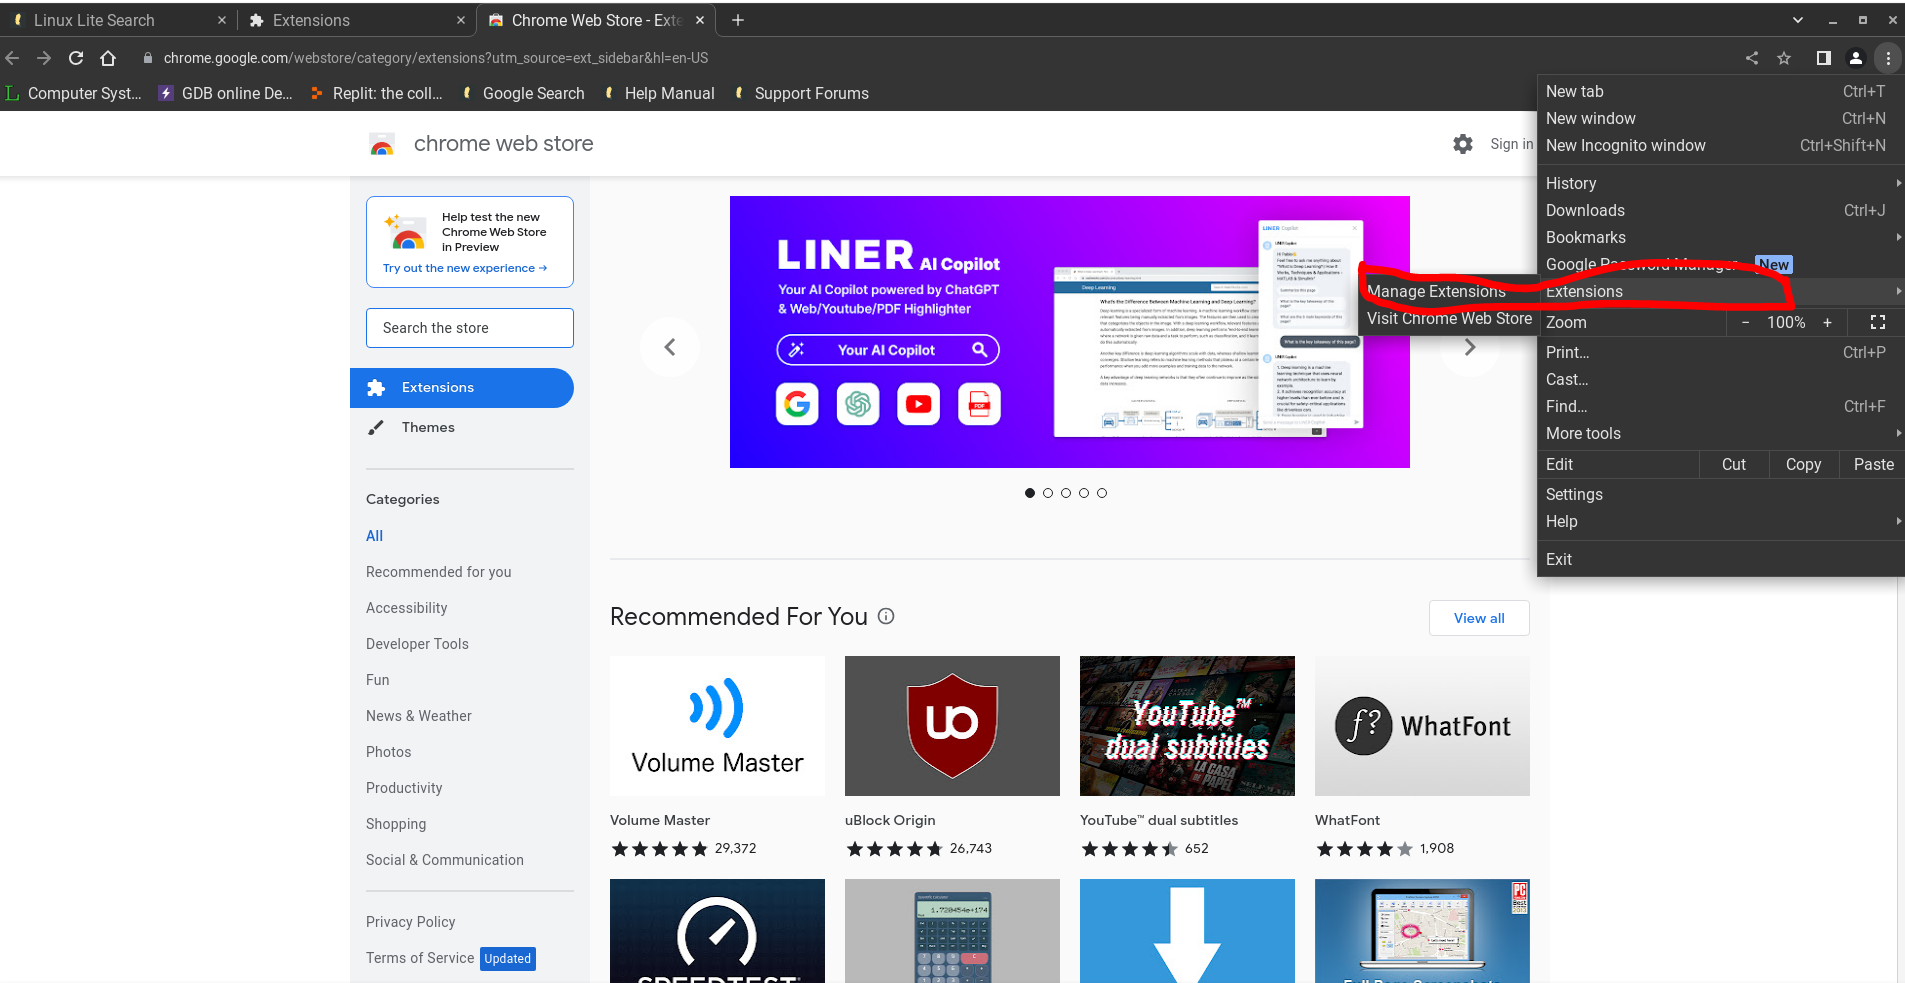
Jos laajennusta ei ole asennettu, mene Chrome Web Storeen ja asenna laajennus TICloudAgent Bridge.
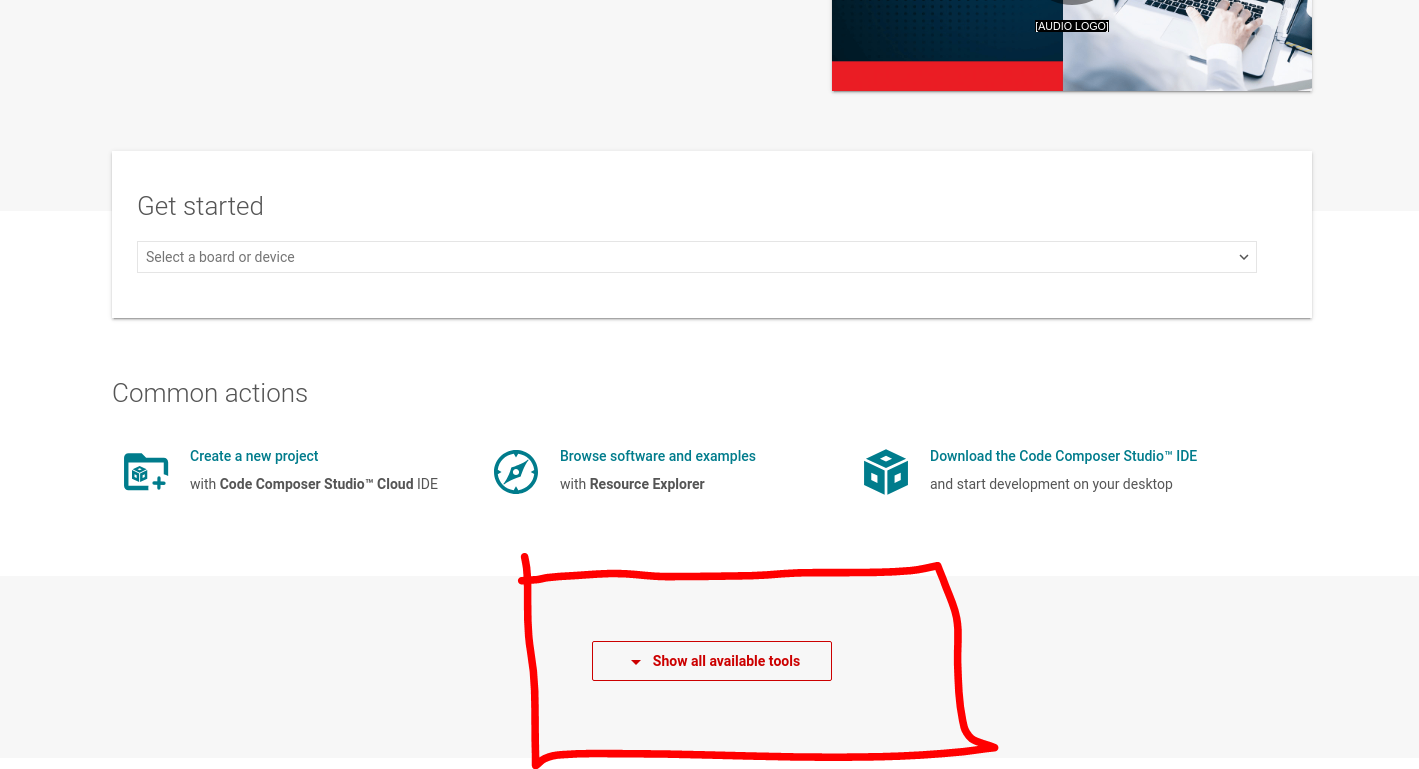
- Avaa Chromessa TI Developer Zone. Mene sivun loppuun ja valitse
Show all available tools. Tämä avaa uuden menun jonka kautta pääset CCS Cloudiin.
- Käyttääksesi CCS Cloudia tarvitset tilin. Kun tili on tehty, pääset käyttämään CCS Cloudia.
- Kun olet avannut CCS Cloudin, yhdistä SensorTag tietokoneeseen.
- Tärkeä huomautus. XDS110 saattaa tarvita laiteohjelmiston päivityksen. Tämä päivitys saattaa toimia CCSCloudin kanssa, mutta saattaa aiheuttaa ongelmia CCS Studion kanssa. Tässä tapauksessa sinun pitää nollata laitteesi tai asentaa laiteohjelmiston vanhempi versio. Ota yhteyttä kurssihenkilökuntaan, jos tämä tapahtuu.
Tyhjän projektin luominen
Voit tuoda projektin valitsemalla
File -> Import CCS Project. - Lataa tyhjä projekti, jonka latasit CCS-osion alussa.
Suorita koodia SensorTagissa
Voit suorittaa koodia samaan tapaan kuin CCS Studiossa